TG:ON Guide —
from install to your first campaign
Every section is a step-by-step tutorial: a short clip of the real app in action, screenshots with the relevant buttons highlighted, and concrete actions. No more "the button should be around here somewhere" — everything is captured from the live interface.
Your first broadcast in 5 minutes
We'll add 16 local chats, write a message with spintax, and launch a scheduled campaign. Three chapters — three short clips, with the same steps in screenshots under each one.
-
1
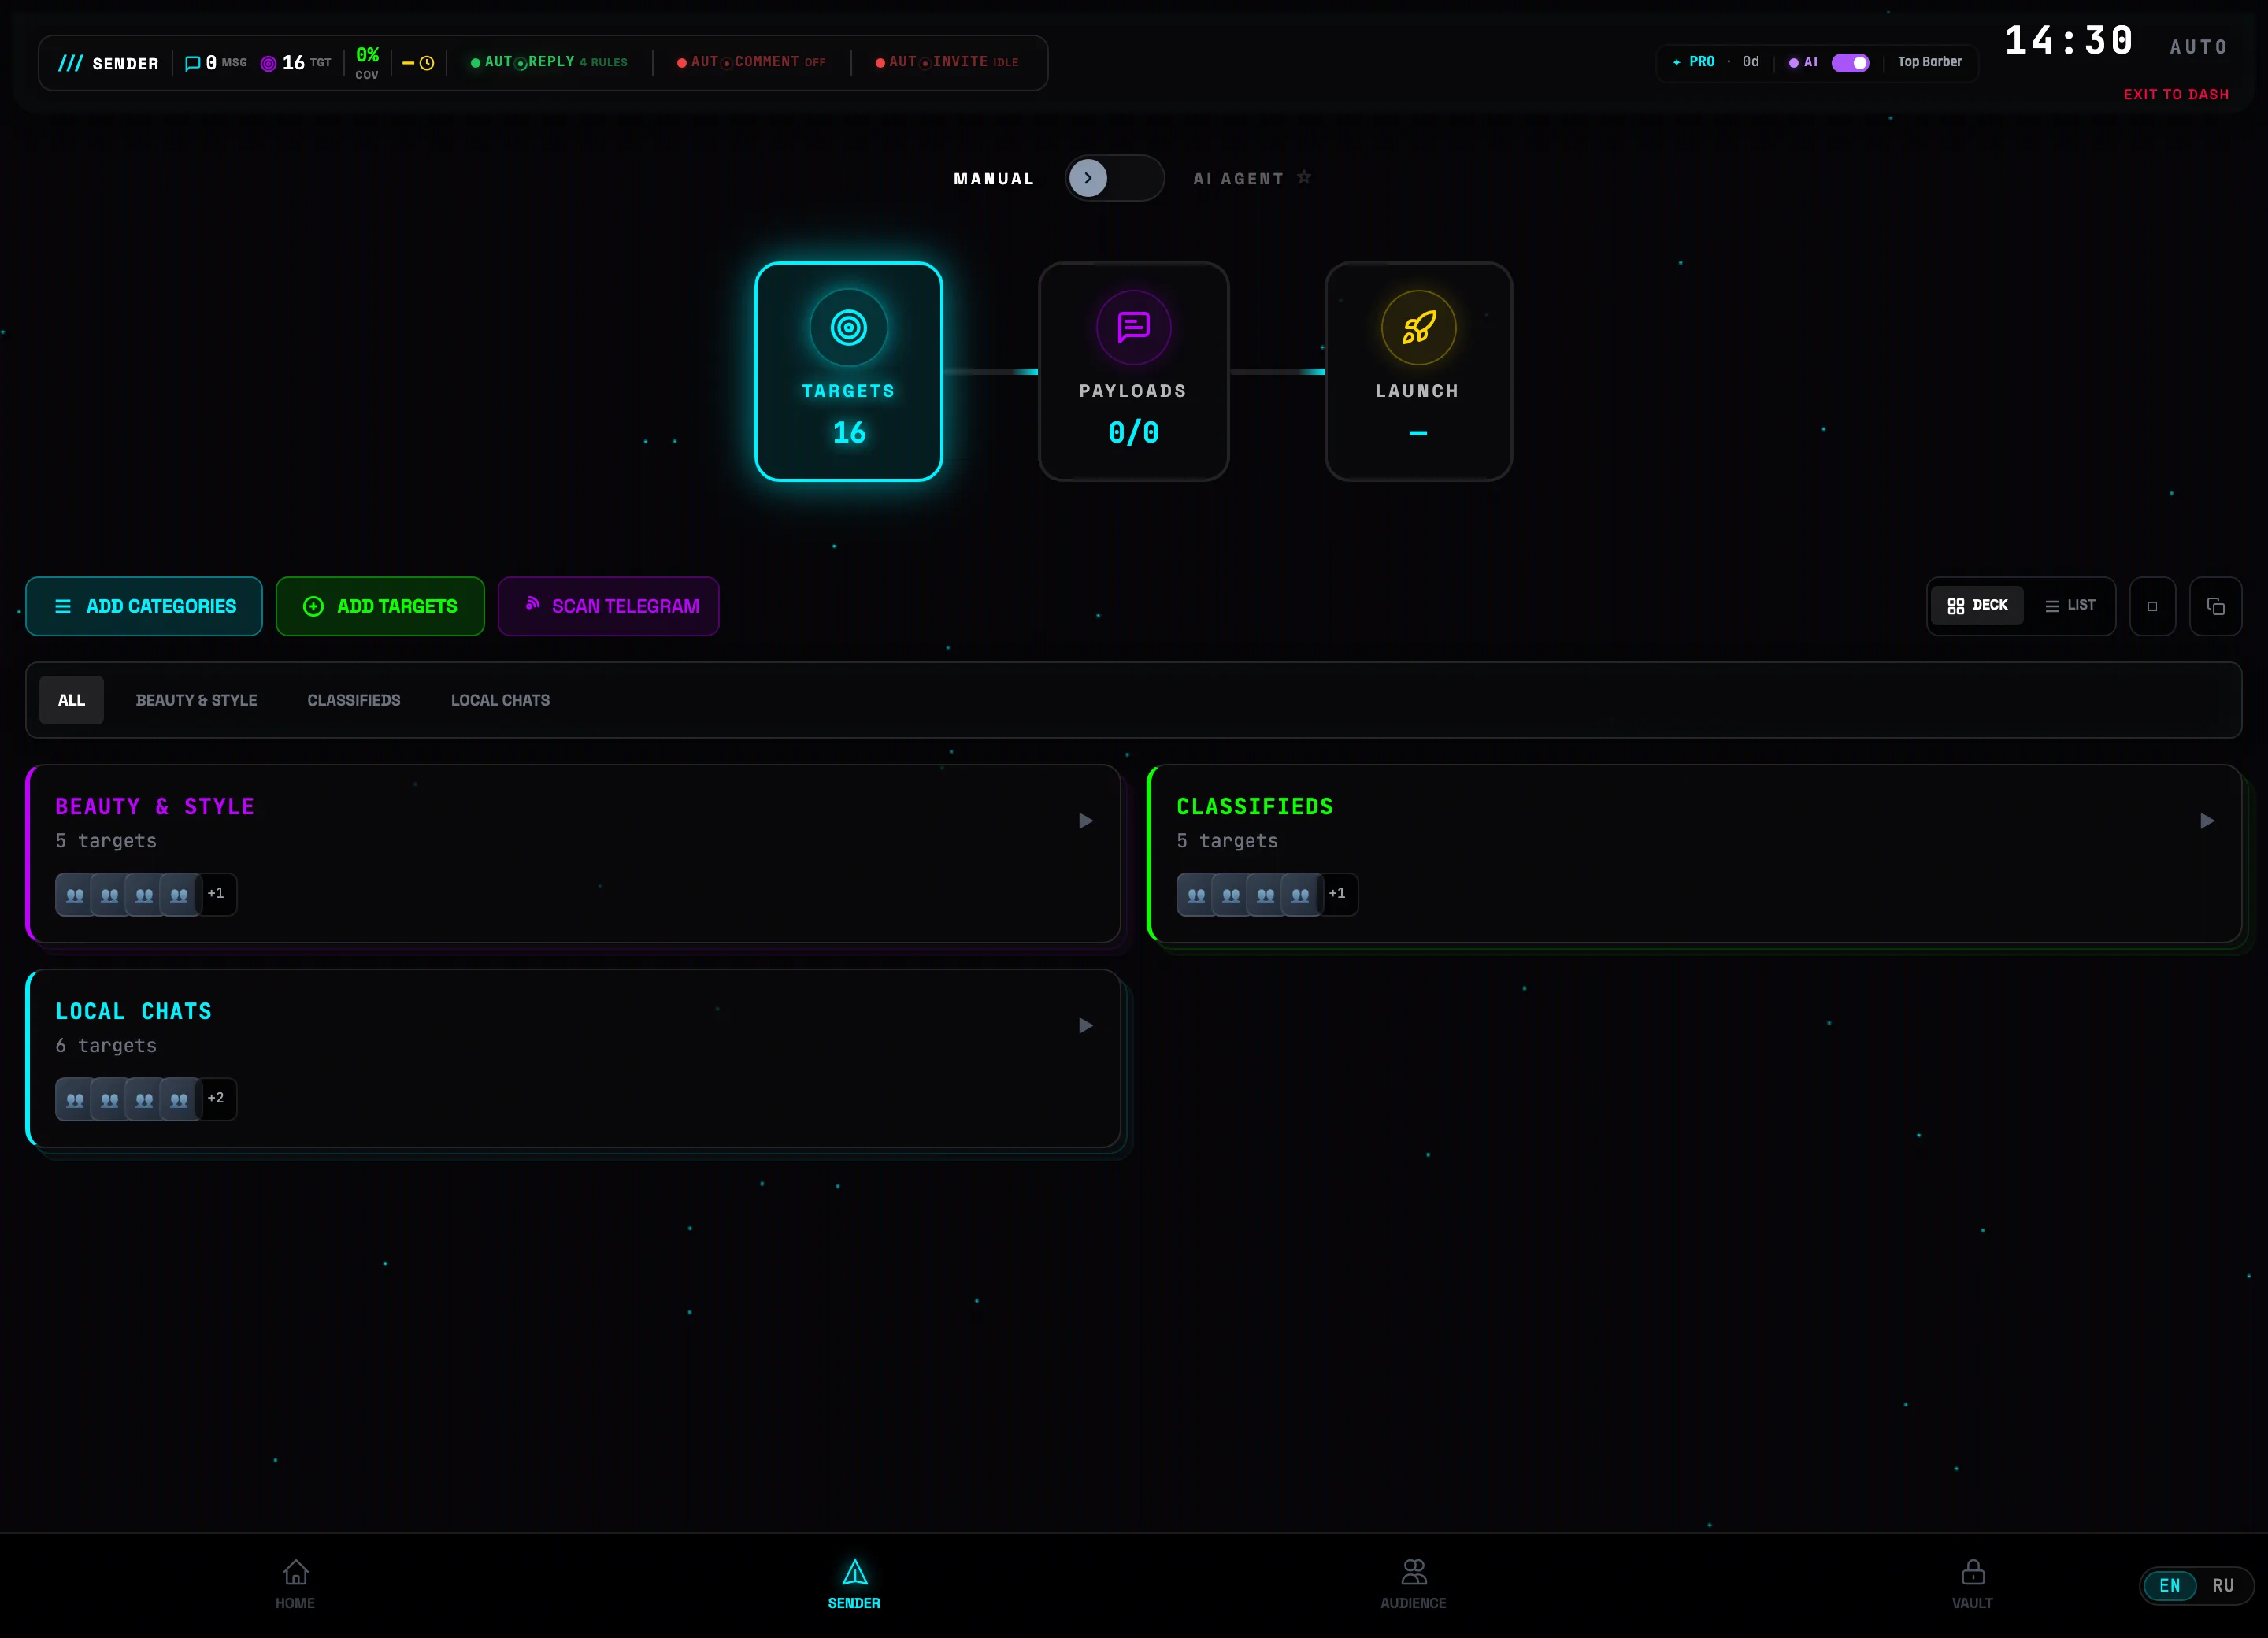
Open the "Sender" tab
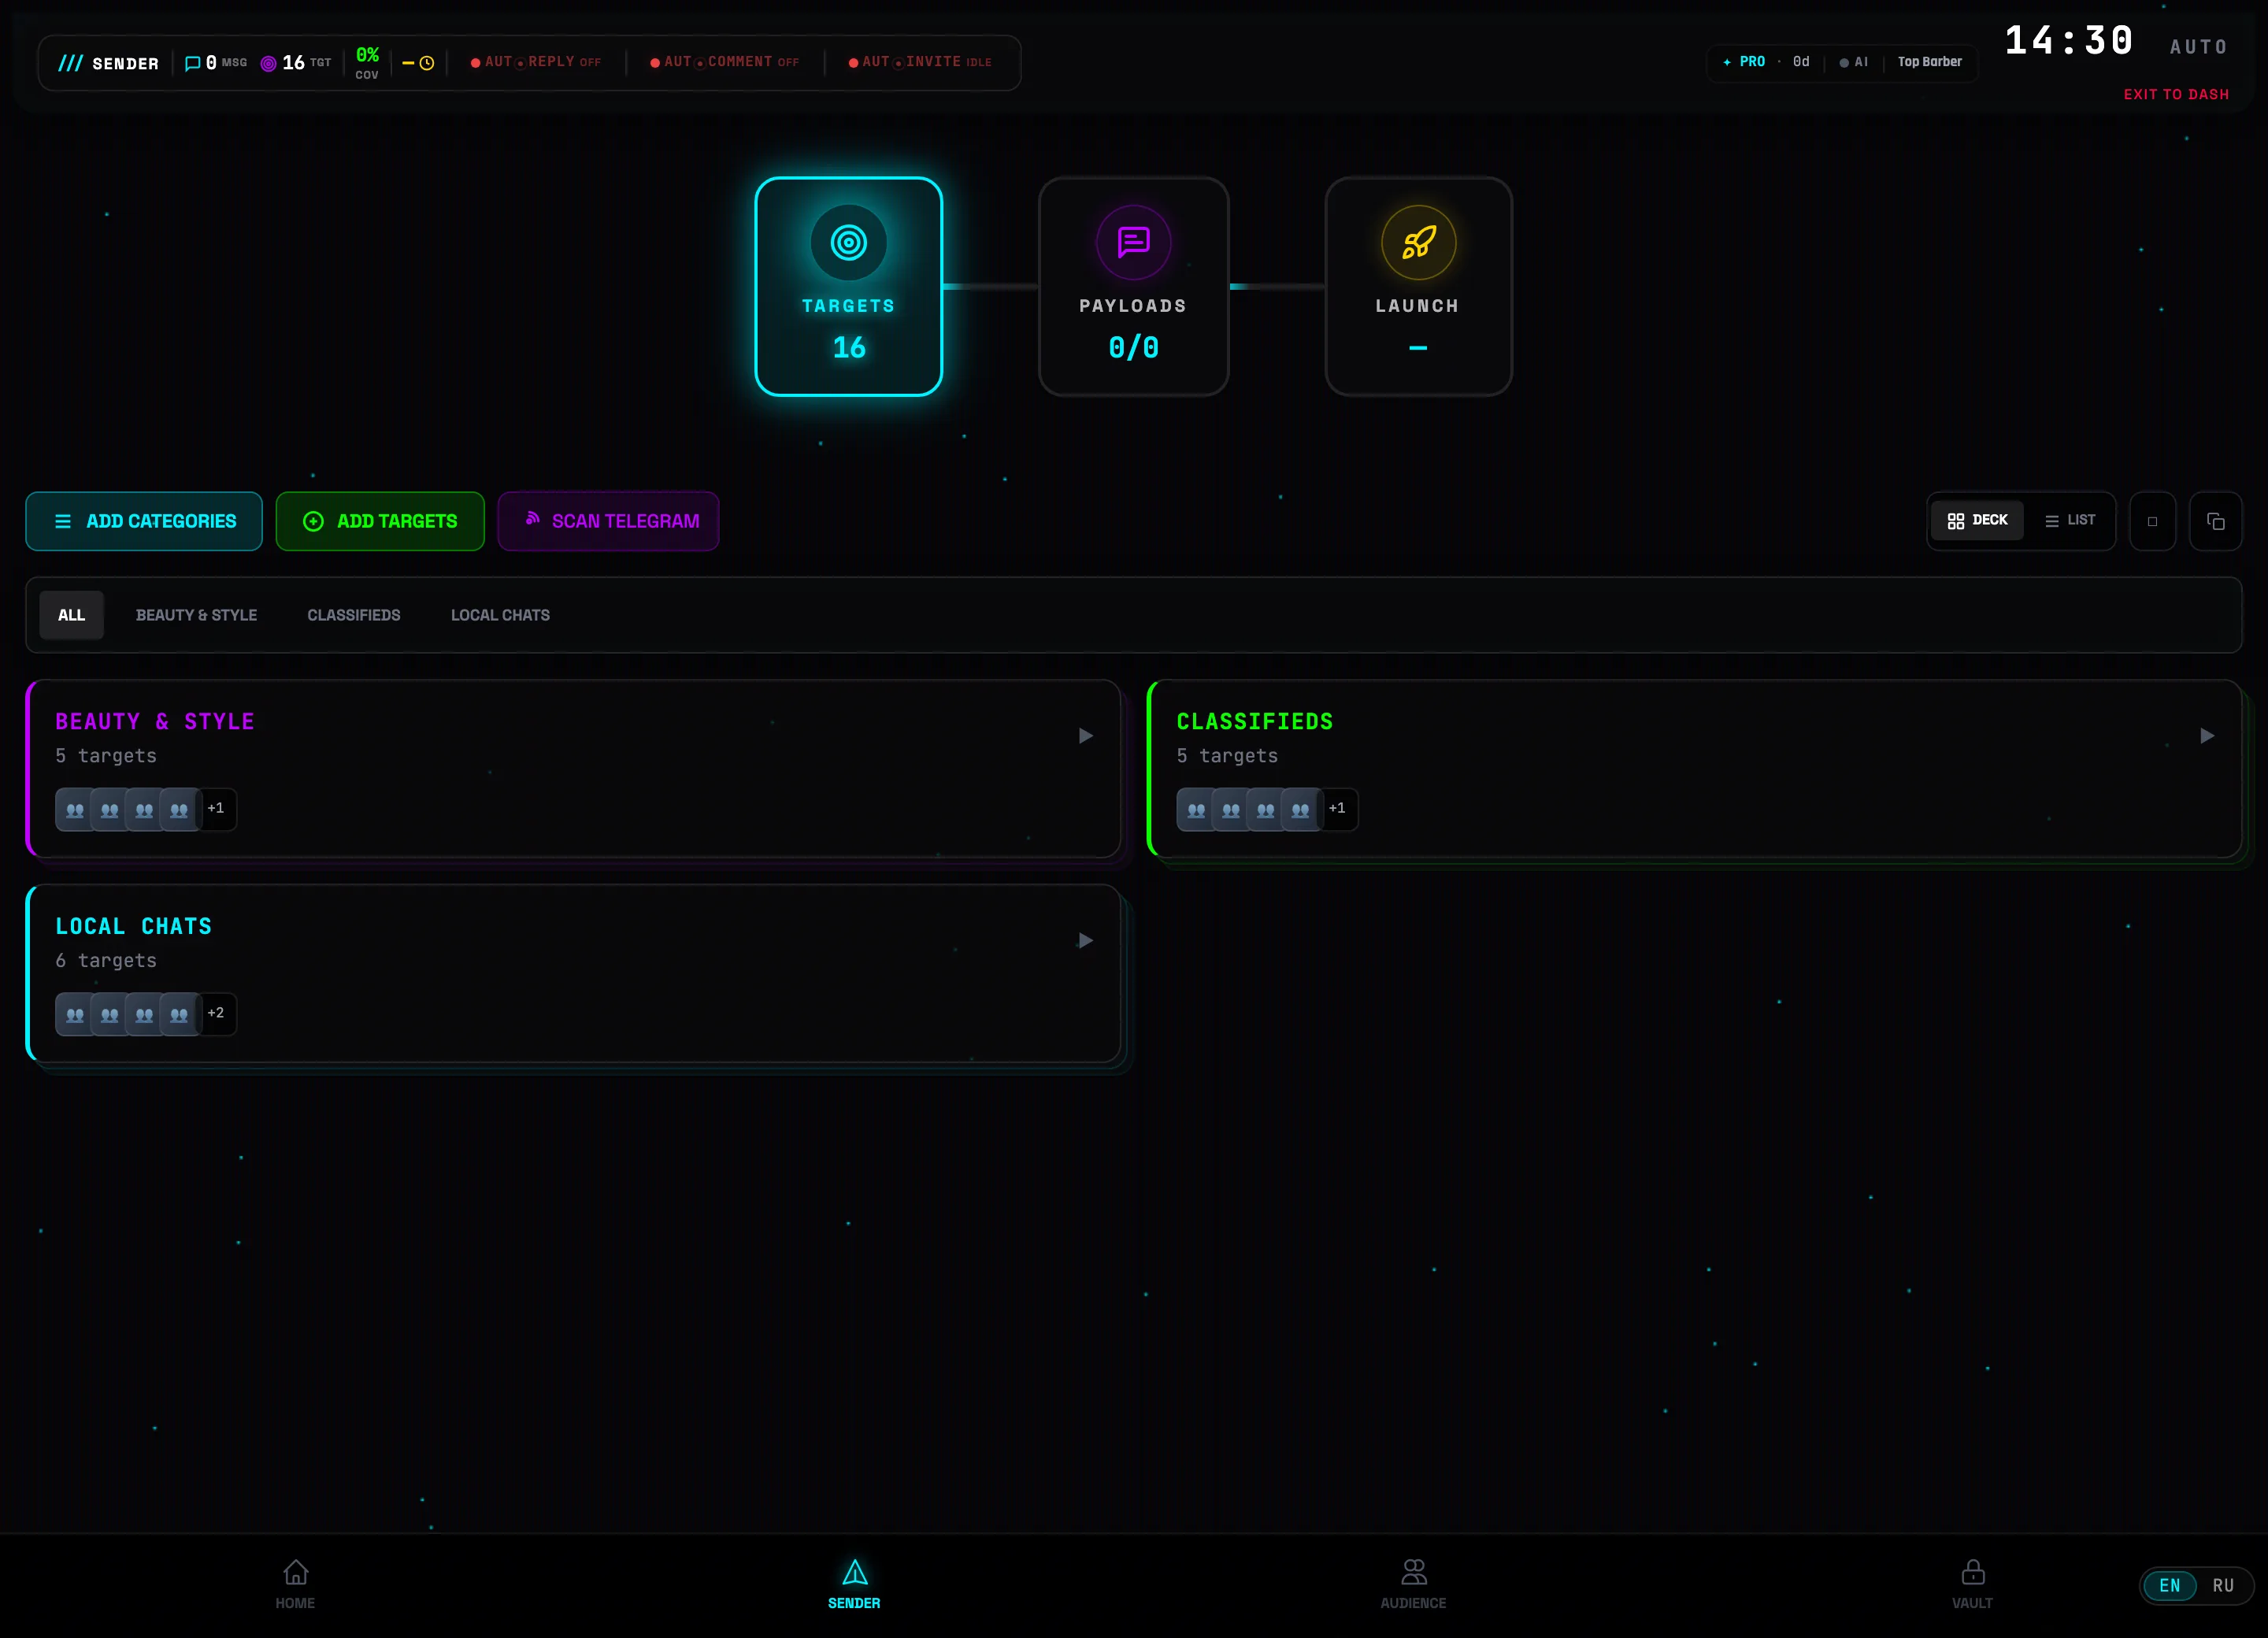
Bottom menu → SENDER. The whole broadcast is built in three steps — the TARGETS → MESSAGES → LAUNCH pipeline at the top of the screen shows where you are.
 3-step pipeline
 -
2
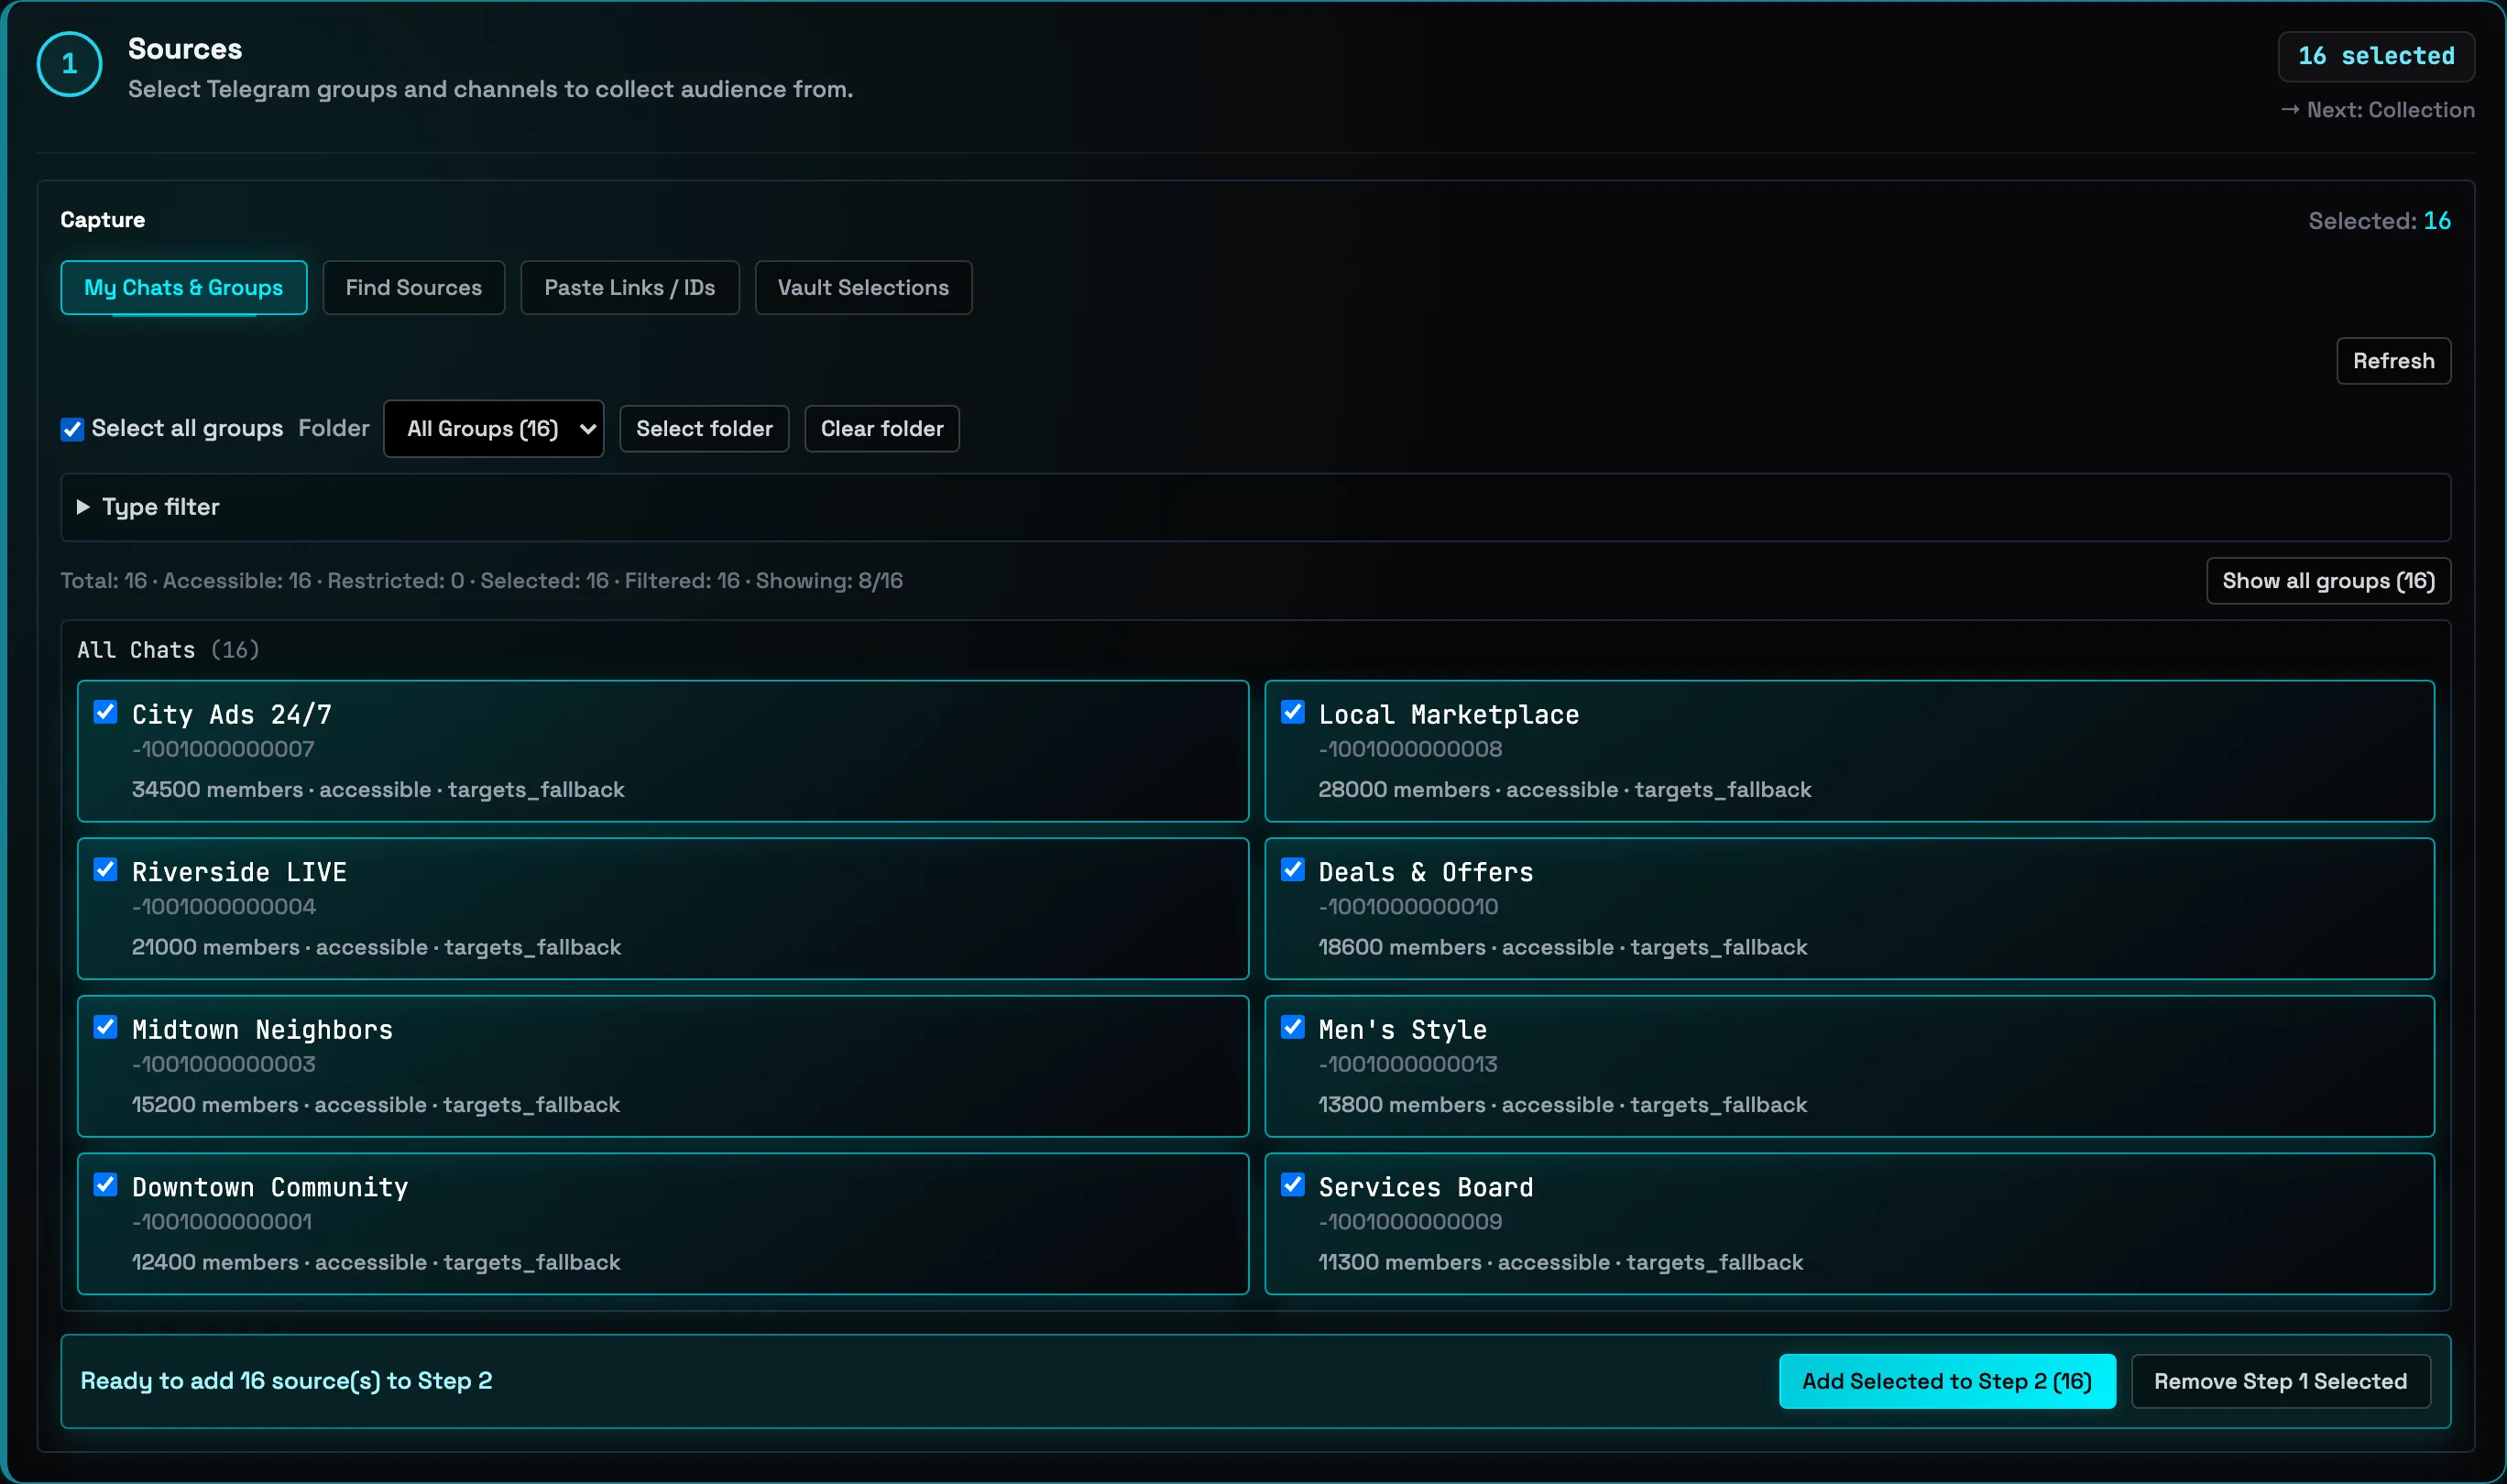
Click "Add targets"
On the TARGETS step, click the green ⊕ ADD TARGETS button. Categories are created right next to it — ADD CATEGORIES: we have "District chats", "Classifieds", "Beauty & style".
 Click here
 -
3
Paste the chat links
Pick a category and paste the list — @username, t.me/… or IDs all work, separated by spaces or on new lines. Green chips mean targets were recognized. Click 🎯 ADD 6 TARGETS.
 Paste the linksThen click💡No chat list of your own? The app will find them for you: Vault — a catalog of 2M+ groups with filters, or Deep Hunter — live search by keyword.
 -
4
Check your target list
Targets are sorted into categories, and the pipeline counter reads TARGETS · 16. The tabs above the list filter by category, and the view switches between grid and list.
 Filter by category
-
5
Create a message
Click the MESSAGES step in the pipeline and press + NEW MESSAGE.
 Click here
 -
6
Text, categories, schedule
Set a name and the text. The construct {Hi|Hello|Good day} is spintax: each chat gets its own variant of the text. Below, check the target categories and the schedule — ours is DAILY at 10:00 and 19:00. Then hit 💾 SAVE.
 Text with spintax💡Uniquification works even without spintax: invisible characters, emoji variation, and a digital signature are added automatically.
 -
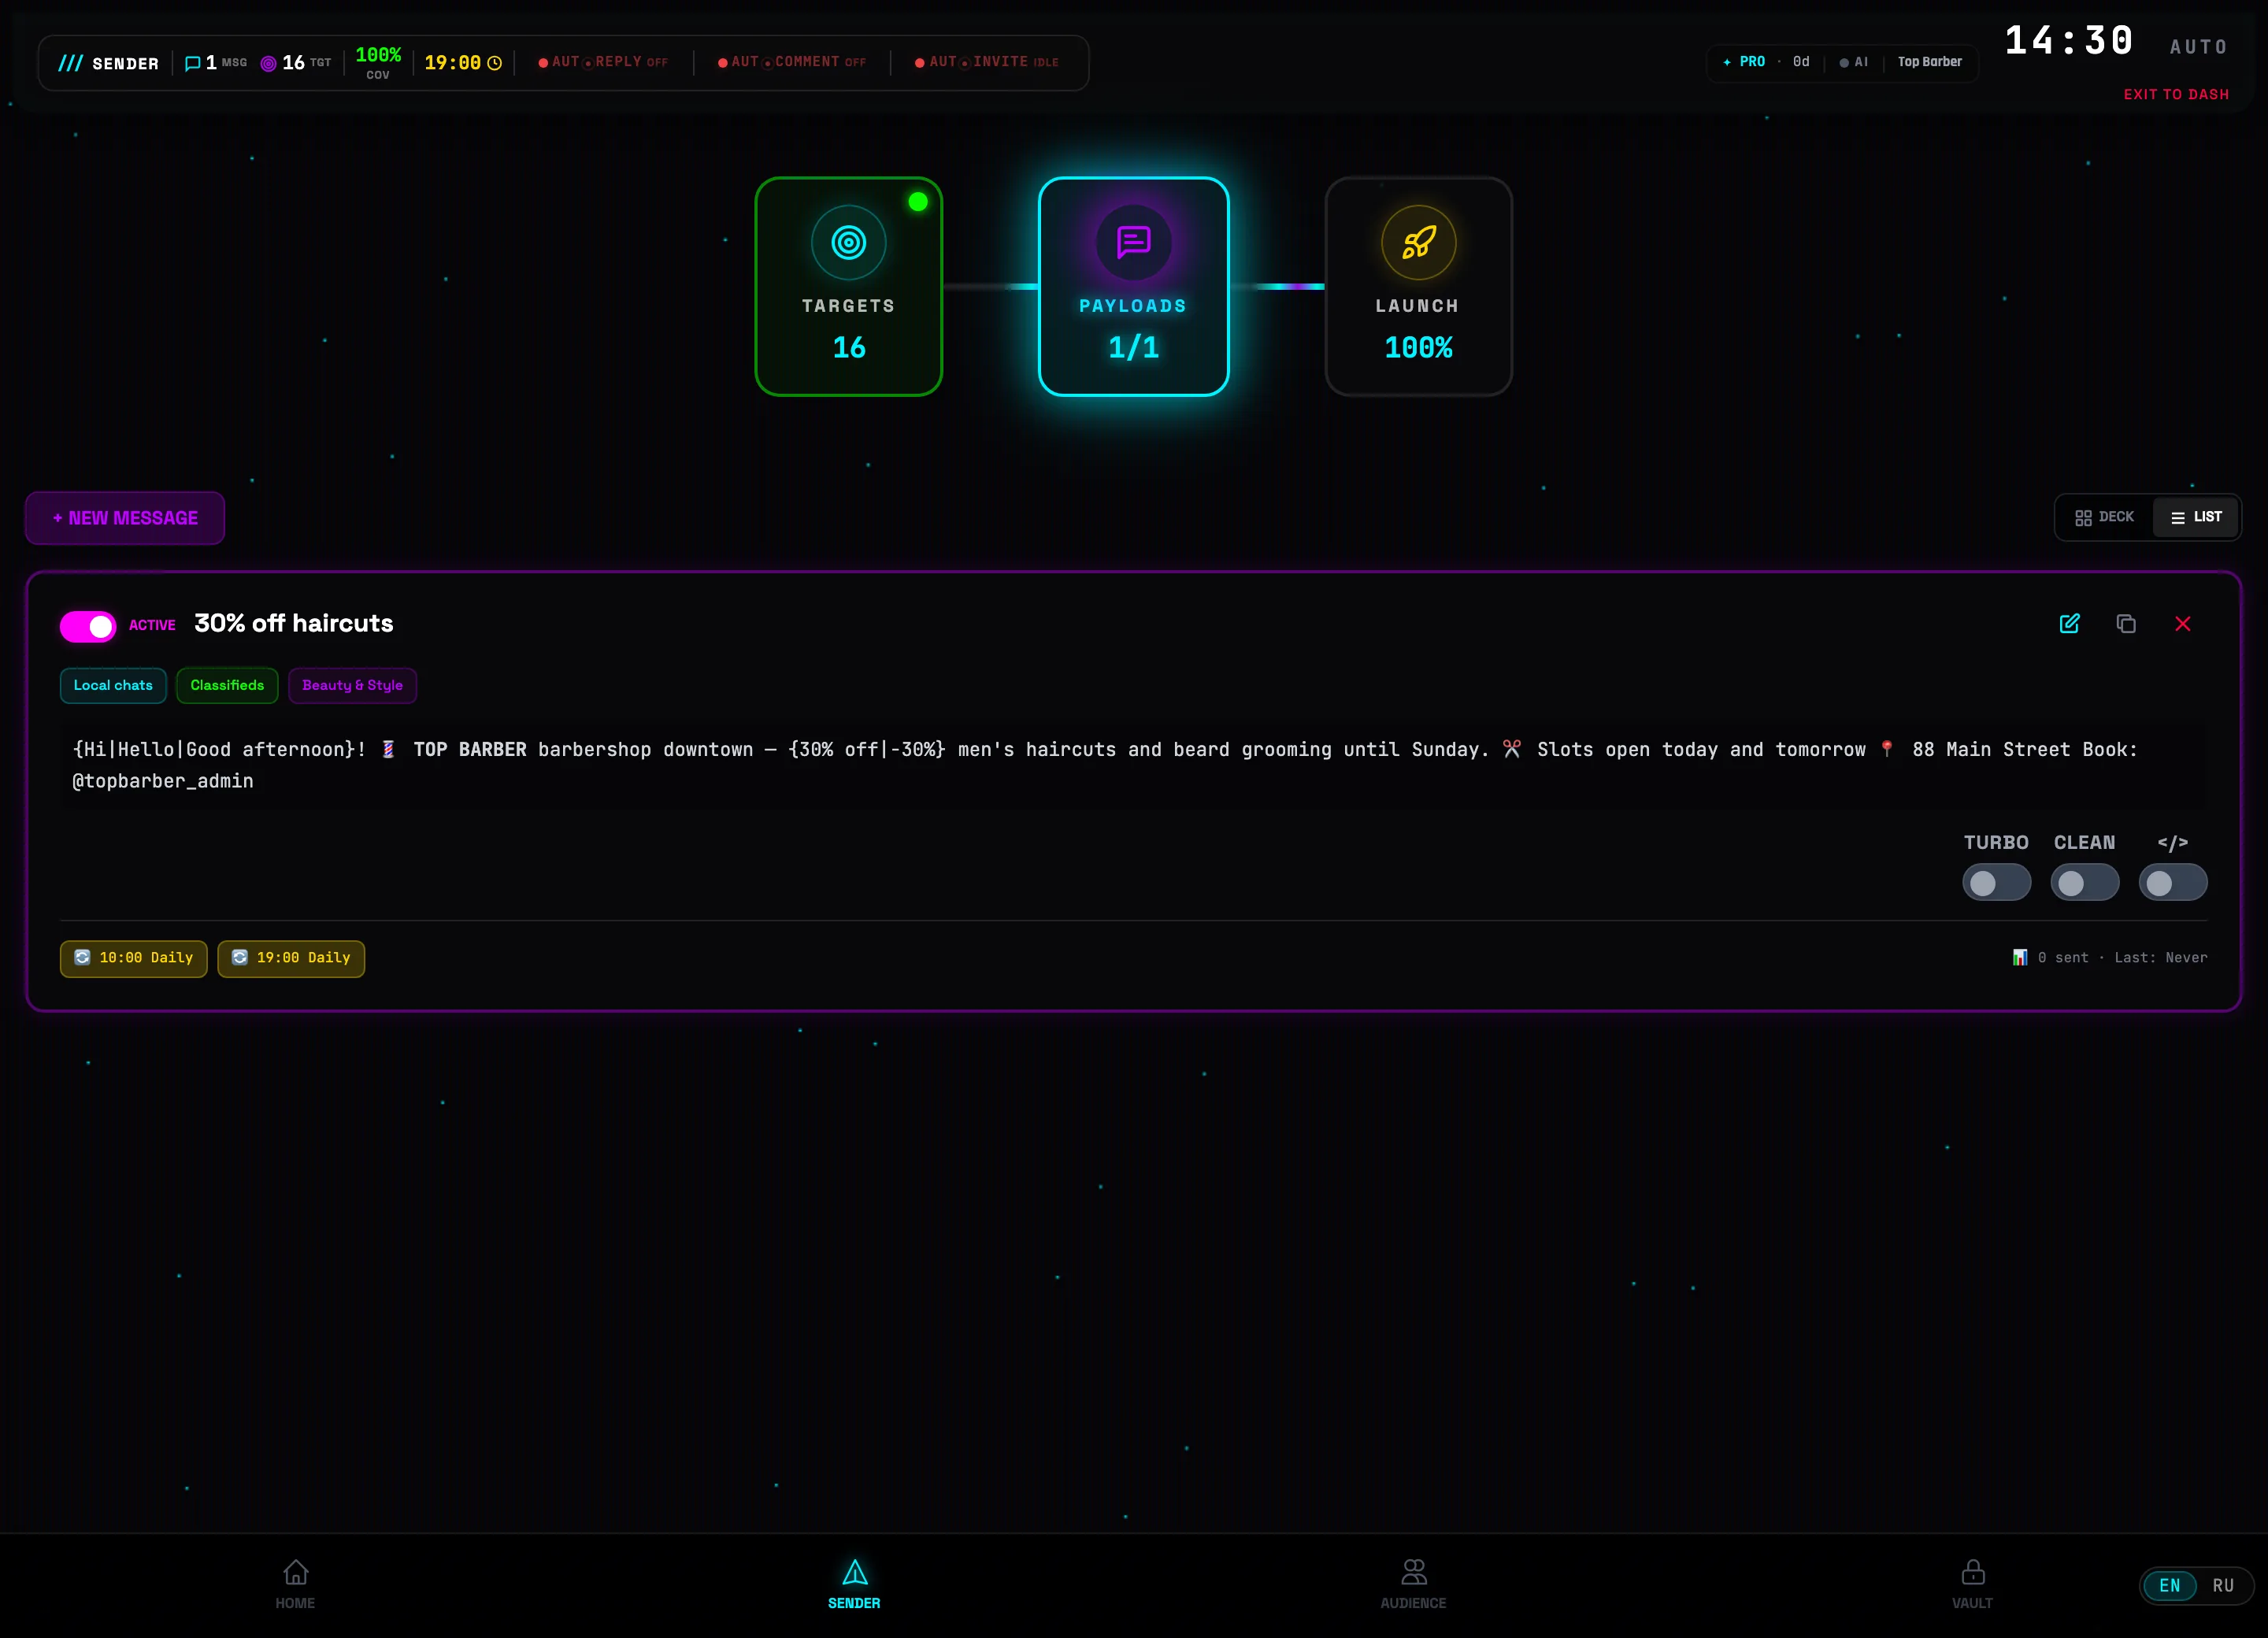
7
Message ready
The card shows the text, the target categories, and the schedule badges 10:00 daily 19:00 daily. The toggle on the left is the status: only active messages go into the broadcast.
 Your message
-
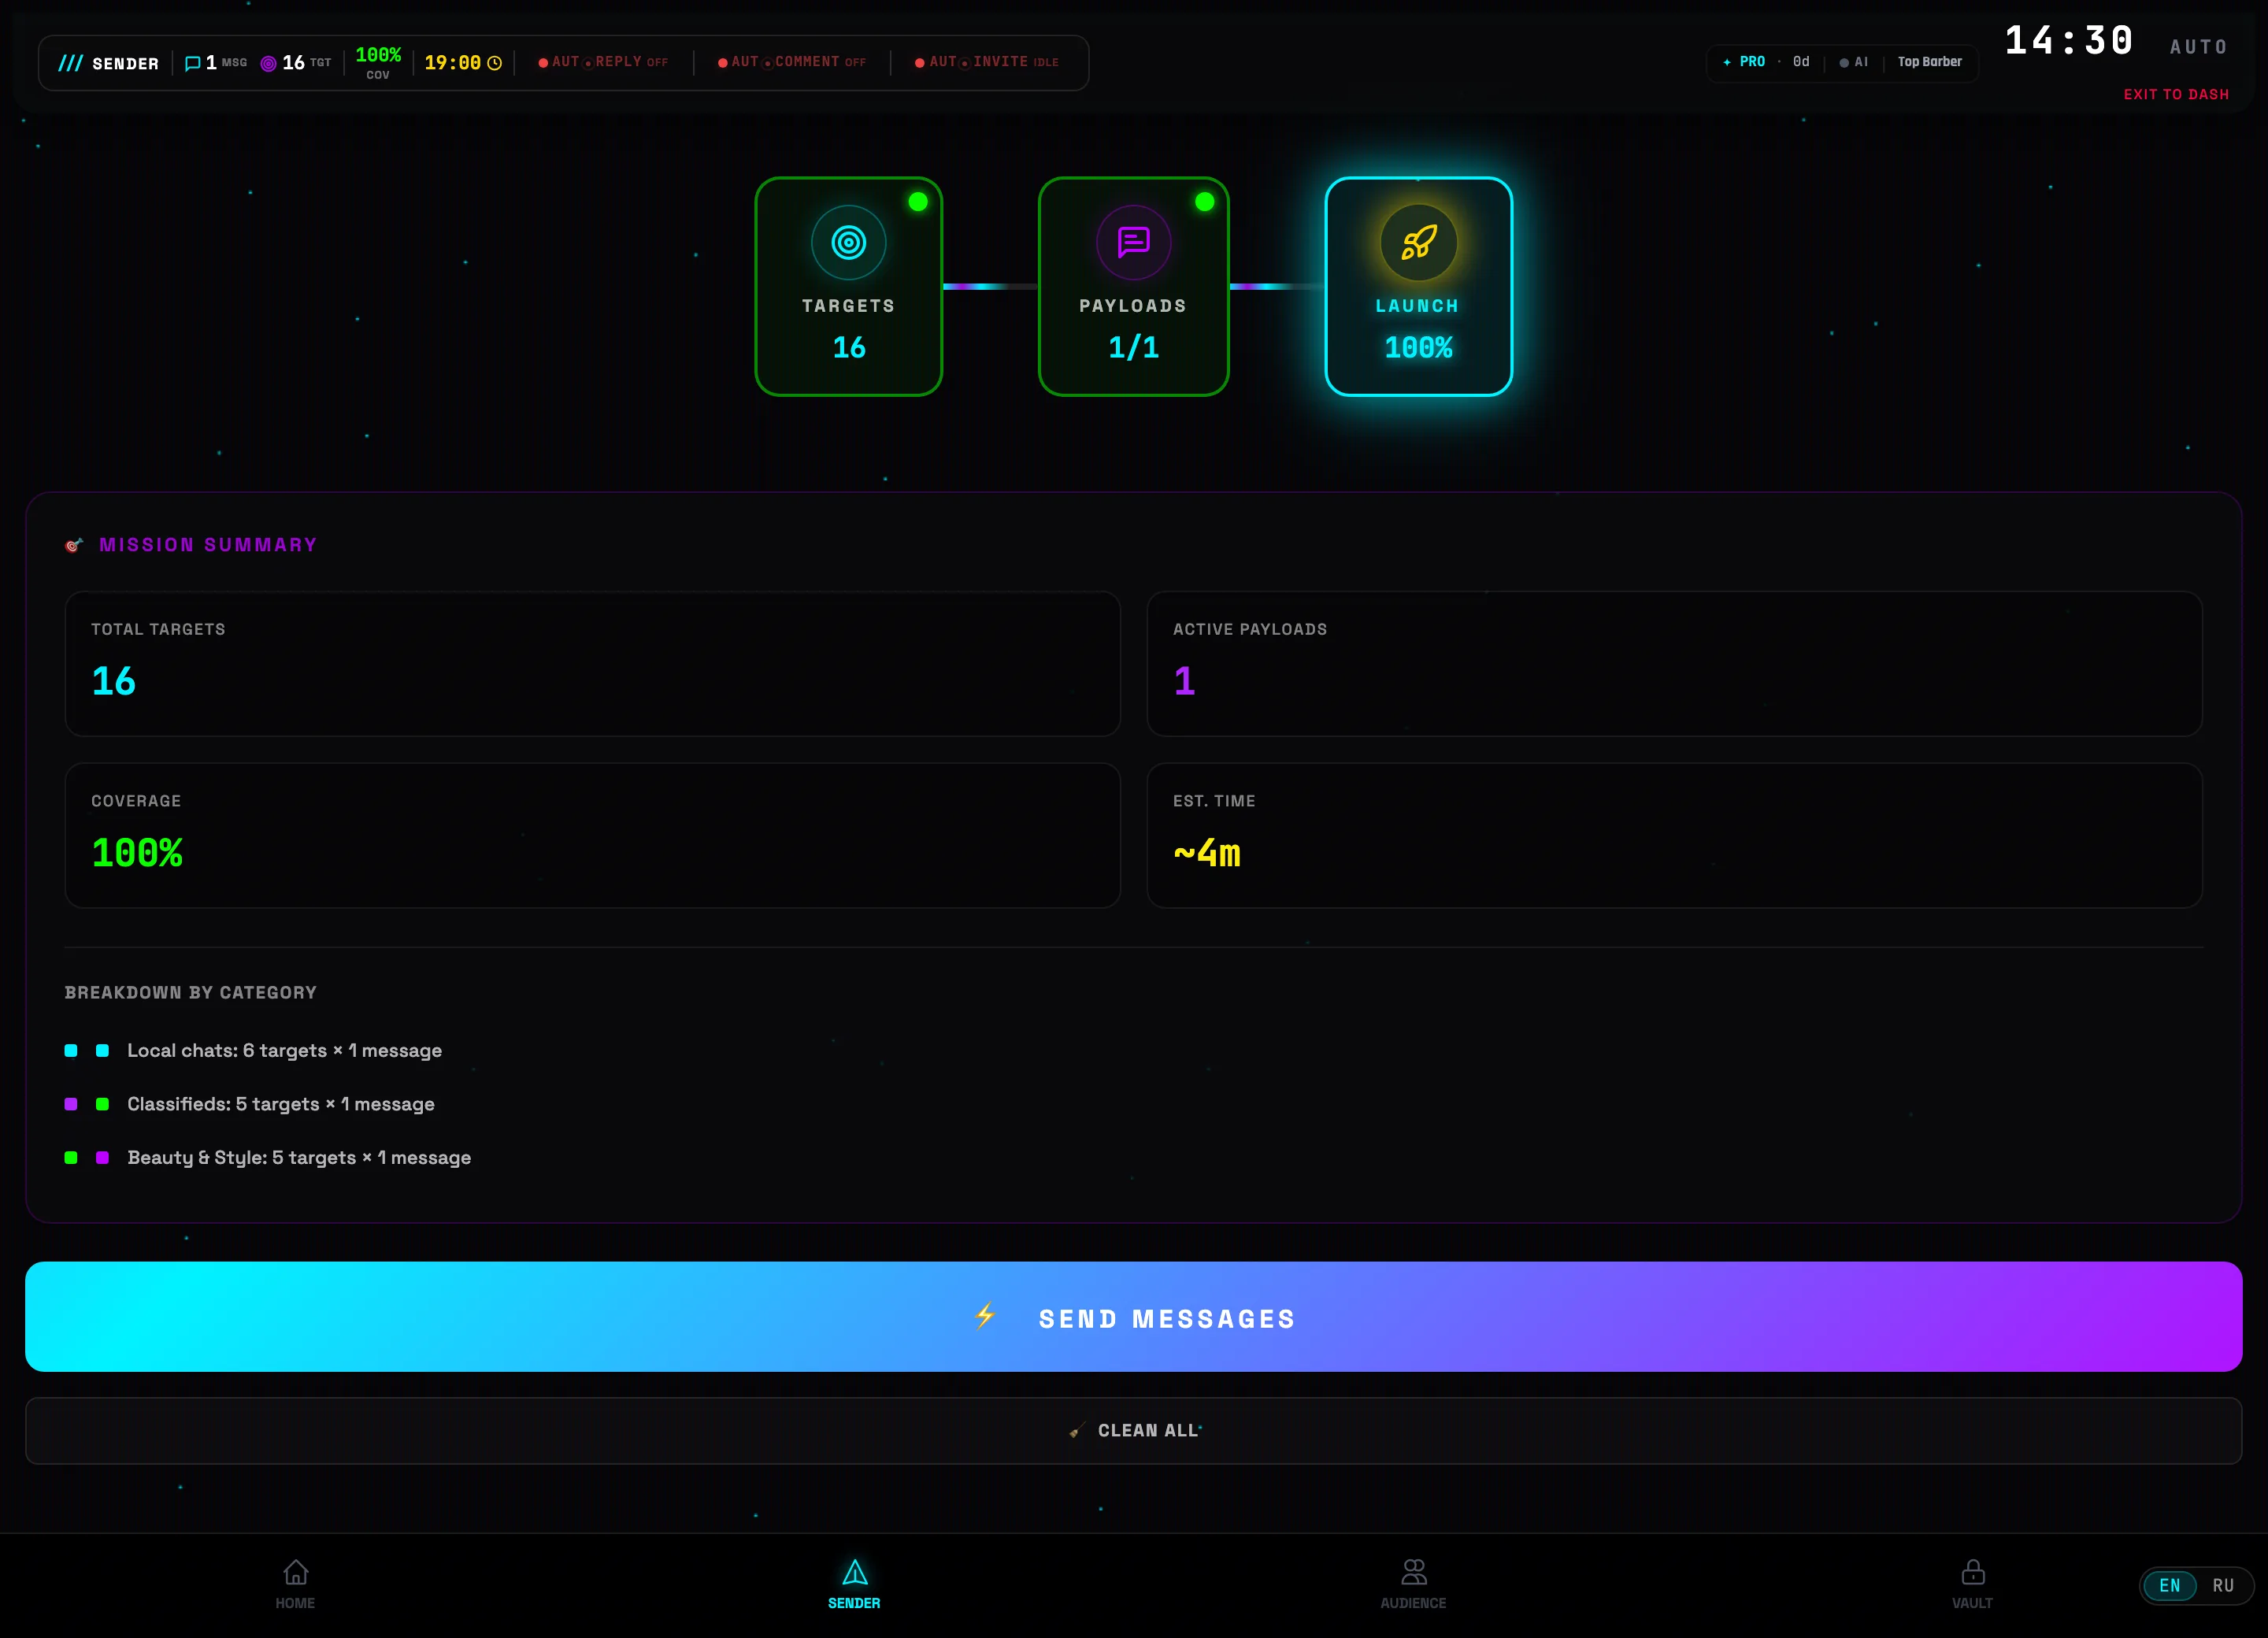
8
Review the summary on the "Launch" step
The LAUNCH step pulls the campaign together: 16 targets · 1 active message · 100% reach · ~4 minutes. Below is the per-category breakdown. If it all adds up — hit ⚡ SEND MESSAGES.
 Launch the campaign
 -
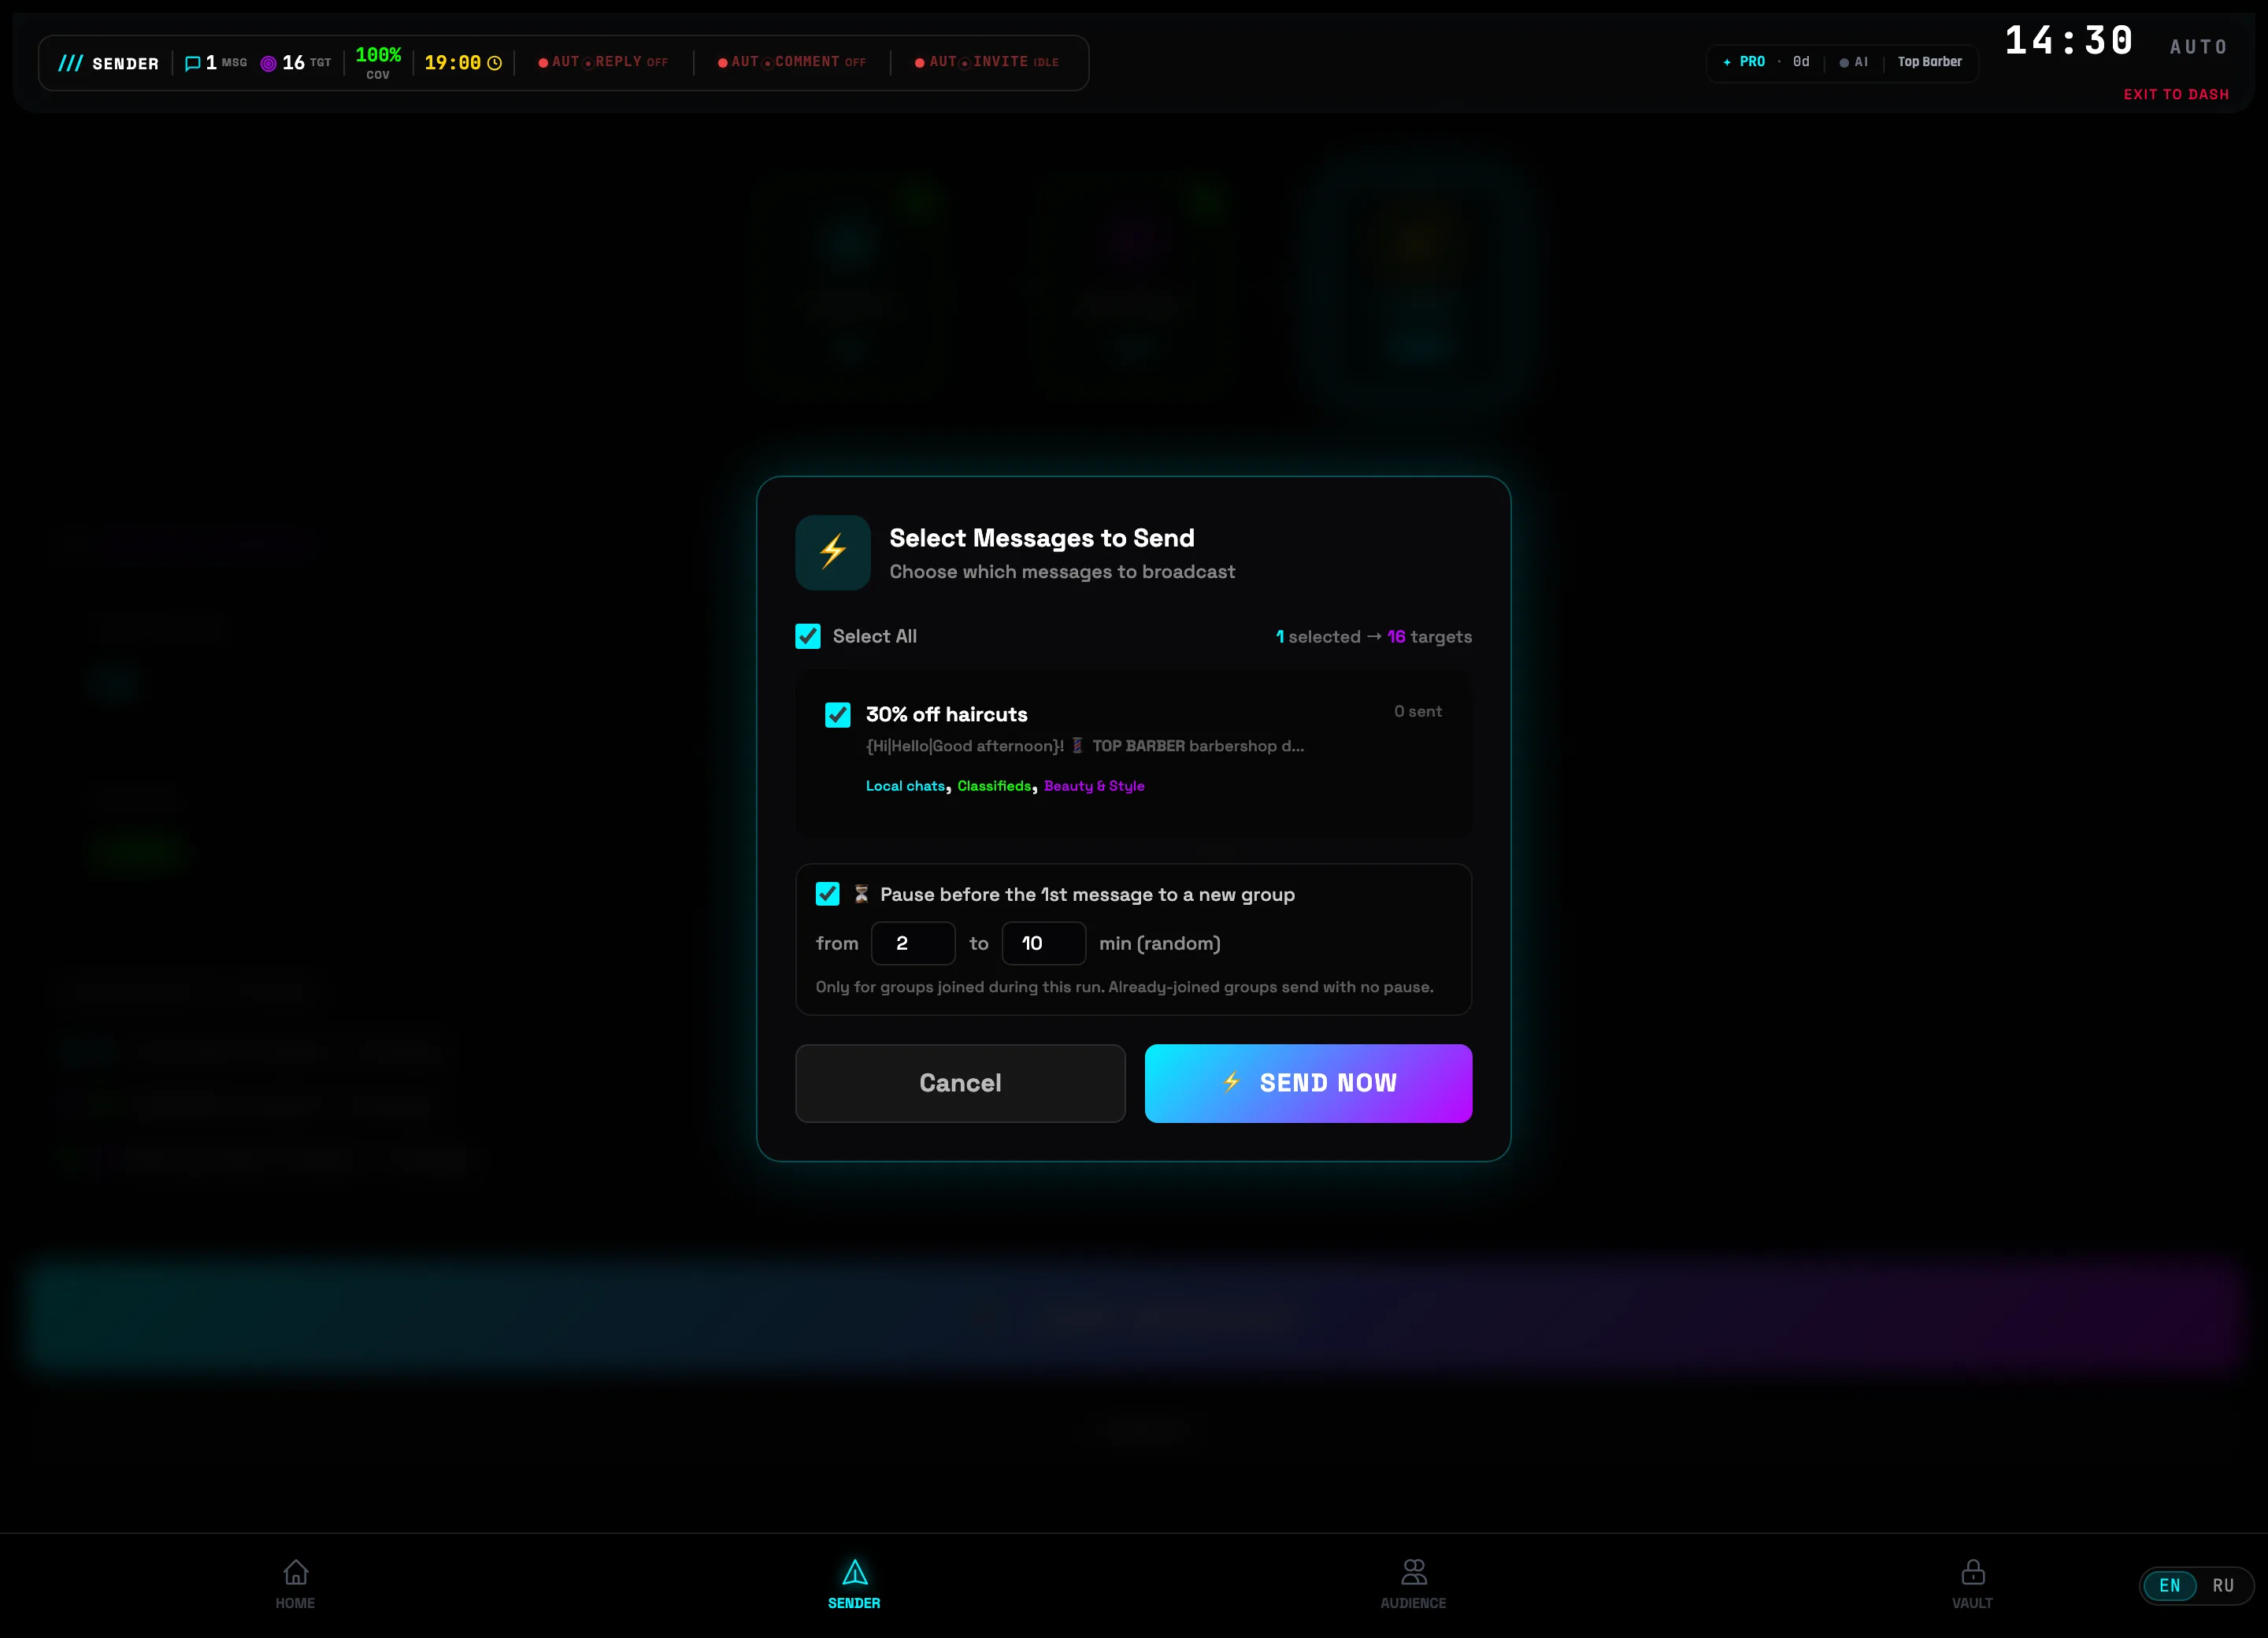
9
Confirm sending
Check the messages you want to send. The "Pause before the 1st message to a new group" checkbox is an anti-spam pause of 2–10 minutes for chats the account is joining right now. Hit ⚡ SEND NOW — progress is shown in real time.
 Confirm🛡Account safety: pauses between messages are handled by Smart Delays, and Flood Guard slows the broadcast down when Telegram signals. Don't turn them off on new accounts.
Intro & installation
TG:ON is a desktop platform for Telegram marketing: broadcasts to groups, finding target chats, building an audience, auto-replies, and AI campaigns. It runs locally on your computer — your accounts and data never leave the machine.
What the platform can do
- Send scheduled messages to groups and channels (Sender)
- Find target chats: a catalog of 2M+ groups (Vault) and live search (Deep Hunter)
- Collect an audience and manage contacts in a CRM (Audience)
- Read incoming messages from all accounts in one window (Live Inbox)
- Reply automatically — by rules or via AI (Autoresponder)
- Build an entire campaign with AI (AI Campaign Builder)
- Work with several Telegram accounts at once (Dashboard)
System requirements
| Parameter | Minimum |
|---|---|
| OS | macOS 12+, Windows 10+, Linux (Ubuntu 20.04+) |
| RAM | 4 GB |
| Disk | 500 MB free space |
| Internet | stable connection |
Installation — macOS
With one command in Terminal:
curl -fsSL https://tg-on.com/install.sh | bash
Or manually: download TG-ON.dmg, open the disk image, drag TG:ON into Applications. On first launch: right-click → "Open" (to bypass Gatekeeper).
Installation — Windows
With one command in PowerShell:
irm https://tg-on.com/install.ps1 | iex
Or manually: download the installer and follow the instructions — a shortcut will appear on your desktop.
First launch
- A sign-in window opens — register or log in
- Activate a Trial license (free)
- Connect a Telegram account — QR code, phone number, or import of an existing session (section 04)
- Run your first campaign following the tutorial above — 5 minutes
Sign-in
Your TG:ON account is your access to the license and the sync of your settings. Registration takes a minute.
- Registration: on the start screen — email and password, confirmed with a code from the email.
- Sign-in: email + password. The session is remembered — no need to log in again.
- Password recovery: "Forgot password?" on the sign-in screen — a reset link arrives by email.
License & Trial
A new account gets a free Trial — you can test broadcasting without paying. After that comes a license key.
- Trial: activated in one click after registration — a message limit and the basic modules, which is enough for a first campaign.
- Key activation: buy a plan on tg-on.com, the key arrives by email — paste it on the activation page (the license badge in the app header).
- License status is always visible in the header: plan, days remaining, limits.
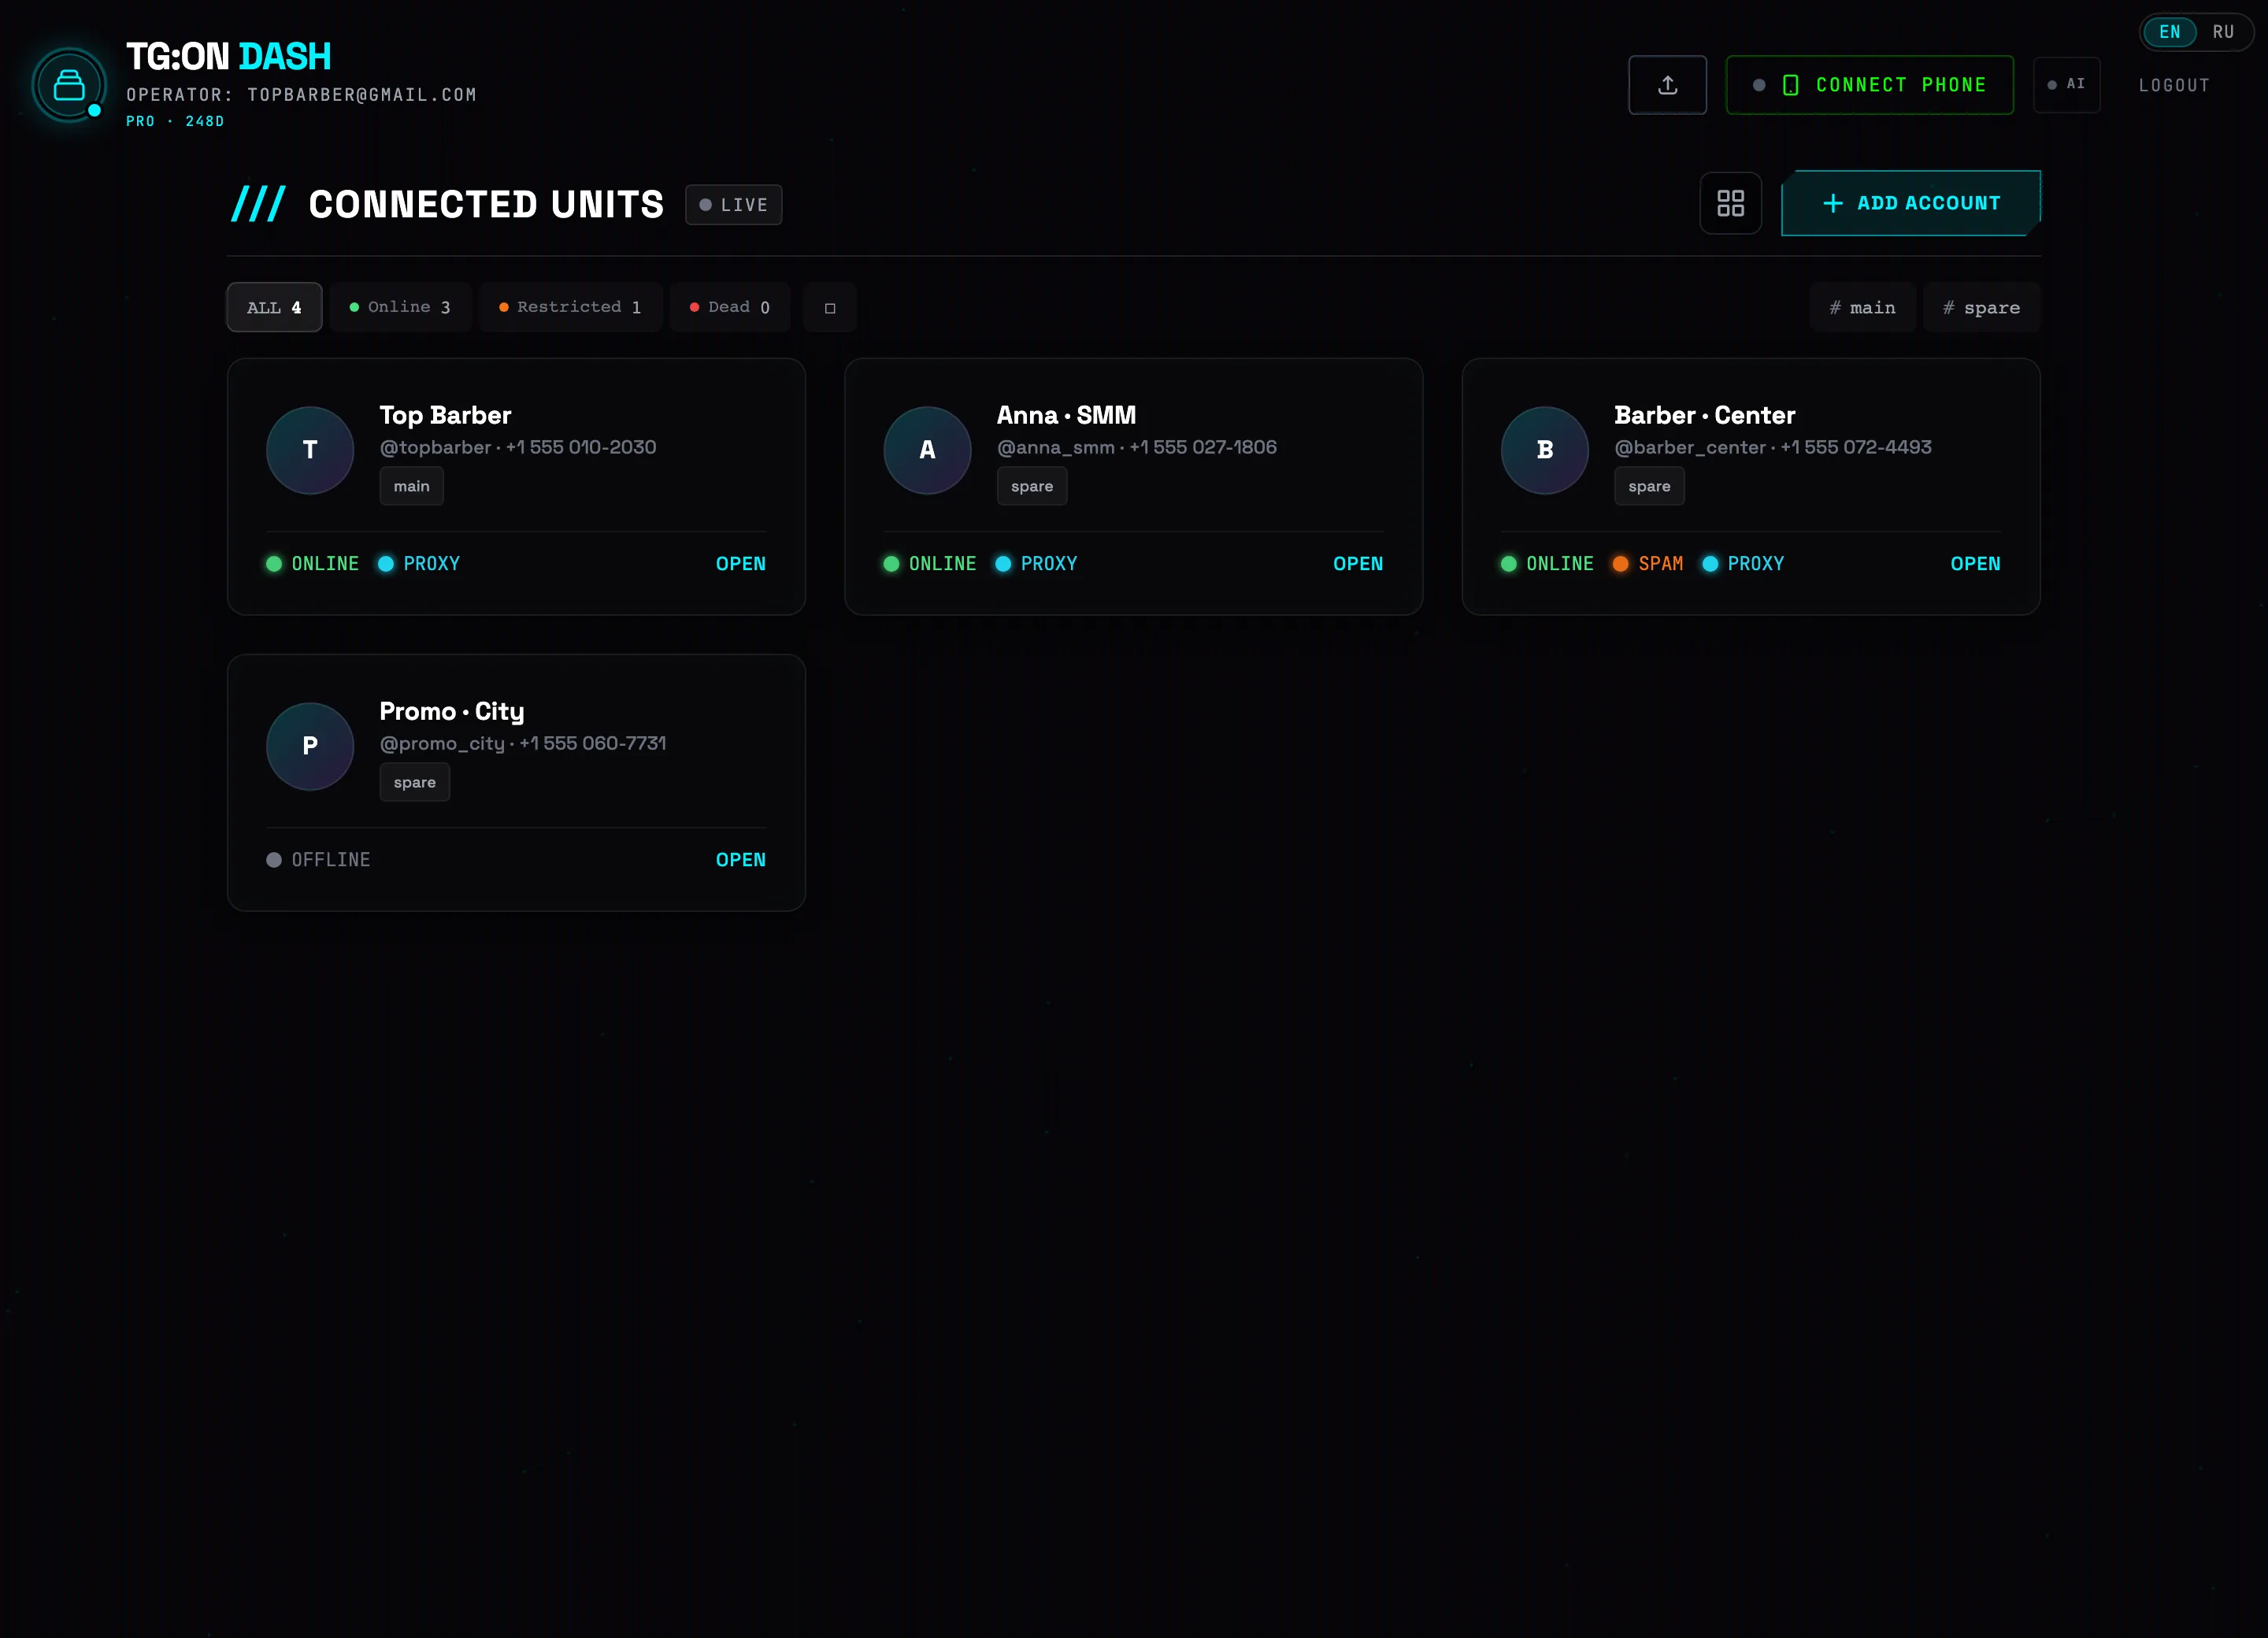
DASHBOARD — account management
The Dashboard is the control center for your Telegram accounts: here you connect accounts (QR, phone number, or import of ready-made sessions), configure proxies, and keep track of statuses and spam blocks.
-
1
Check the state of your accounts on the cards
Each account is a separate card with two indicators: connection (ONLINE / OFFLINE) and restrictions (SPAM, FLOOD, BAN — a healthy account has no badge). The blue PROXY label means the account routes through a proxy. The chips ALL / Online / Restricted / Inactive at the top filter the list, and OPEN takes you into the account's workspace.
 Status filtersAccount with a spam block💡Tip: clicking the ONLINE / OFFLINE indicator right on the card starts or stops that account's bot.
 -
2
Click "+ ADD ACCOUNT" and choose a method
The + ADD ACCOUNT button opens the CONNECT TELEGRAM window with three methods: SCAN QR CODE (no SMS — point your Telegram camera at the code), BY PHONE NUMBER (the confirmation code arrives in Telegram), and IMPORT SESSION for ready-made accounts.
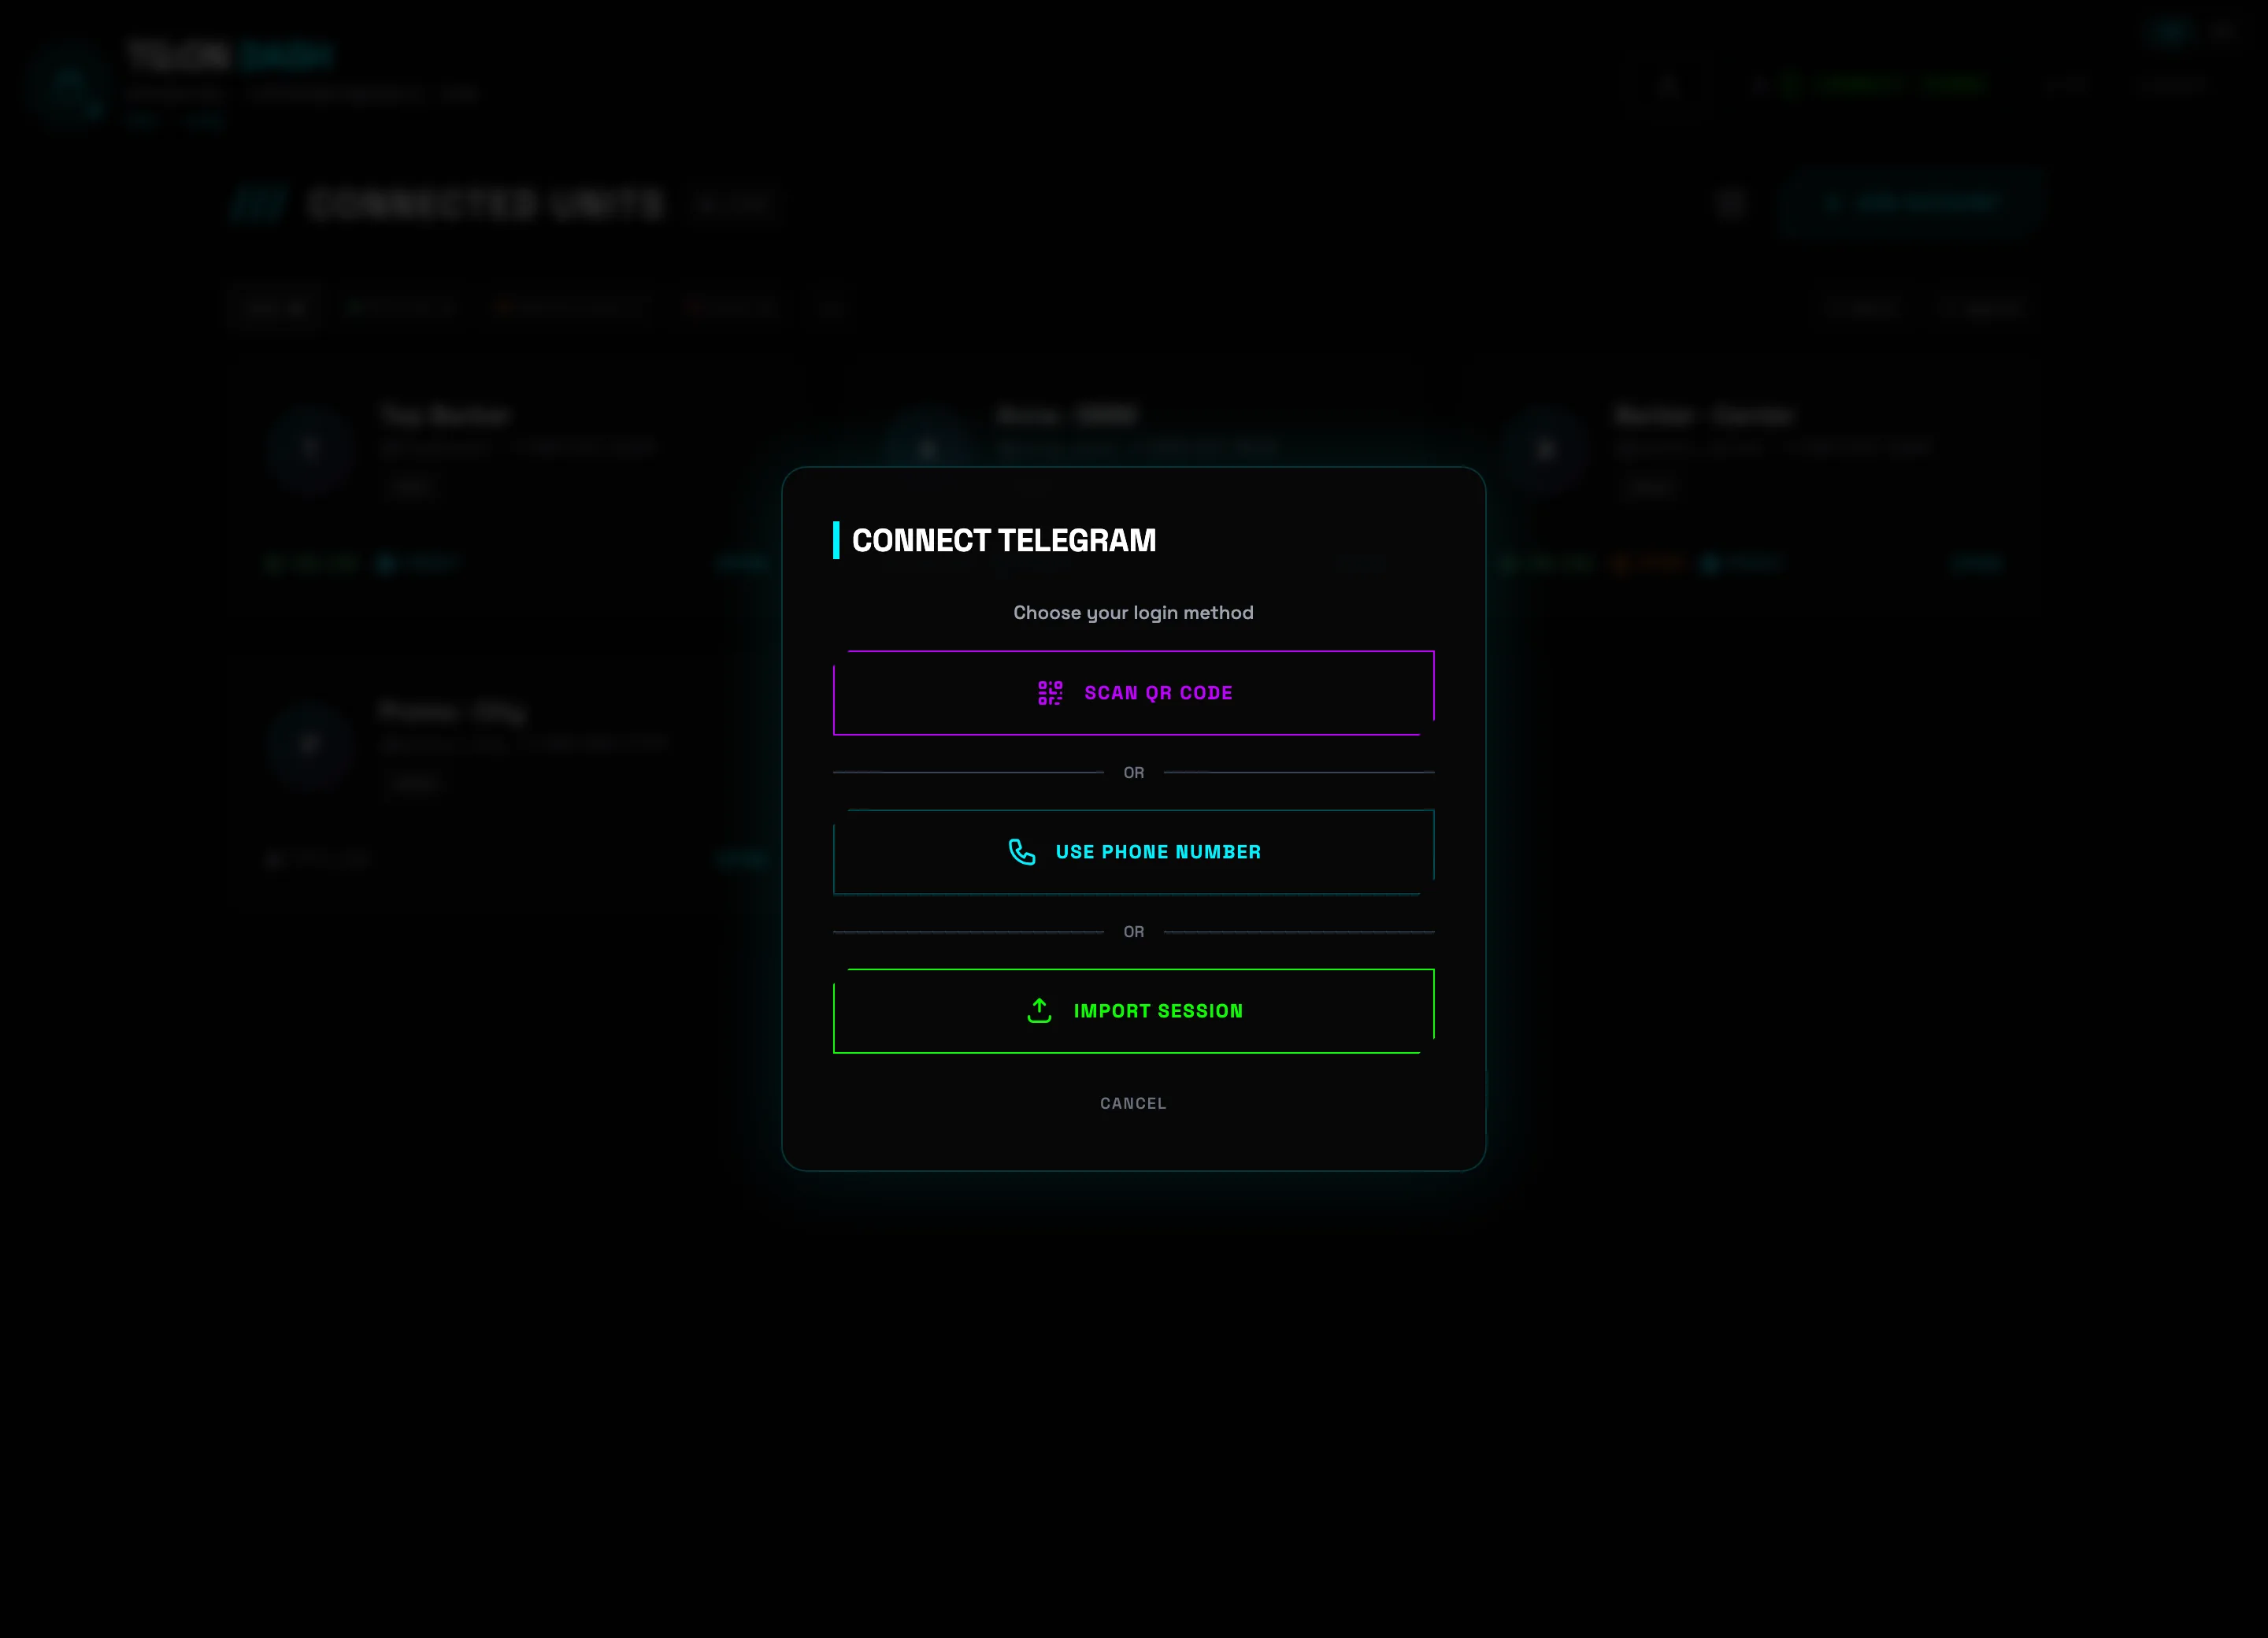 Sign in via QR codeImport a ready-made session
 -
3
Import ready-made accounts: .session / .json / .zip / tdata
Drag files into the drop zone or click CHOOSE FILES — accepted formats are .session + .json pairs, .zip archives, and tdata folders (from Telegram Desktop — the CHOOSE TDATA FOLDER button). The Apply proxy from .json checkbox will pick up proxies from the files, and in the Proxy list (optional) field you can paste your own list — it gets distributed to accounts without a proxy.
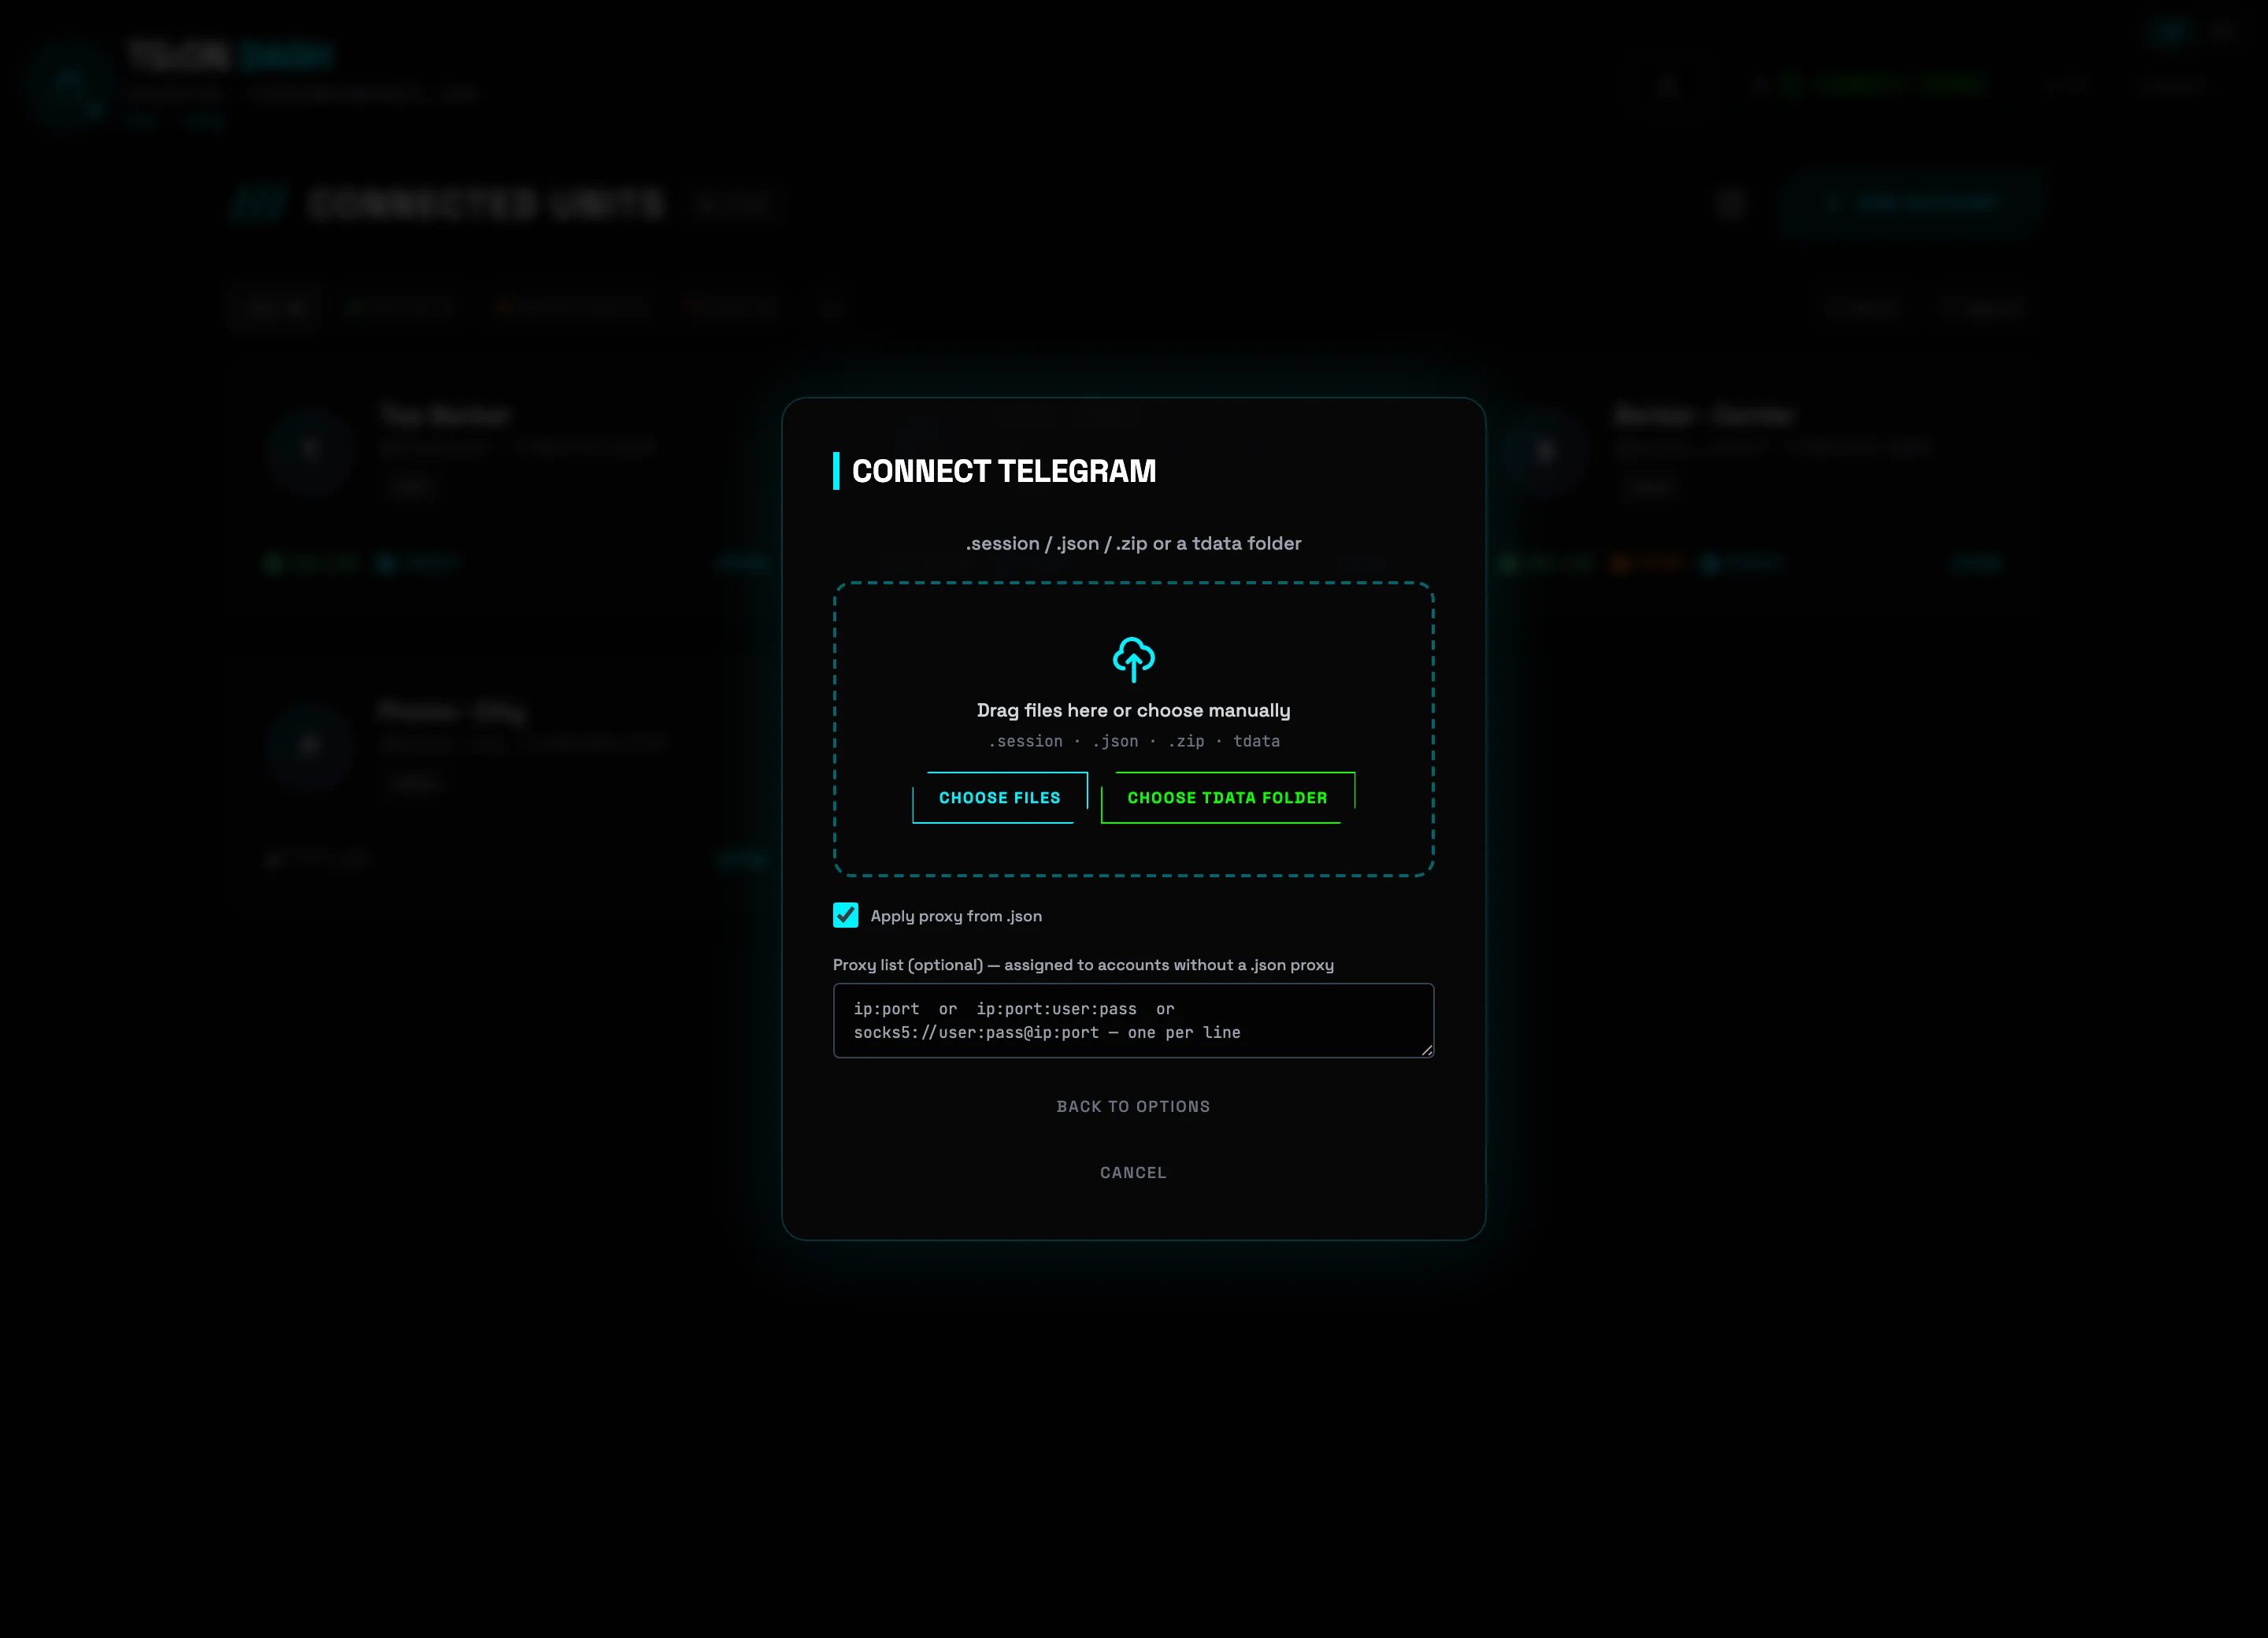 File drop zoneTData folder💡Tip: if the tdata is encrypted with a local passcode, a passcode field will appear — enter it and click APPLY.
 -
4
Review the found accounts and confirm the import
TG:ON will connect to each session and show the ACCOUNTS FOUND list with a live check: name, @username, and status (Session valid, "revoked", "banned", "duplicate"). Tick the ones you need and click IMPORT SELECTED — the accounts appear on the dashboard with no SMS or codes.
 Found accountsConfirm the import
 -
5
Configure a proxy for each account
The shield icon on the card (tooltip "Configure proxy") opens PROXY SETTINGS: up to three slots — PRIMARY, BACKUP 1, BACKUP 2; if the primary one goes down, the bot switches to a backup on its own. Fill in PROTOCOL, IP / HOST, and PORT, verify with the TEST button, and click SAVE. The CURRENT: line shows which proxy the account is using right now.
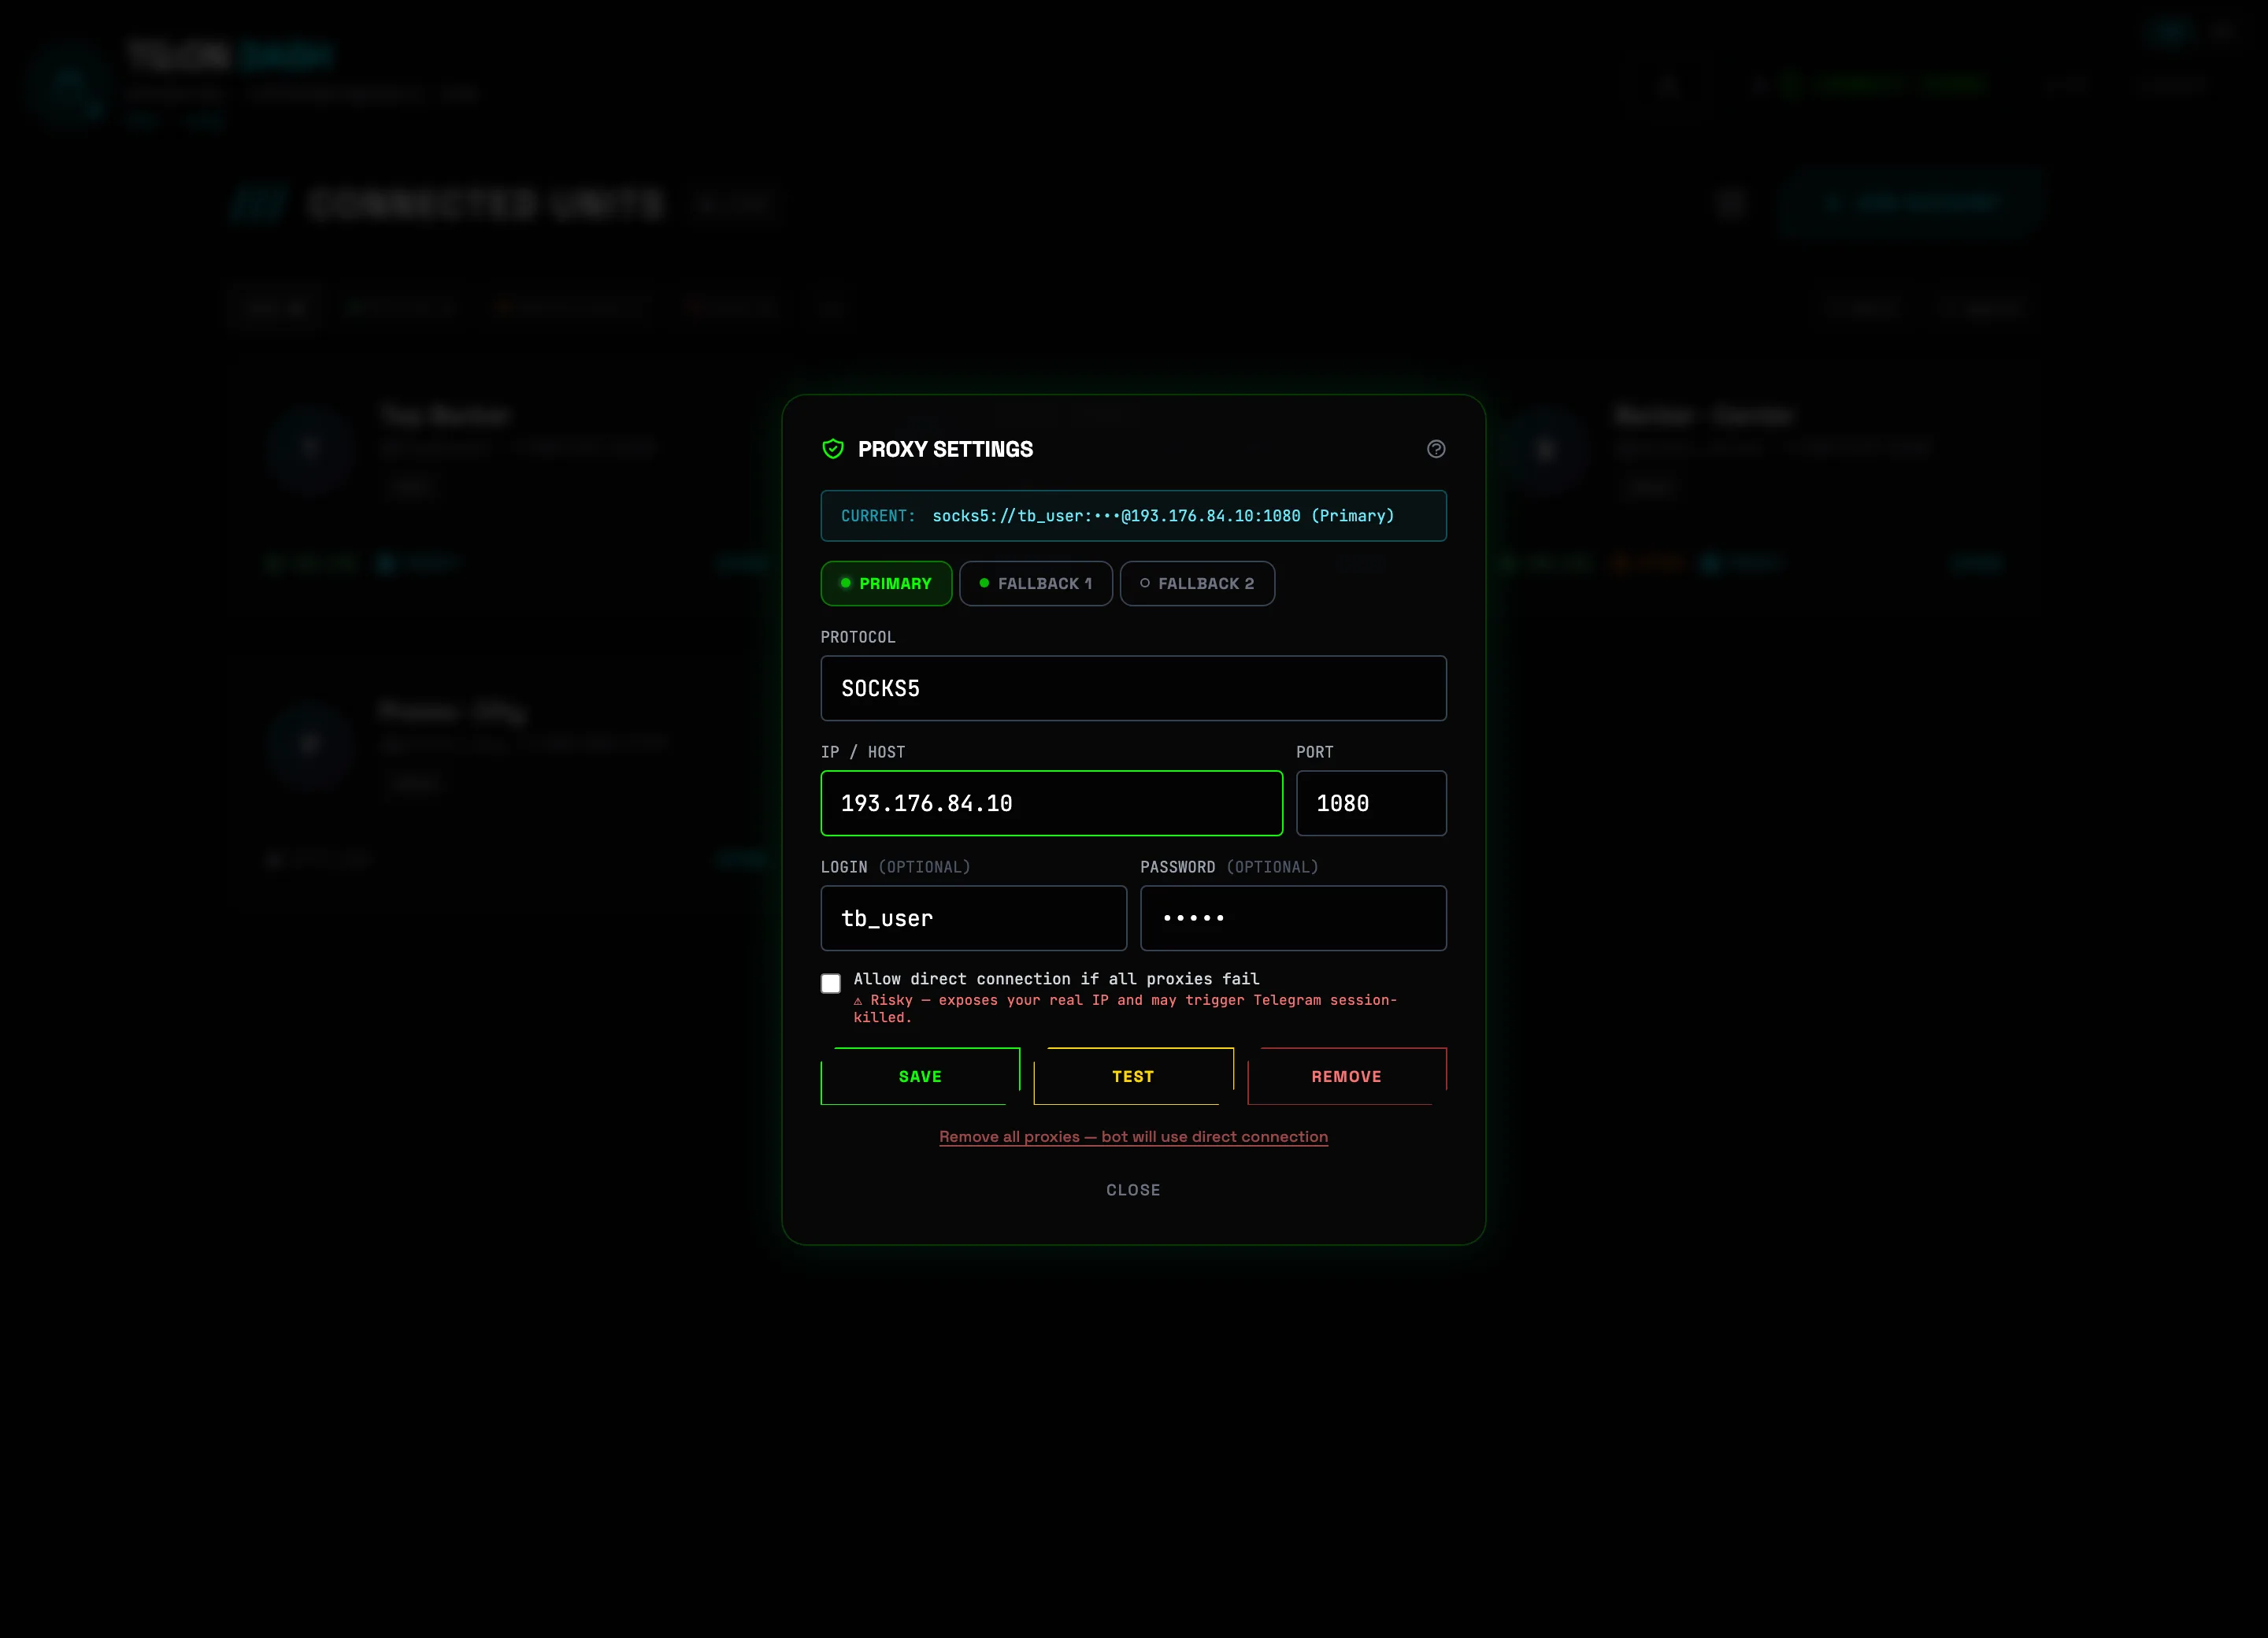 Active proxySave⚠️Important: one account — one proxy. Don't enable "Allow direct connection" unless you have to: it exposes your real IP and may cost you the session.
 -
6
Check the spam block via @SpamBot
The orange icon on the card ("Check @SpamBot") opens the @SPAMBOT CHECK window. Click CHECK NOW — TG:ON sends /start to the official @SpamBot itself, parses the reply, and deletes the conversation. The result updates the badge on the card: clean — or SPAM with the restriction text. For a batch of accounts there's a bulk check: the ☐ button next to the filters → select the accounts → CHECK SPAM.
 What the check doesRun the check💡Tip: run the check before every broadcast — an account with a spam block won't reach the chats, and the campaign burns for nothing.
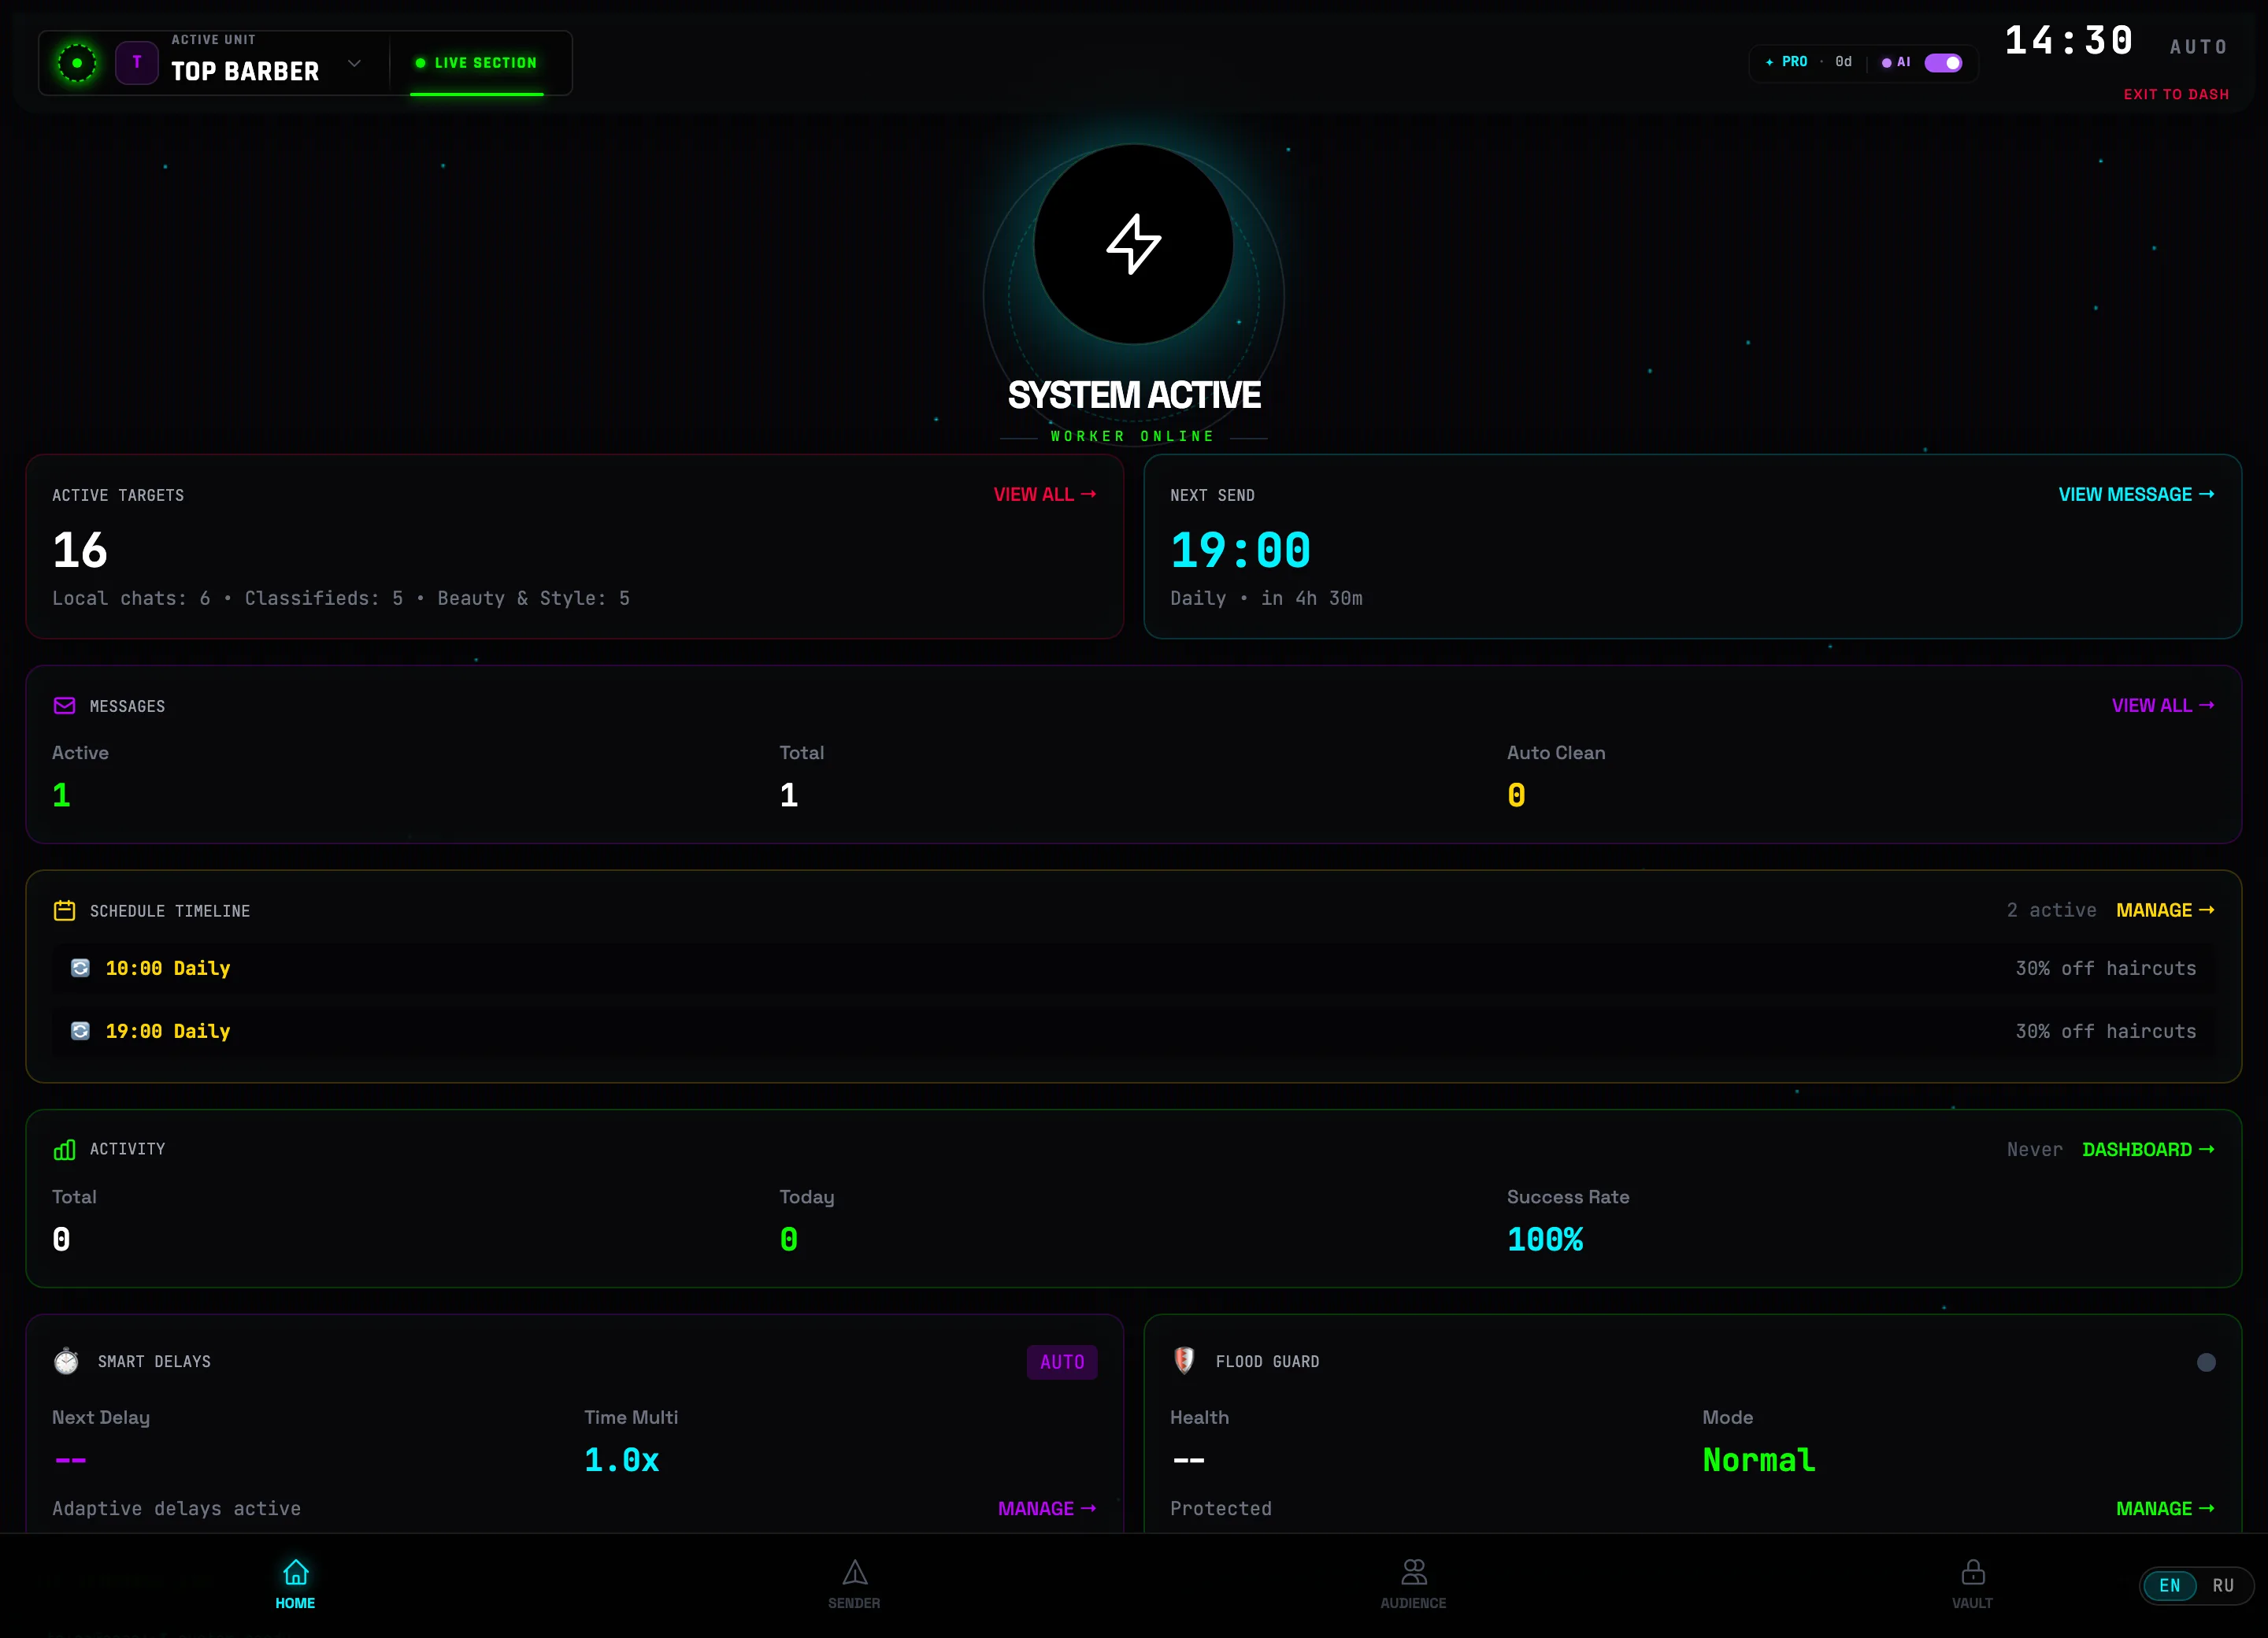
HOME — your account control panel
The bot's main screen: the power button starts the account worker, the widgets show targets, schedule and stats, and the terminal log streams every send in real time.
-
1
Press the power button
While the status reads SYSTEM OFFLINE (with the caption "Ready to work"), the account sends nothing. The round button with the lightning bolt in the center of the screen turns the system on.
 Power button💡Tip: while the system is off, scheduled sends do not run — turn it on before launching scheduled broadcasts.
 -
2
Check the system status
Once turned on, the header changes to SYSTEM ACTIVE, with WORKER ONLINE appearing below it, and the button's core lights up. The green LIVE SECTION indicator lights up on the left of the header.
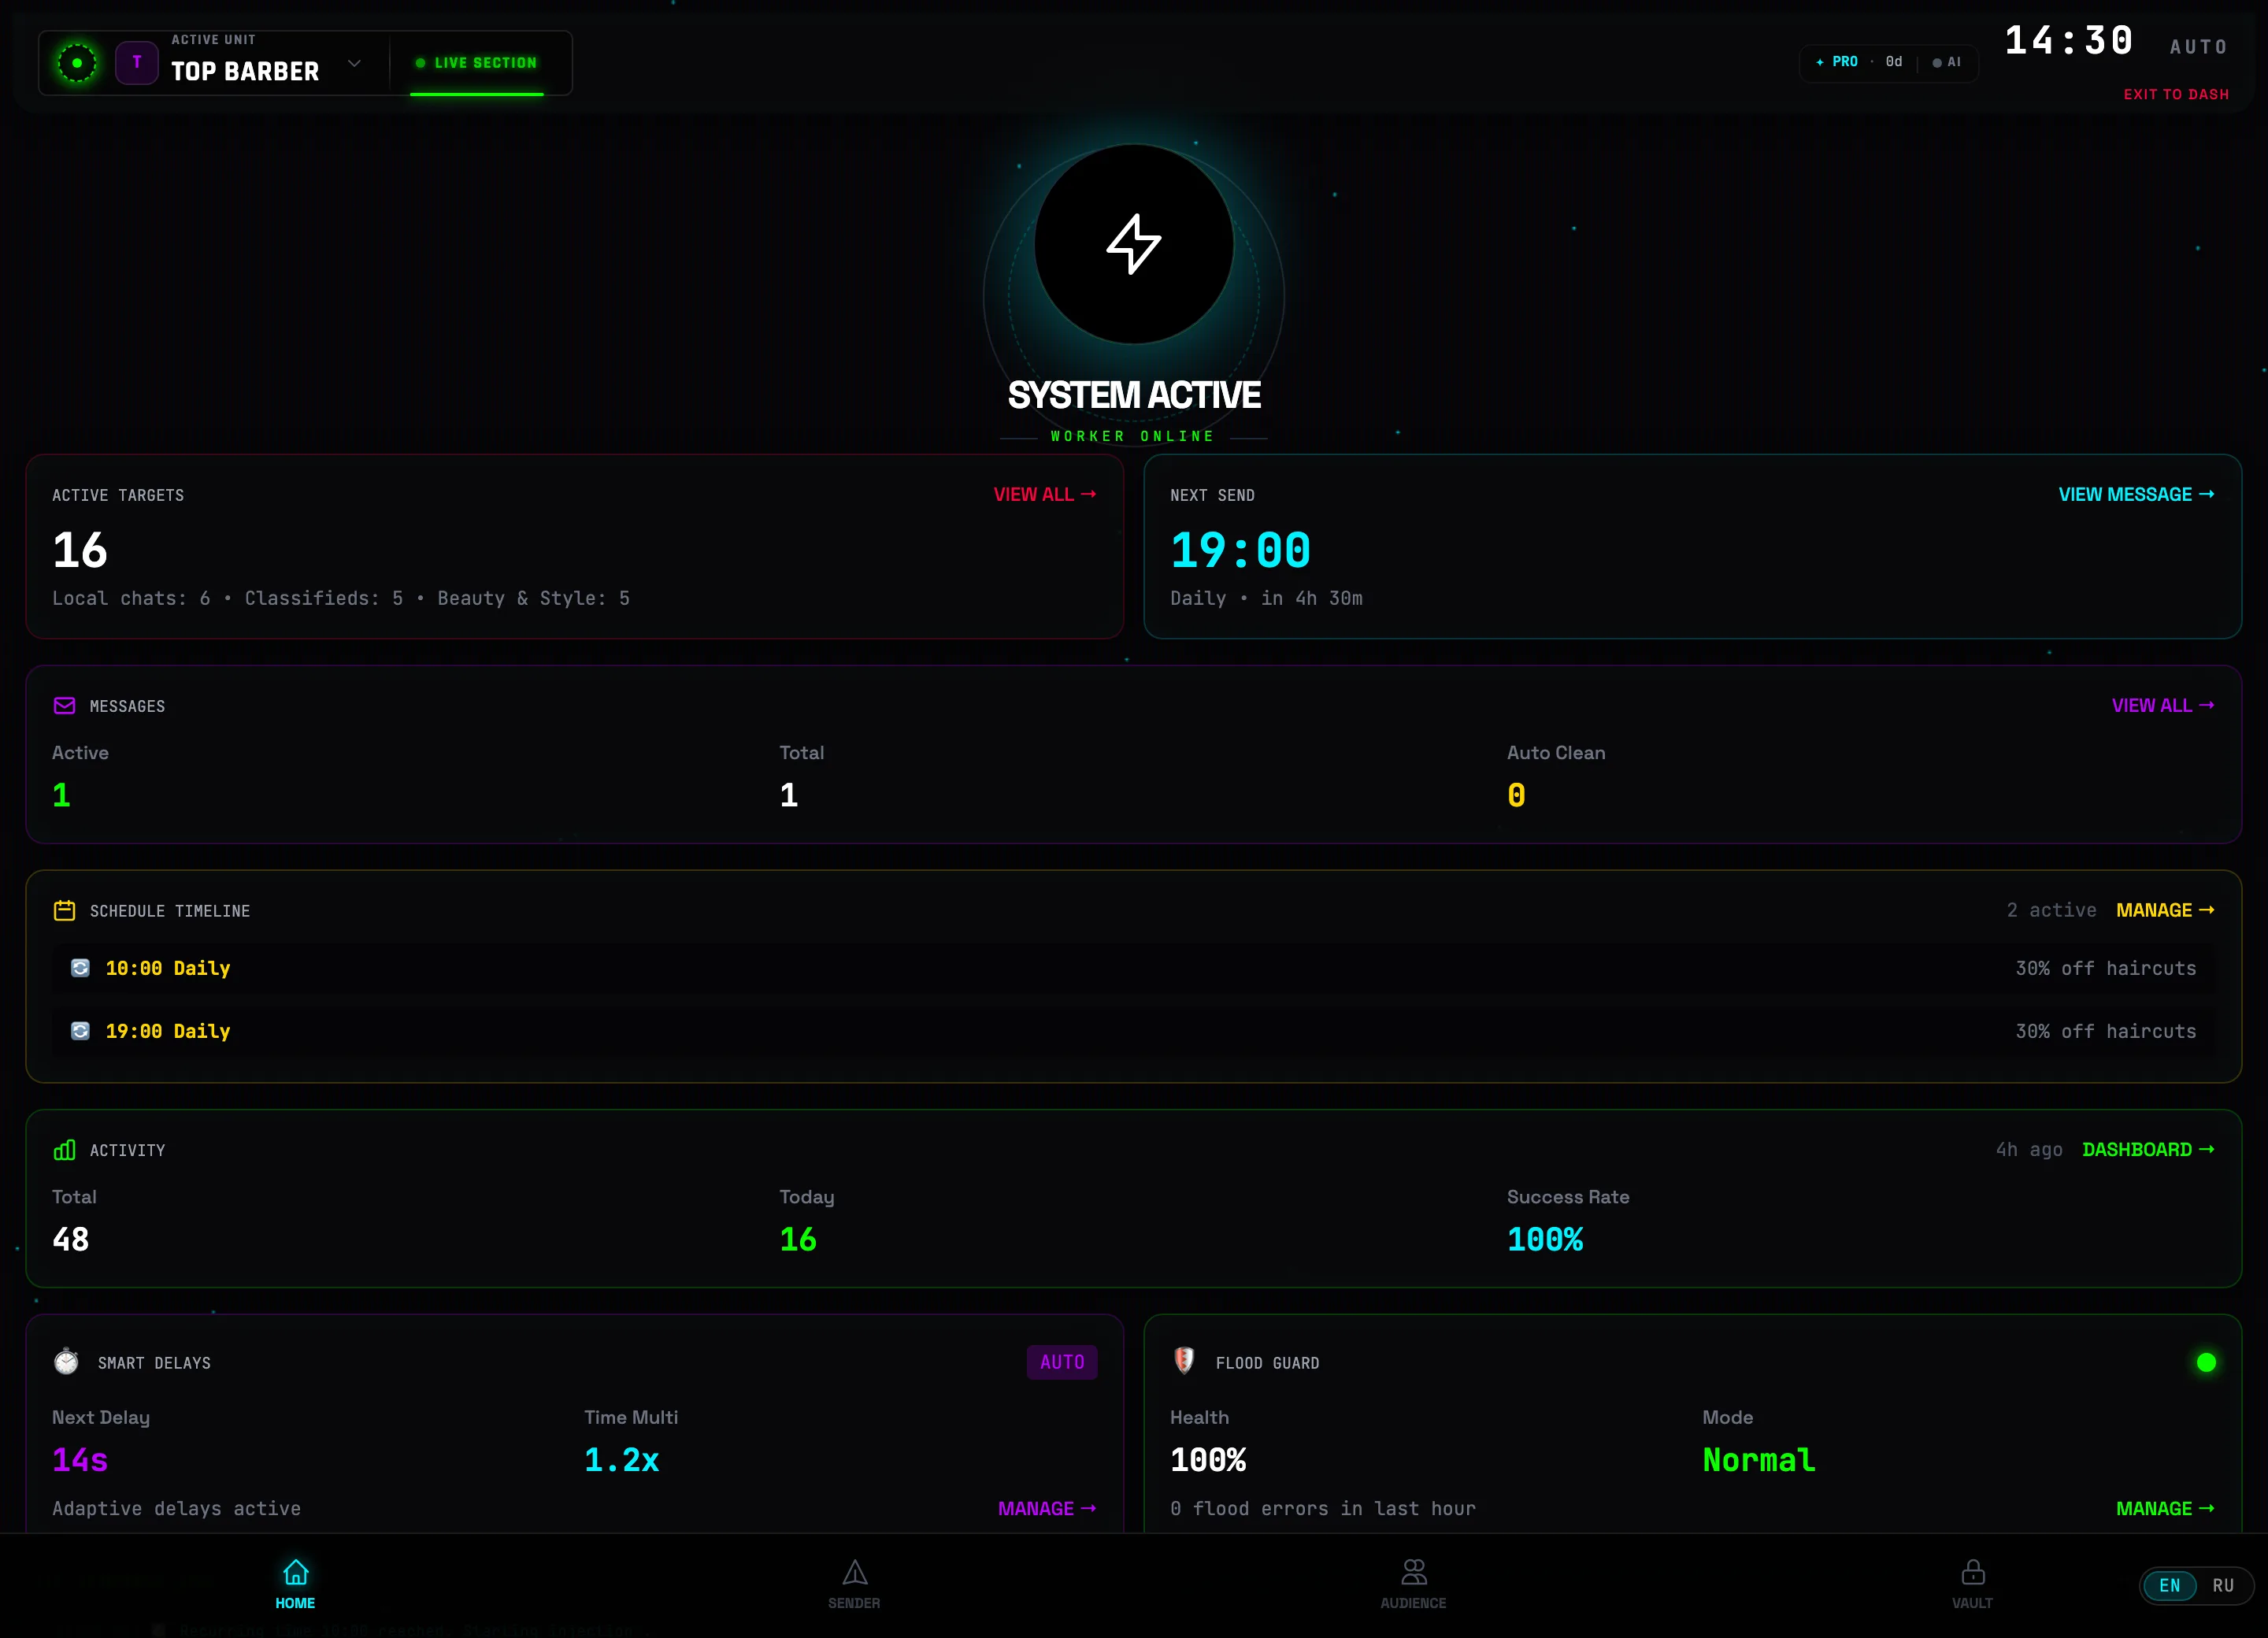 SYSTEM ACTIVE
 -
3
Read the state from the widgets
Below the power button is the account summary: ACTIVE TARGETS (number of chats and a breakdown by category), NEXT SEND (time of the nearest schedule slot), MESSAGES, SCHEDULE and ACTIVITY (total / today / success). The ALL → and MANAGE → buttons take you to the corresponding sections.
 Active targetsNext send
 -
4
Configure Smart Delays
In the SMART DELAYS widget, click MANAGE →. In the window, the SEND SPEED slider sets the pause between messages — from 2s (fast) to 60s (safe). Below it is the DELAY MODES reference: from TURBO (3–5 sec) to RECOVERY (60–120 sec); the system adjusts the pauses to the load on its own.
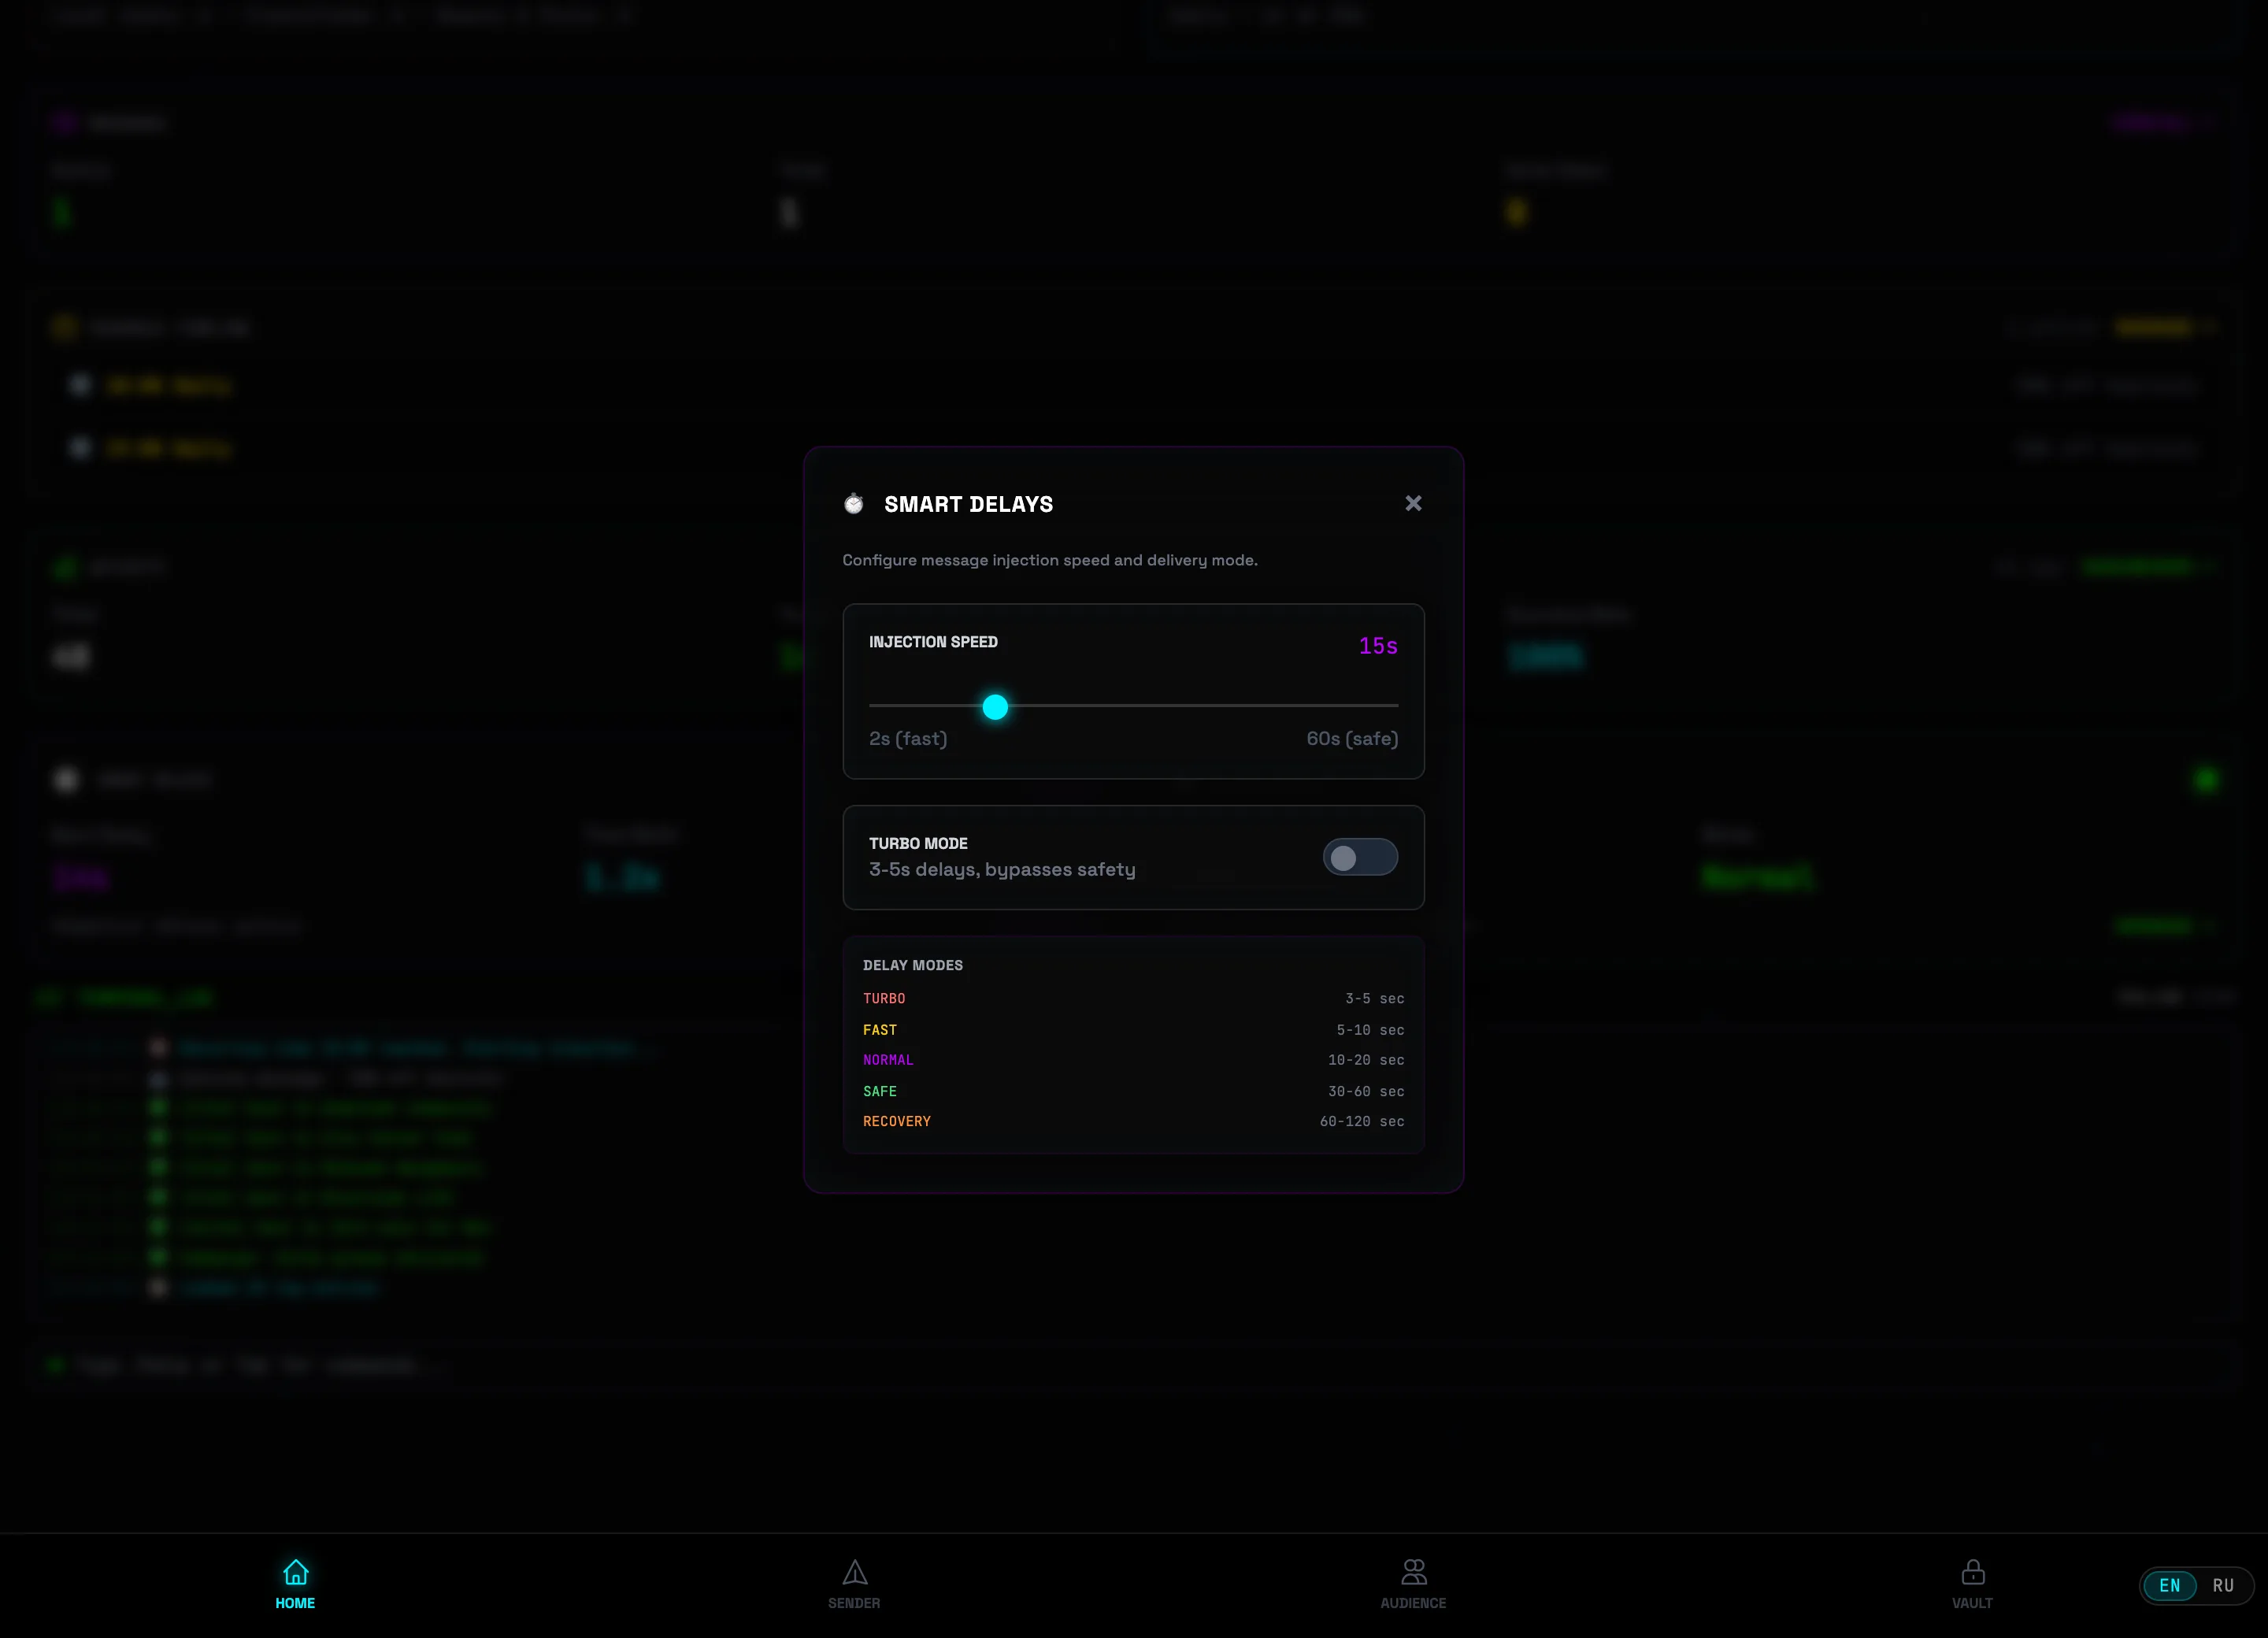 Send speedTurbo mode⚠️Caution: TURBO MODE compresses pauses to 3–5 seconds and, as the window states plainly, "bypasses protection". Enable it only on warmed-up accounts.
 -
5
Take a look at Flood Guard
The FLOOD GUARD widget → MANAGE →. The CURRENT STATUS block shows Health (100% — all good), Mode and Errors/hour. The HEALTH SCALE: 80–100 — normal operation, 50–79 — the system increases delays, 0–49 — safe mode kicks in. It all happens automatically — the AUTOMATIC PROTECTION block lists what the system tracks on its own.
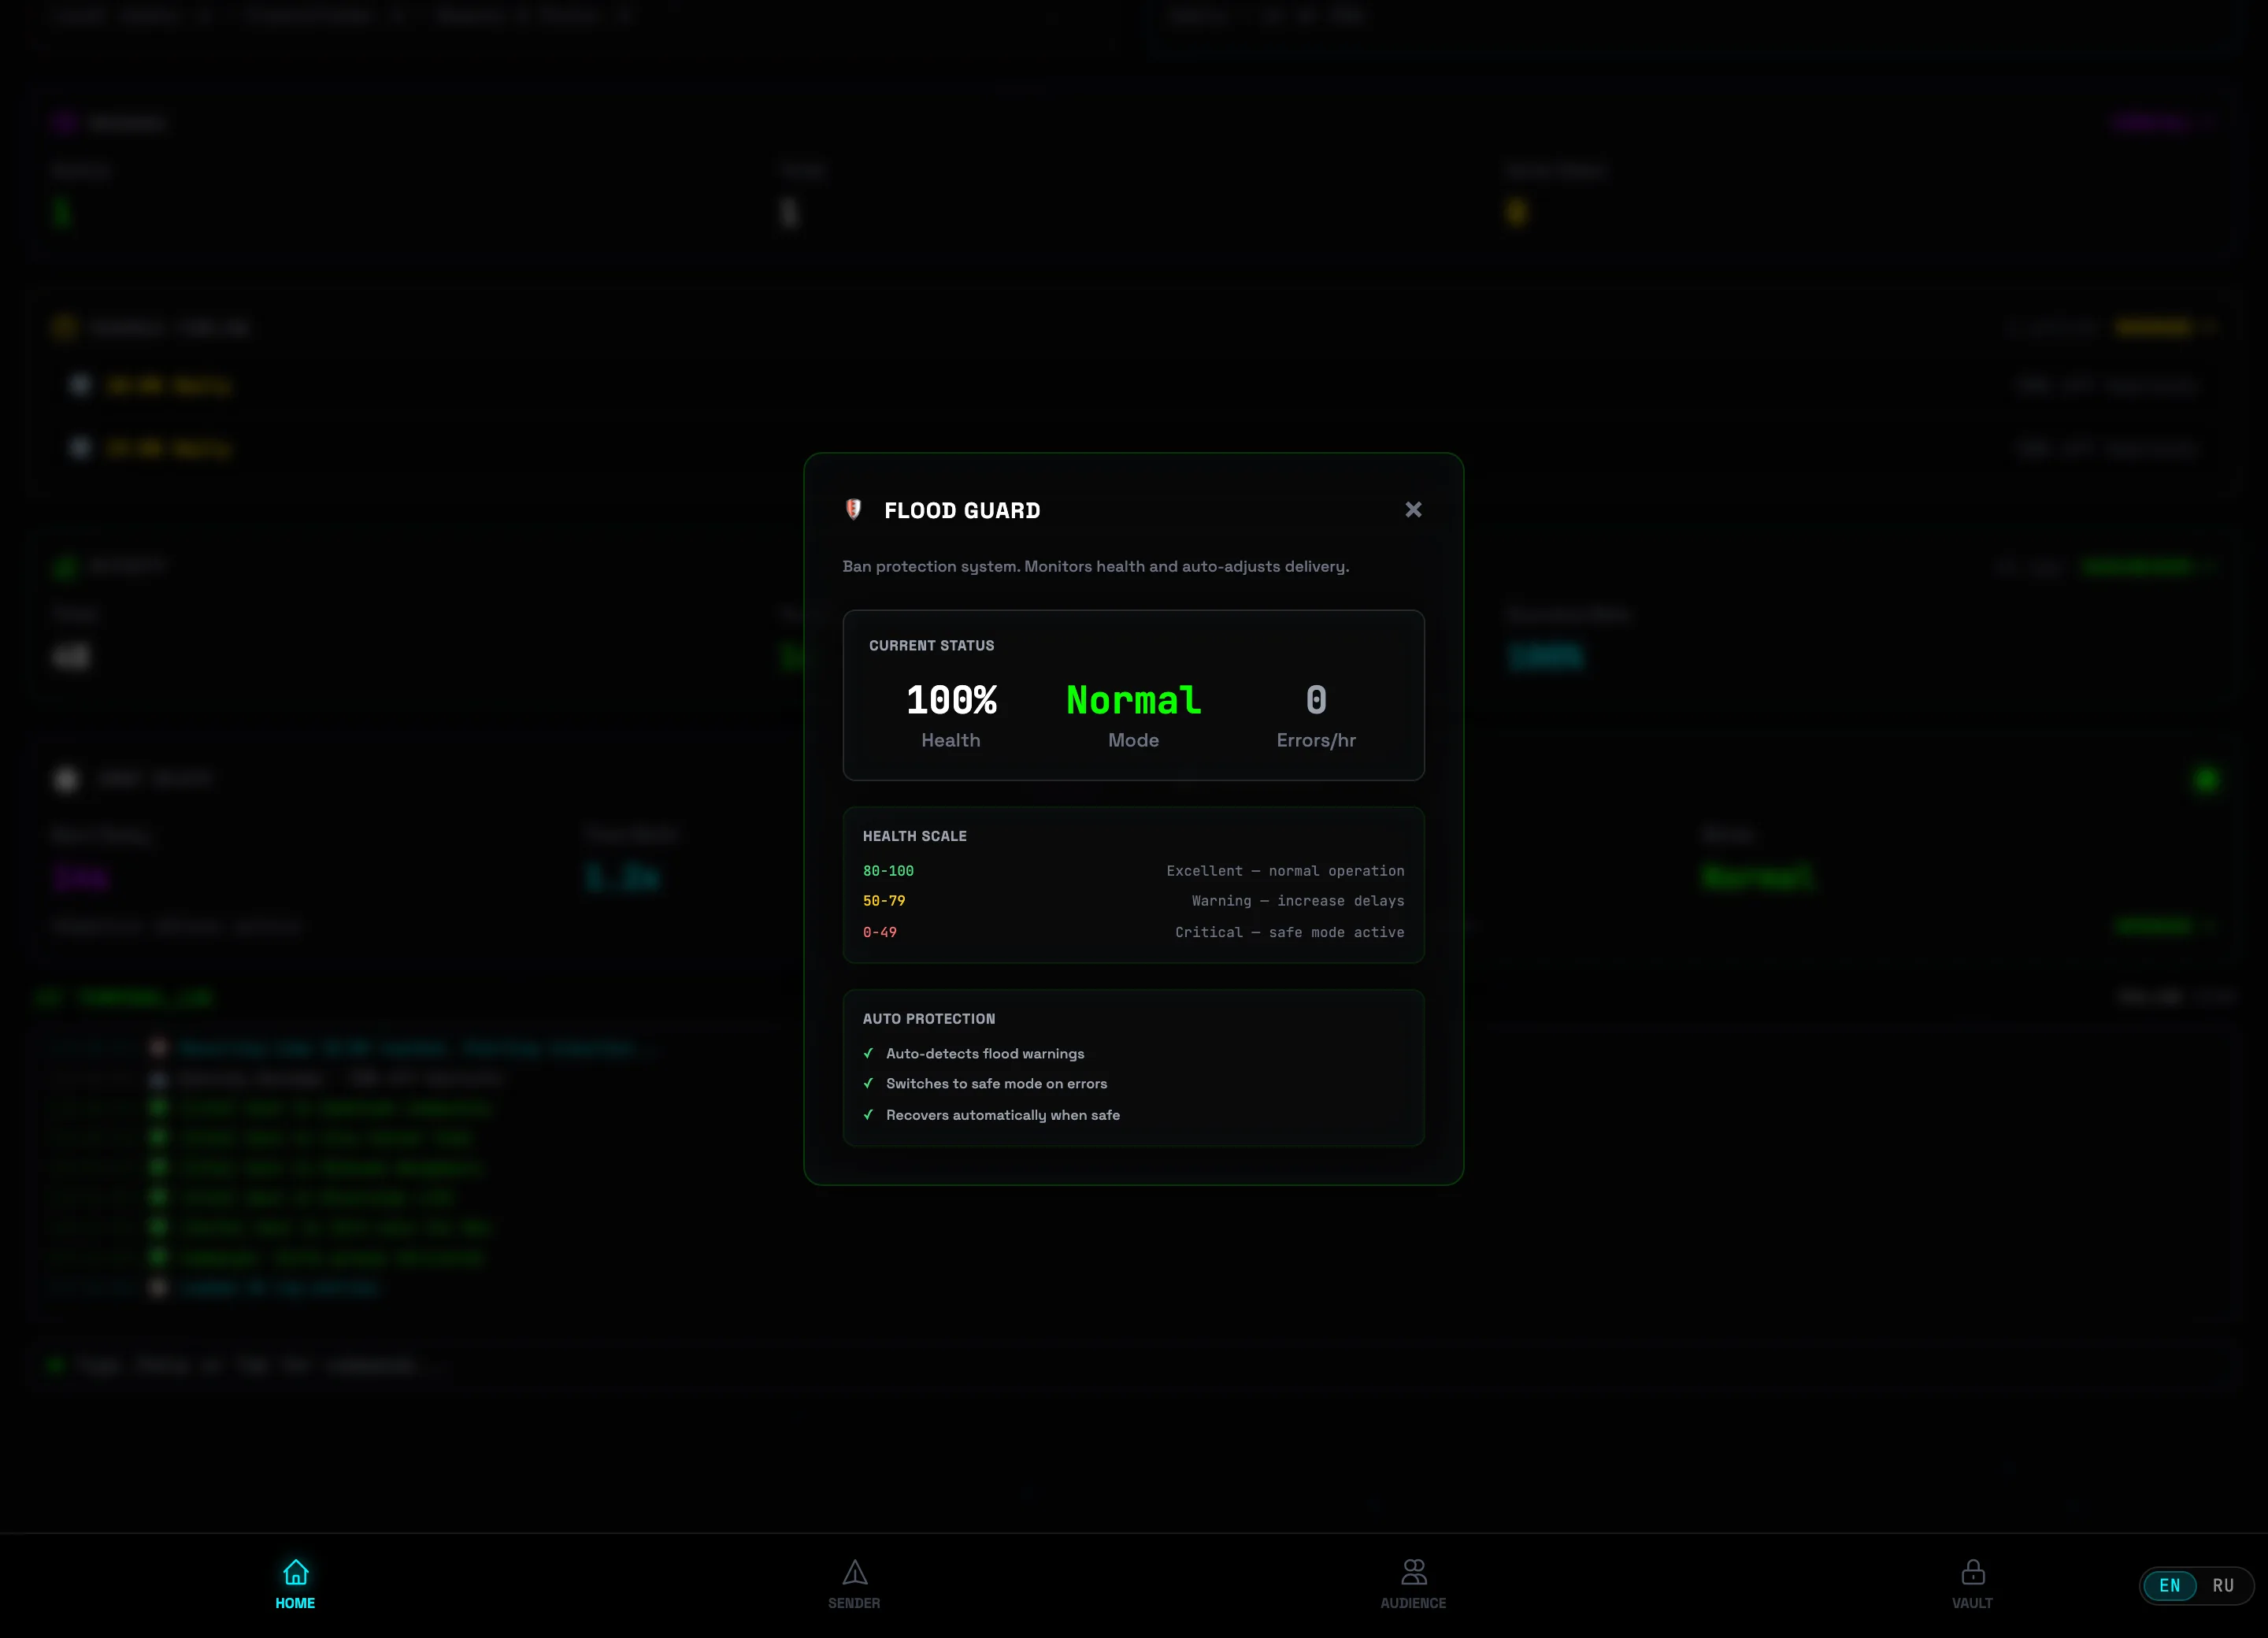 Current statusHealth scale
 -
6
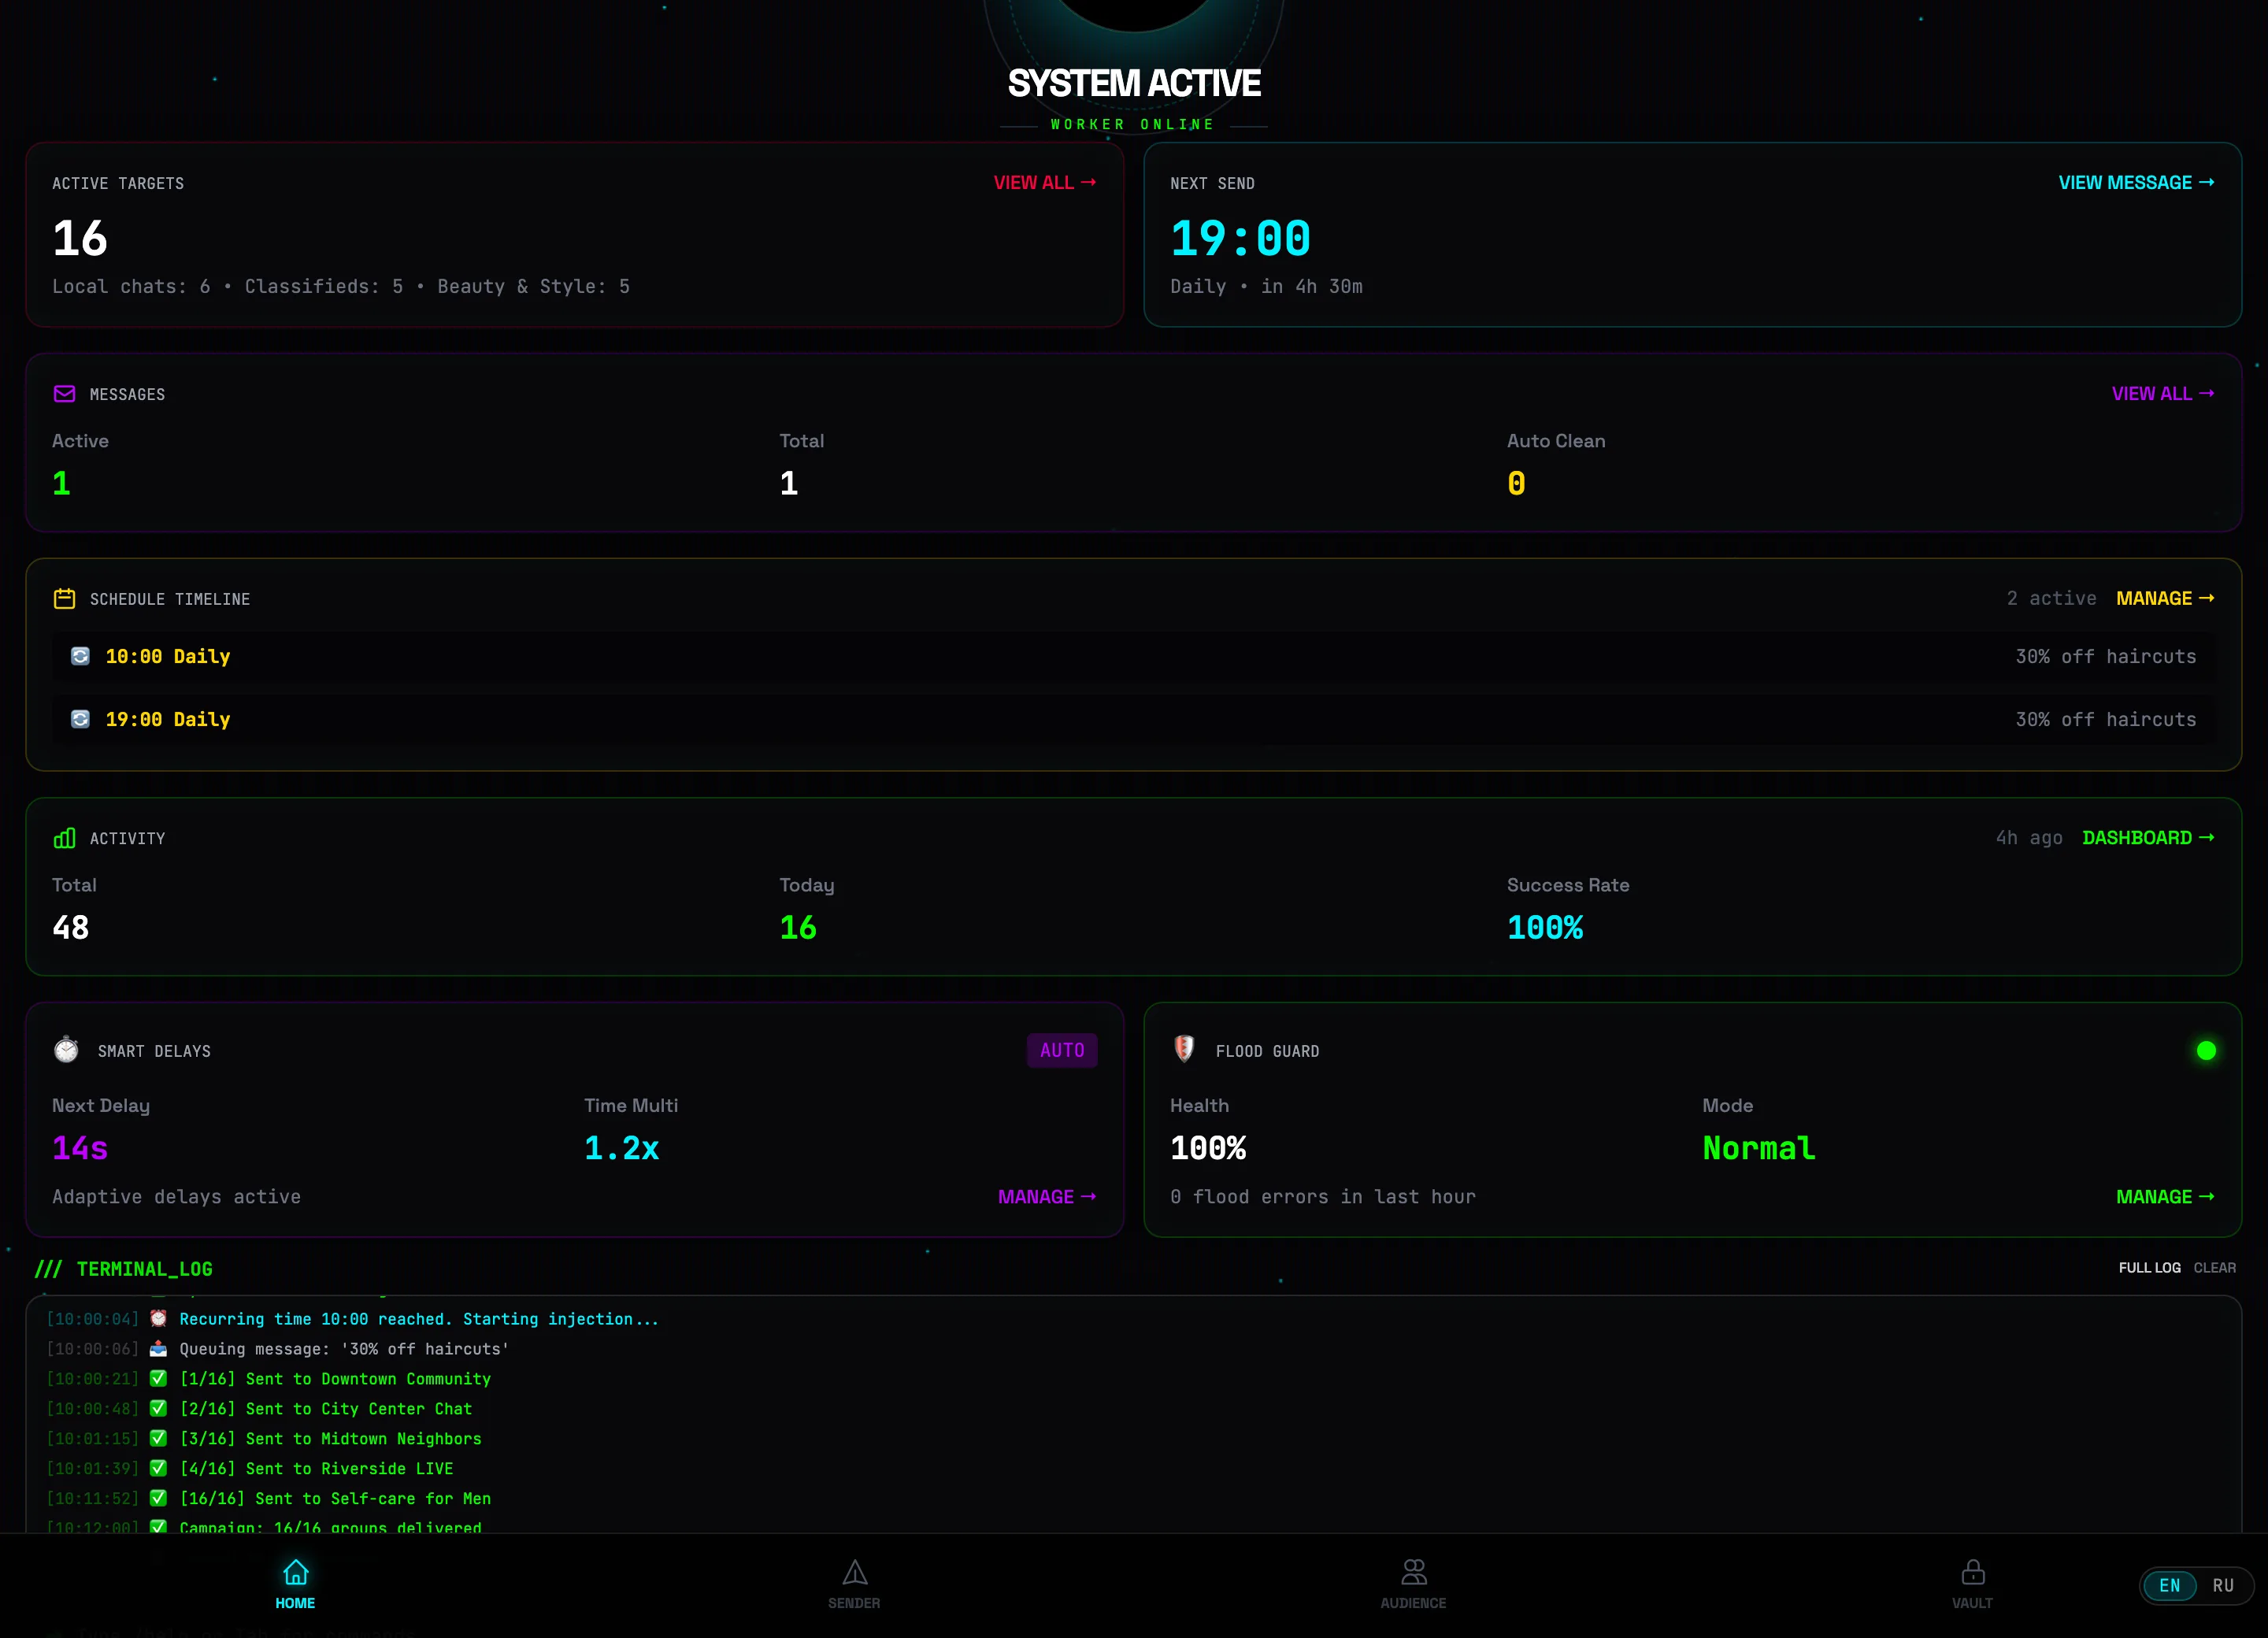
Watch the terminal log
At the bottom of the screen is the /// TERMINAL_LOG: every send, schedule and system event with a timestamp. FULL LOG opens the entire history, CLEAR deletes the records. In the line below you can enter commands — the hint reads: "Type /help or Tab for commands…".
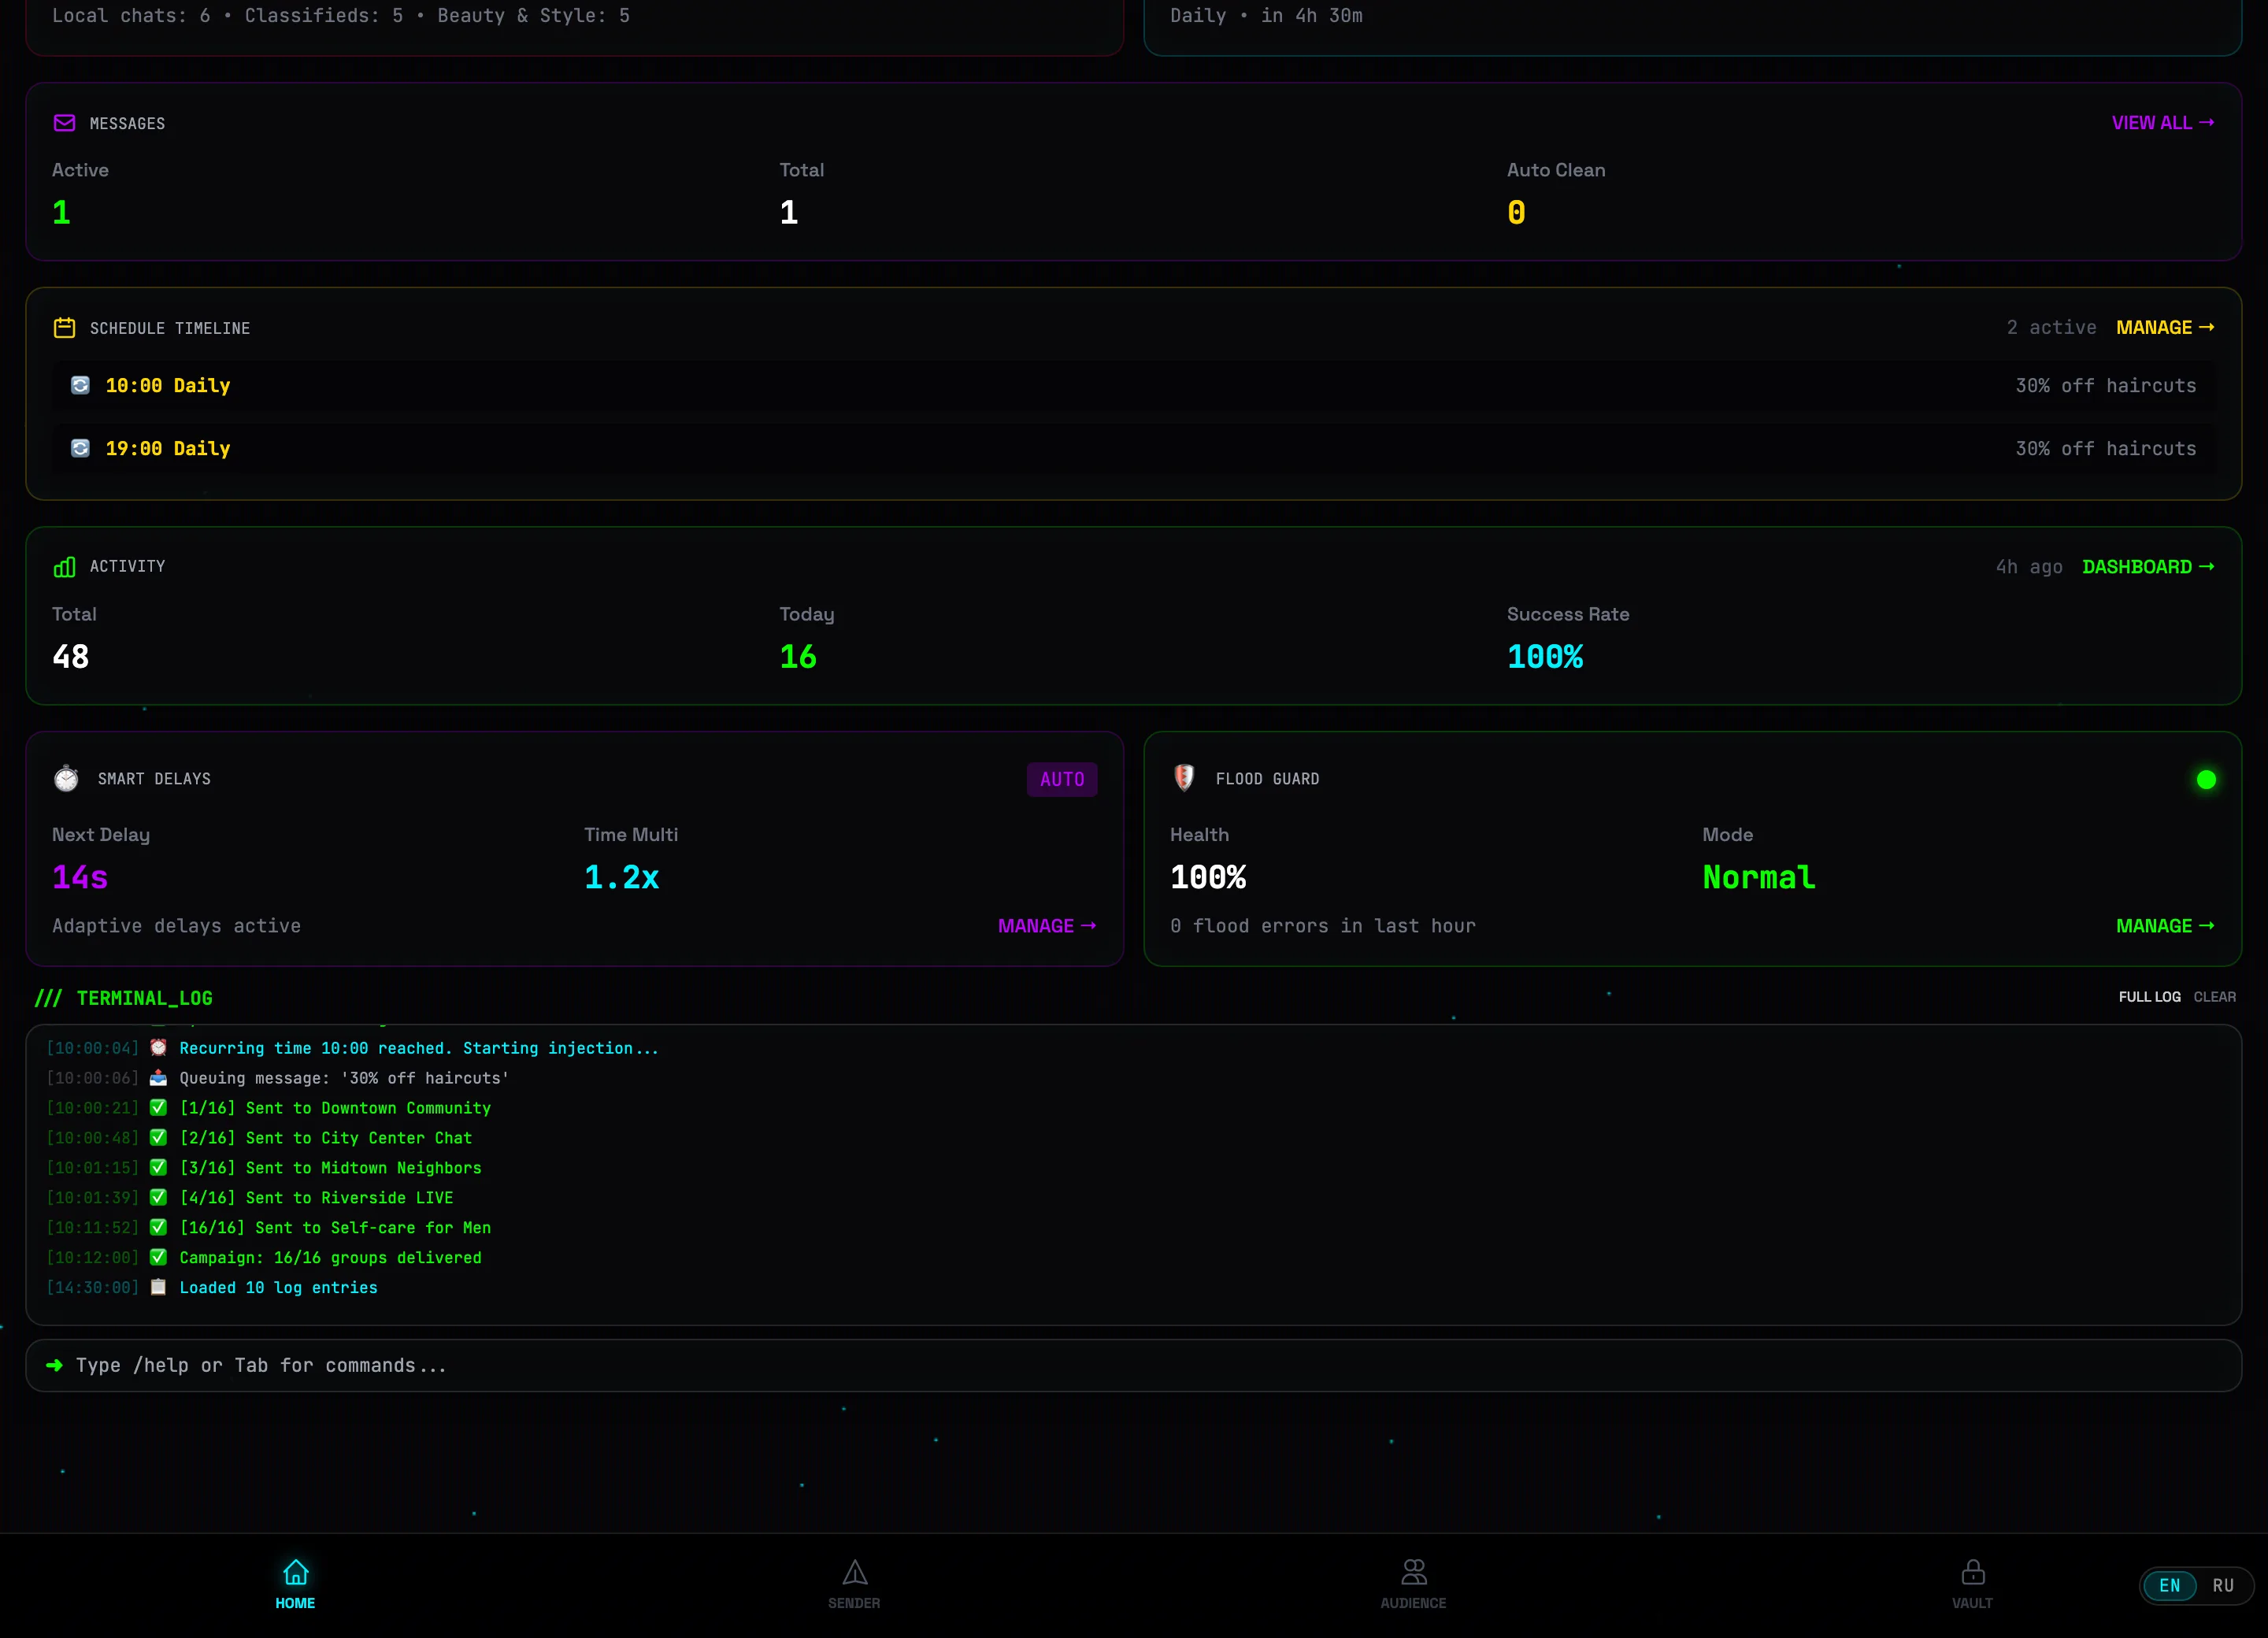 Activity logCommand line
 -
7
Switch between accounts
If you have several Telegram accounts, the ACTIVE UNIT selector with the current unit's name is at the top left. A click opens the AVAILABLE UNITS list with an online/offline indicator for each — pick one and the whole interface switches to it (targets, messages and schedules are separate per account). The OPEN DASHBOARD item at the bottom opens the all-accounts dashboard.
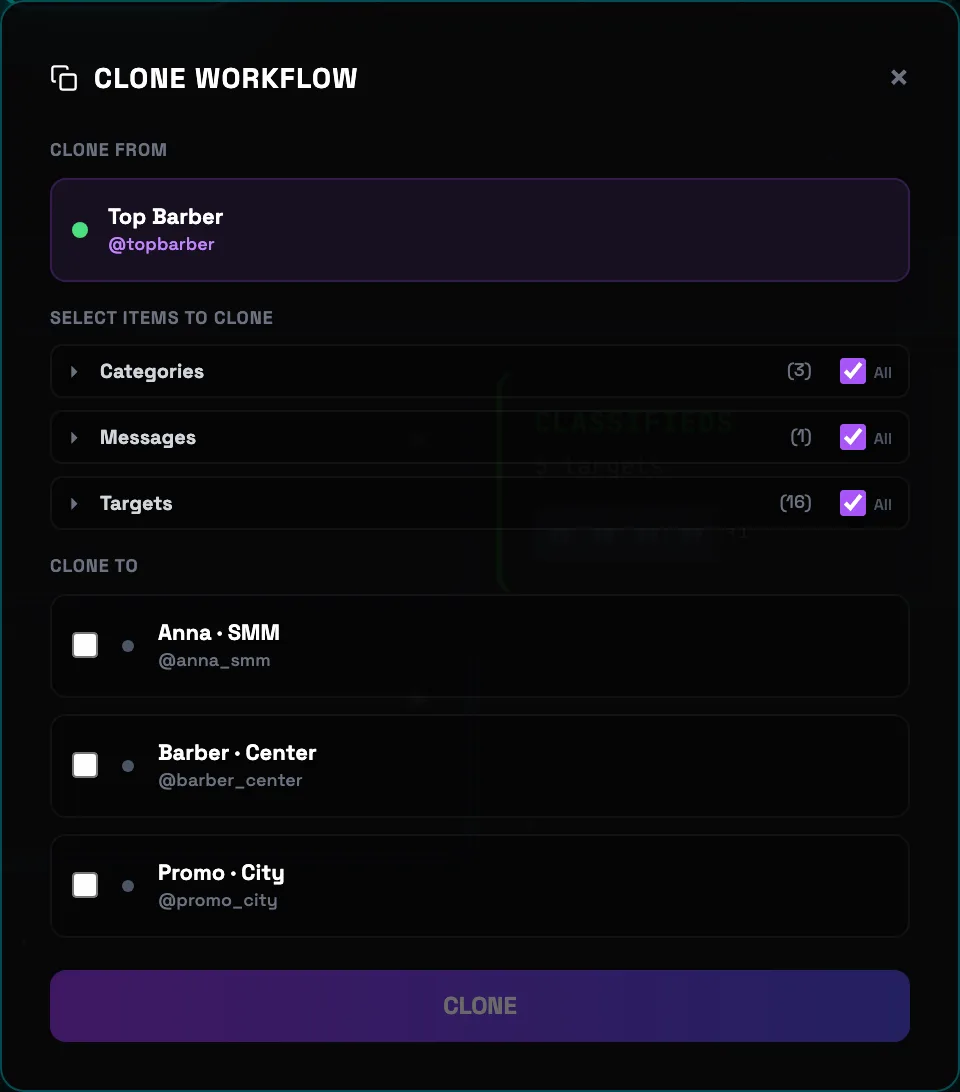
 Accounts list💡Tip: each account works independently — broadcasts, warm-up and auto-replies never overlap. To carry a similar campaign over to a new account, use Clone Workflow in the Sender.
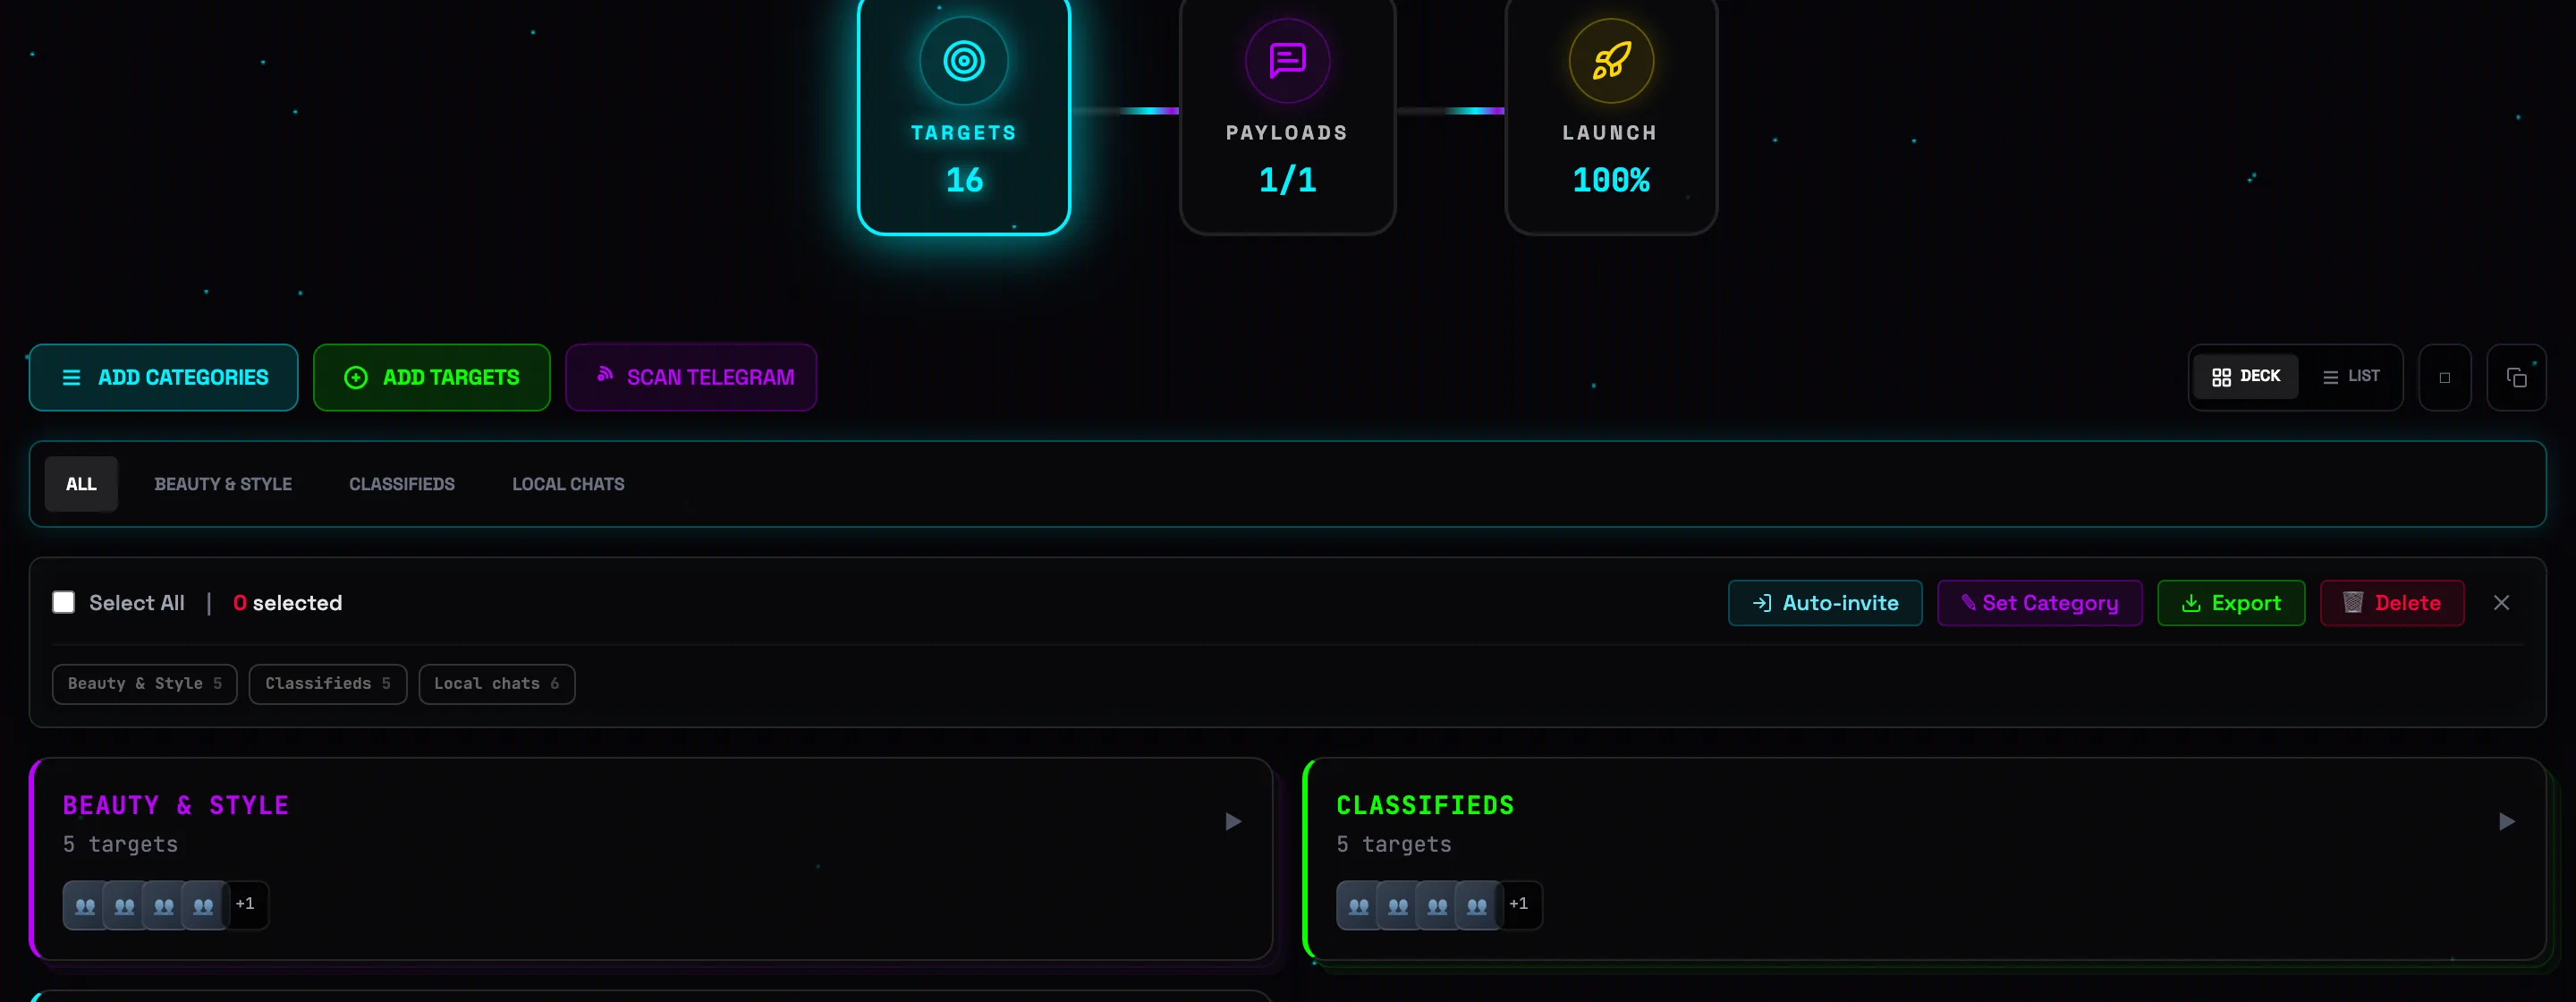
Sender — broadcasts
The platform's main module: targets → messages → launch. The full flow with screenshots and video is in the tutorial "Your first broadcast in 5 minutes". Here are the capabilities you'll need next.
Spintax and uniquification
{Hi|Hello|Good day} — for each group a random variant is picked from inside the curly braces. Spintax can be nested: {Hi{!|.}|Hello}. The PREVIEW button in the editor shows the number of variations and examples. On top of spintax, uniquification works automatically: invisible characters, emoji variation, a digital signature.

Schedules
- Daily — every day at the set time (multiple slots allowed)
- Once — a specific date and time
- Interval — start + repeat every N hours × a number of times
Handy nearby
- Forward mode — broadcasting by forwarding from a Premium account: Premium emoji are preserved ("author shown" mode)
- Clone Workflow — duplicating the entire pipeline (targets + messages + schedules) to another account
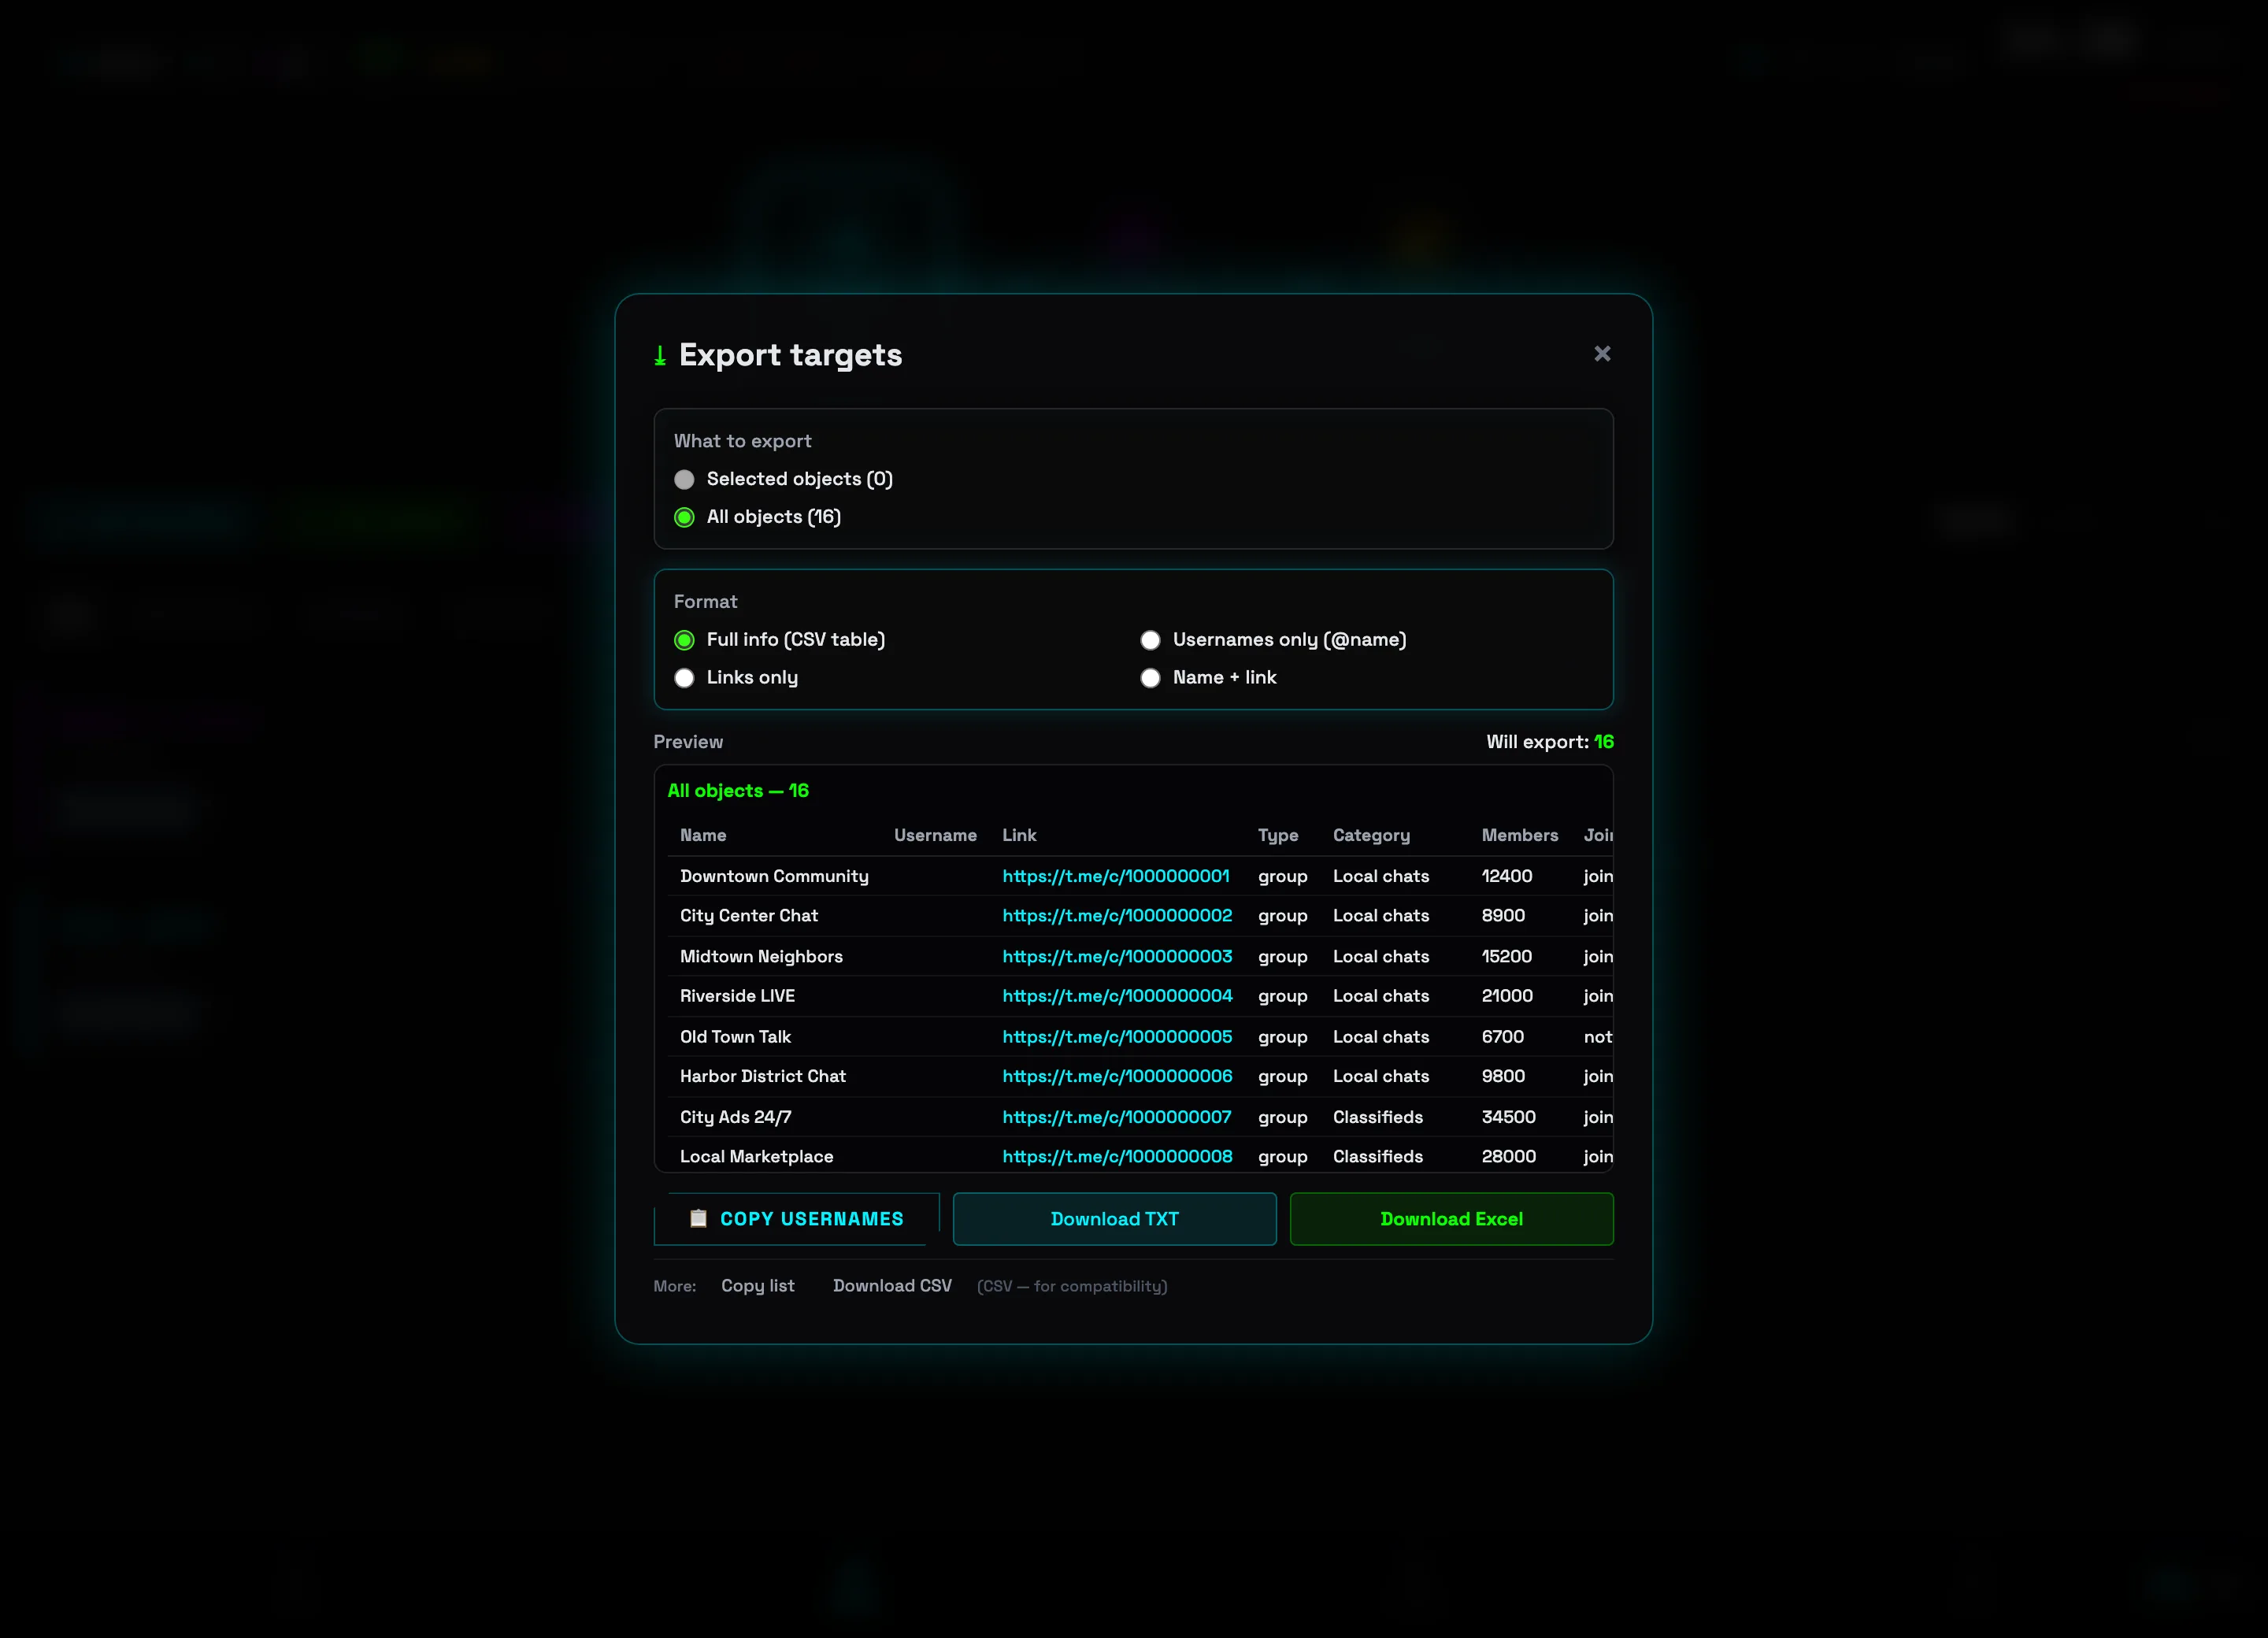
- Export targets — exporting lists to Excel/CSV from the bulk-actions bar (select targets with checkboxes → Export)
- Turbo and Cleanup — toggles on the message card: faster sending and auto-deletion of sent messages
Categories and bulk actions
Targets are organized into categories — the tabs above the list (ALL and one per category) filter them, and a message can be aimed at specific categories. The checkbox button ☐ turns on selection mode: a bulk-actions bar appears — Select all, Auto-invite (join the selected), Set category, Export and Delete.
Clone Workflow — move a campaign to another account
The ⧉ icon above the target list opens CLONE WORKFLOW. Choose what to copy — Categories, Messages, Targets (the counters show how much of each) — tick the destination accounts under CLONE TO and click CLONE. The entire campaign setup moves to another account in one click.
Audience — pipeline collection
The audience is built as a single flow: Sources → Collection → Use. Choose where to pull members from, run a collection task (it joins, scrapes and cleans out bots and deleted accounts on its own), then send the finished list to the Sender or use it for invites.
-
1
Step 1 · Sources — where to pull people from
The AUDIENCE tab opens on the SOURCES step. Sources are added from four tabs: My chats and groups, Find sources (keyword search), Paste links / IDs and From Vault. Check the groups you need (or Select all groups) and click Add selected to Step 2.
 Add to Step 2💡Tip: the top HUD SOURCES → COLLECTION → USE shows which step you are on and lets you switch between them in one click.
 -
2
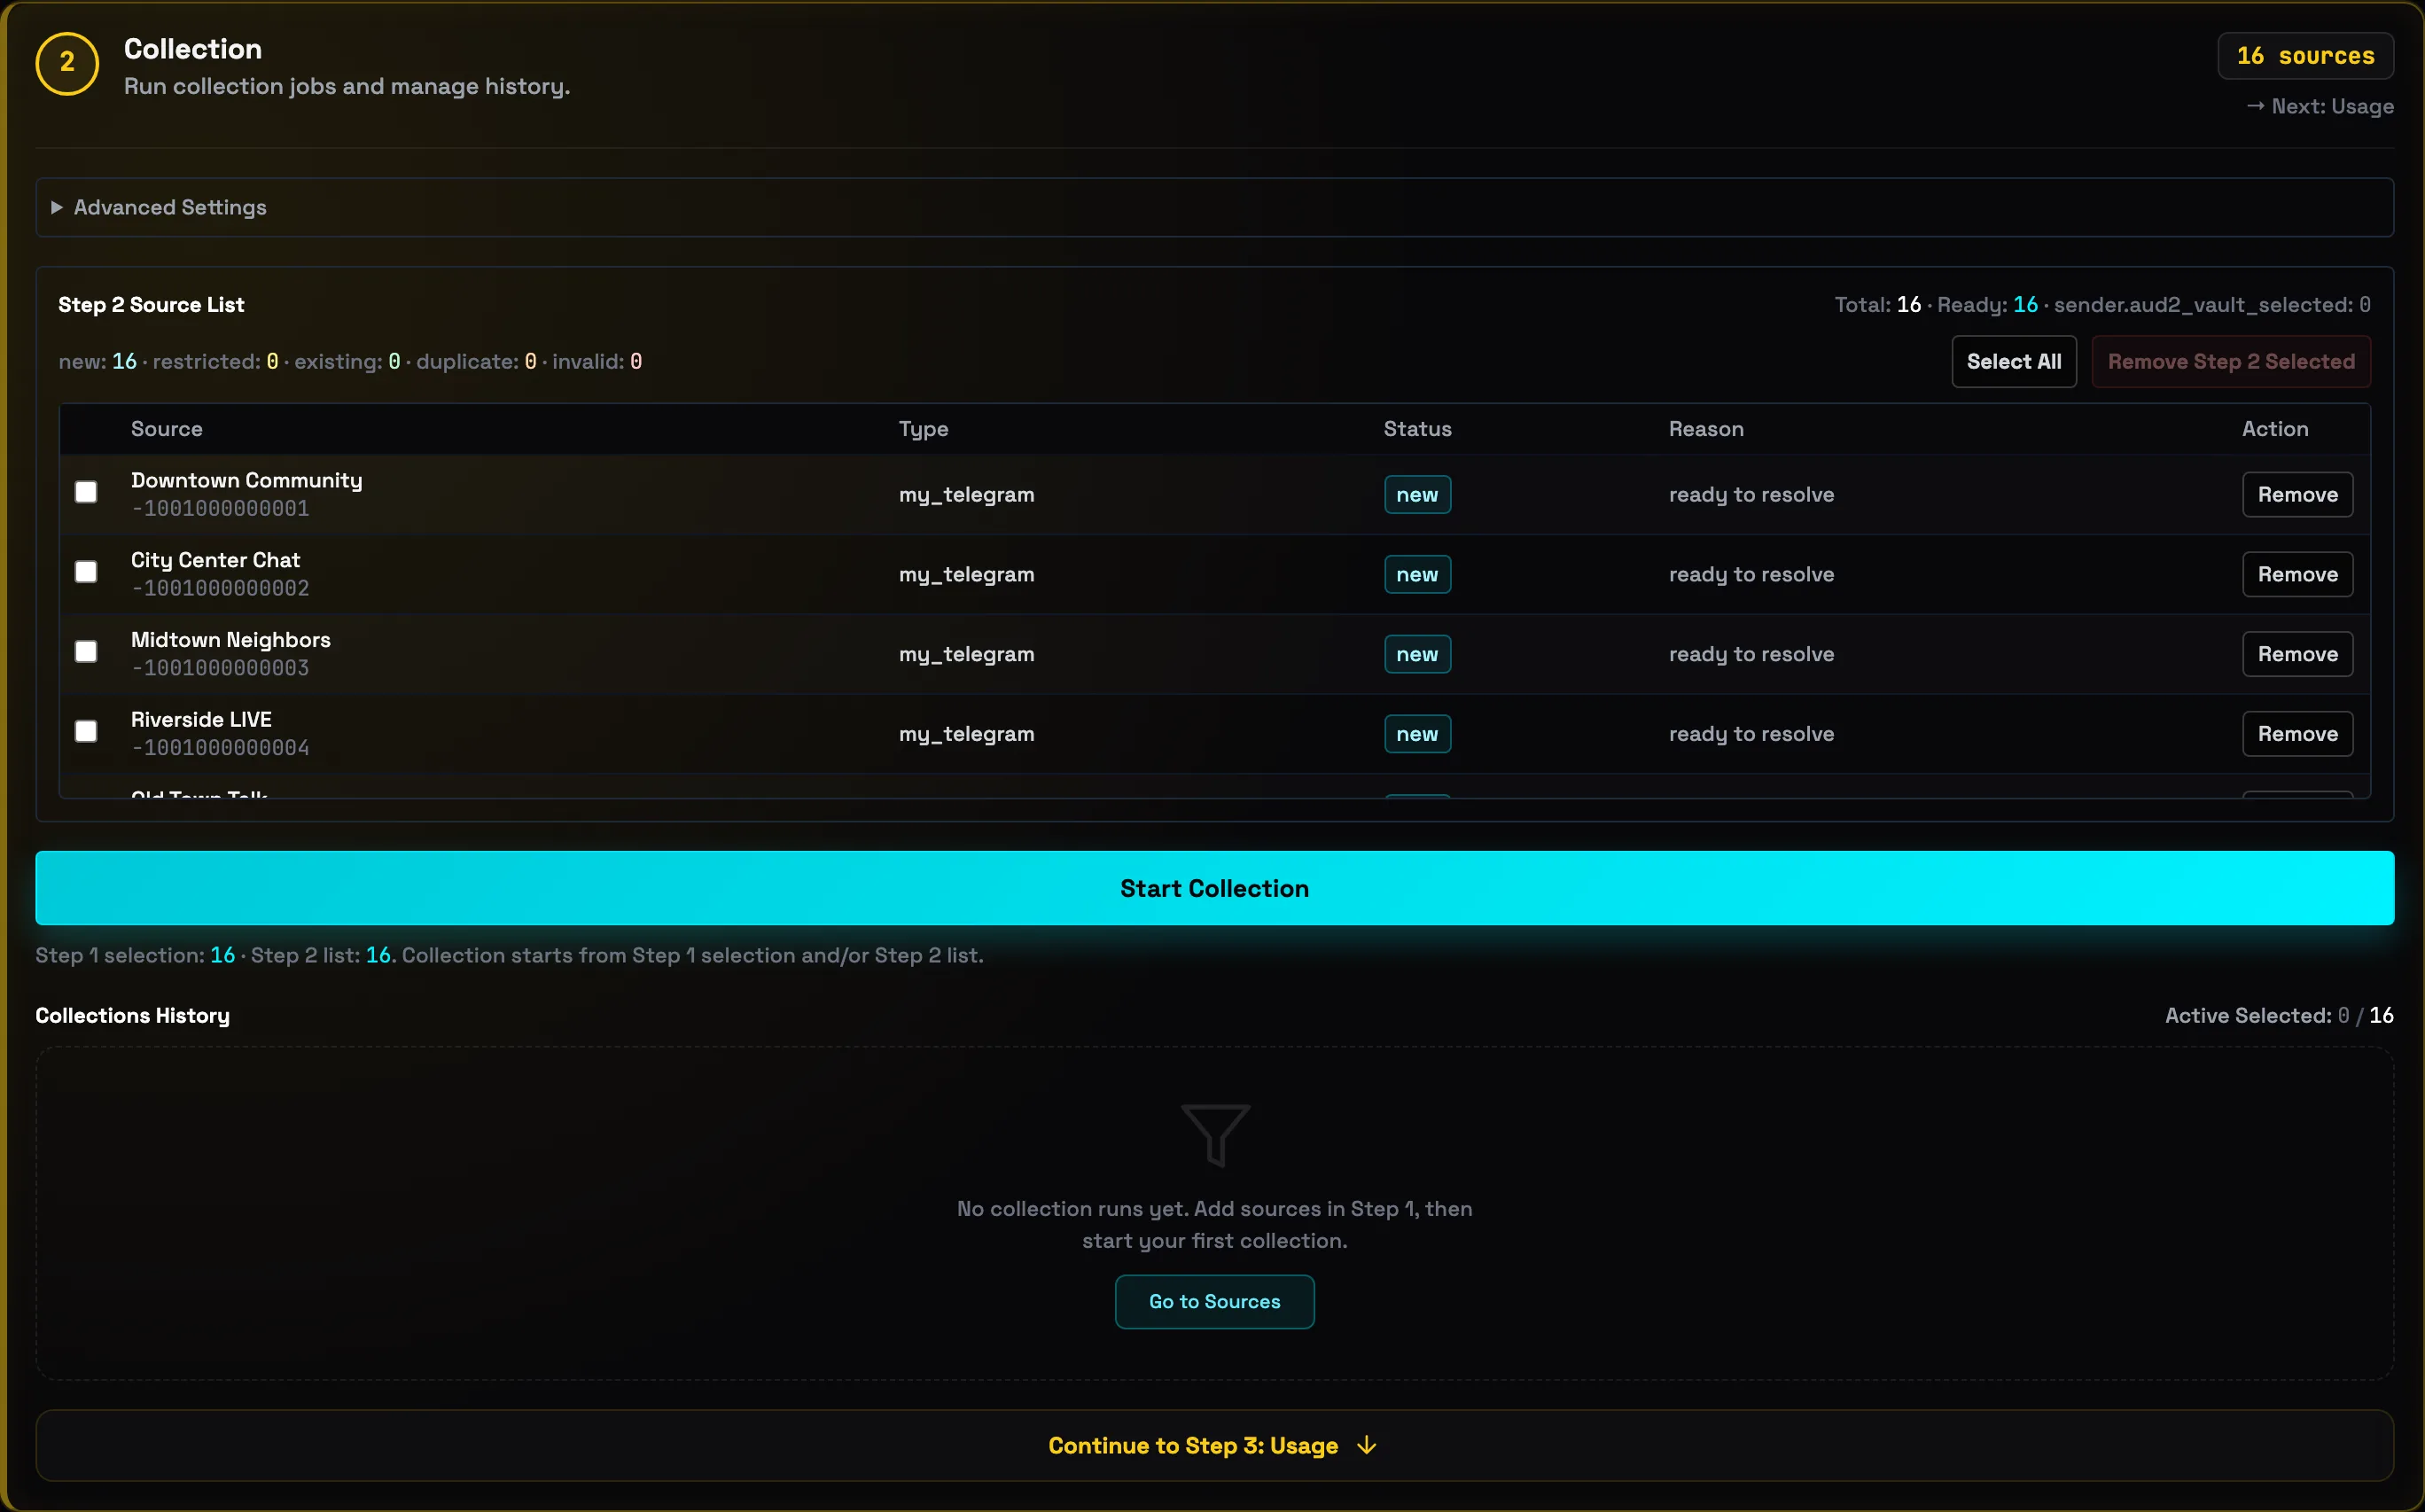
Step 2 · Collection — run the task
On the COLLECTION step you get the Step 2 list of sources with statuses (new · ready to resolve). Click Start collection — the app joins the groups, pulls members and filters out bots, deleted accounts and accounts without a username. Progress and collection history are shown right here. In Advanced settings you choose the collection strategy and filters.
 Run collection
 -
3
Step 3 · Use — where to apply it
From here the finished audience list goes into action two ways: Add to group — invite the collected users (or paste contacts manually), or Load into Sender — pass the list to the Sender for a DM campaign. The Load into Sender button unlocks once collection is finished.
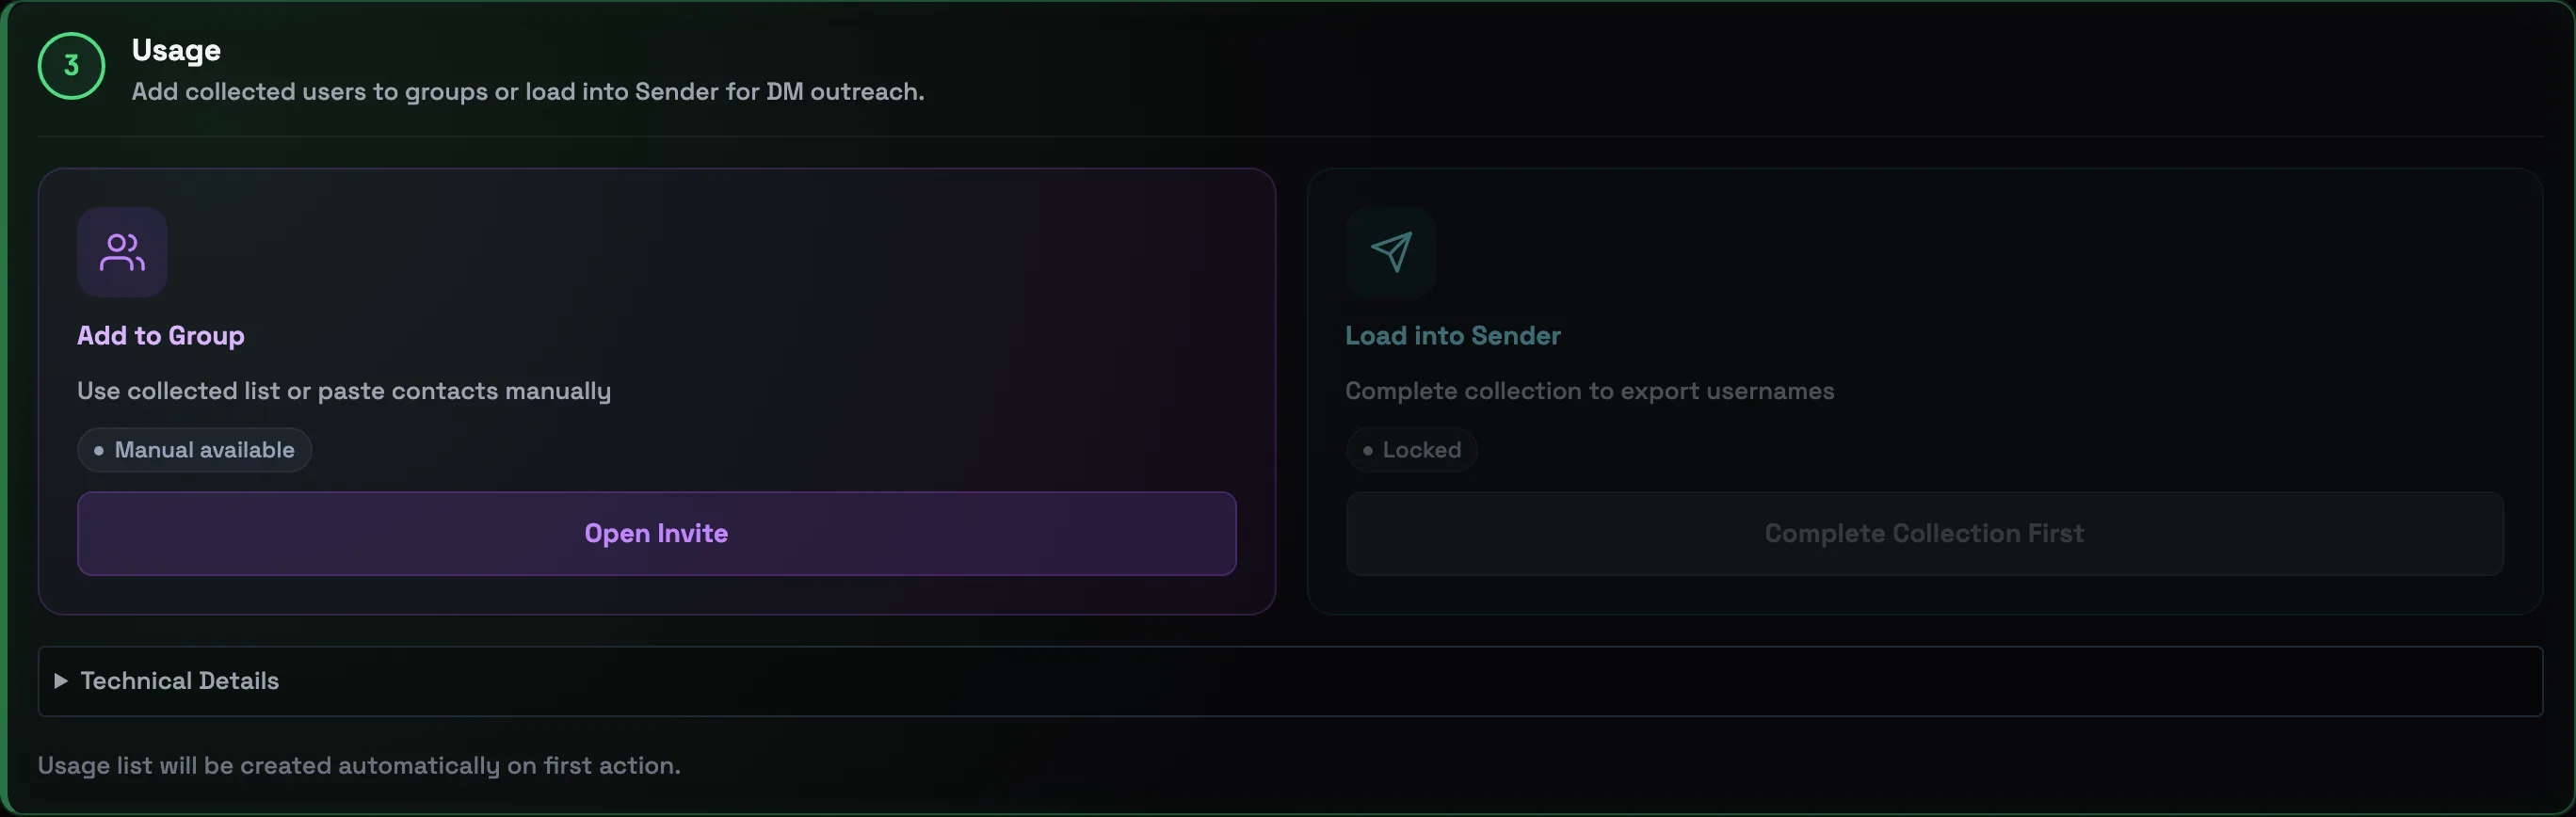 To campaign / invite🛡Careful with invites: mass inviting is the riskiest action for an account. Stick to daily limits and pauses; for a cold base a DM campaign through the Sender is safer.
DATA VAULT — directory of target chats
Vault is a built-in directory of Telegram groups and channels with 2M+ entries. Here you find chats with your audience by categories, search and filters, mark the ones you need — and the account joins them automatically.
-
1
Open the “VAULT” tab
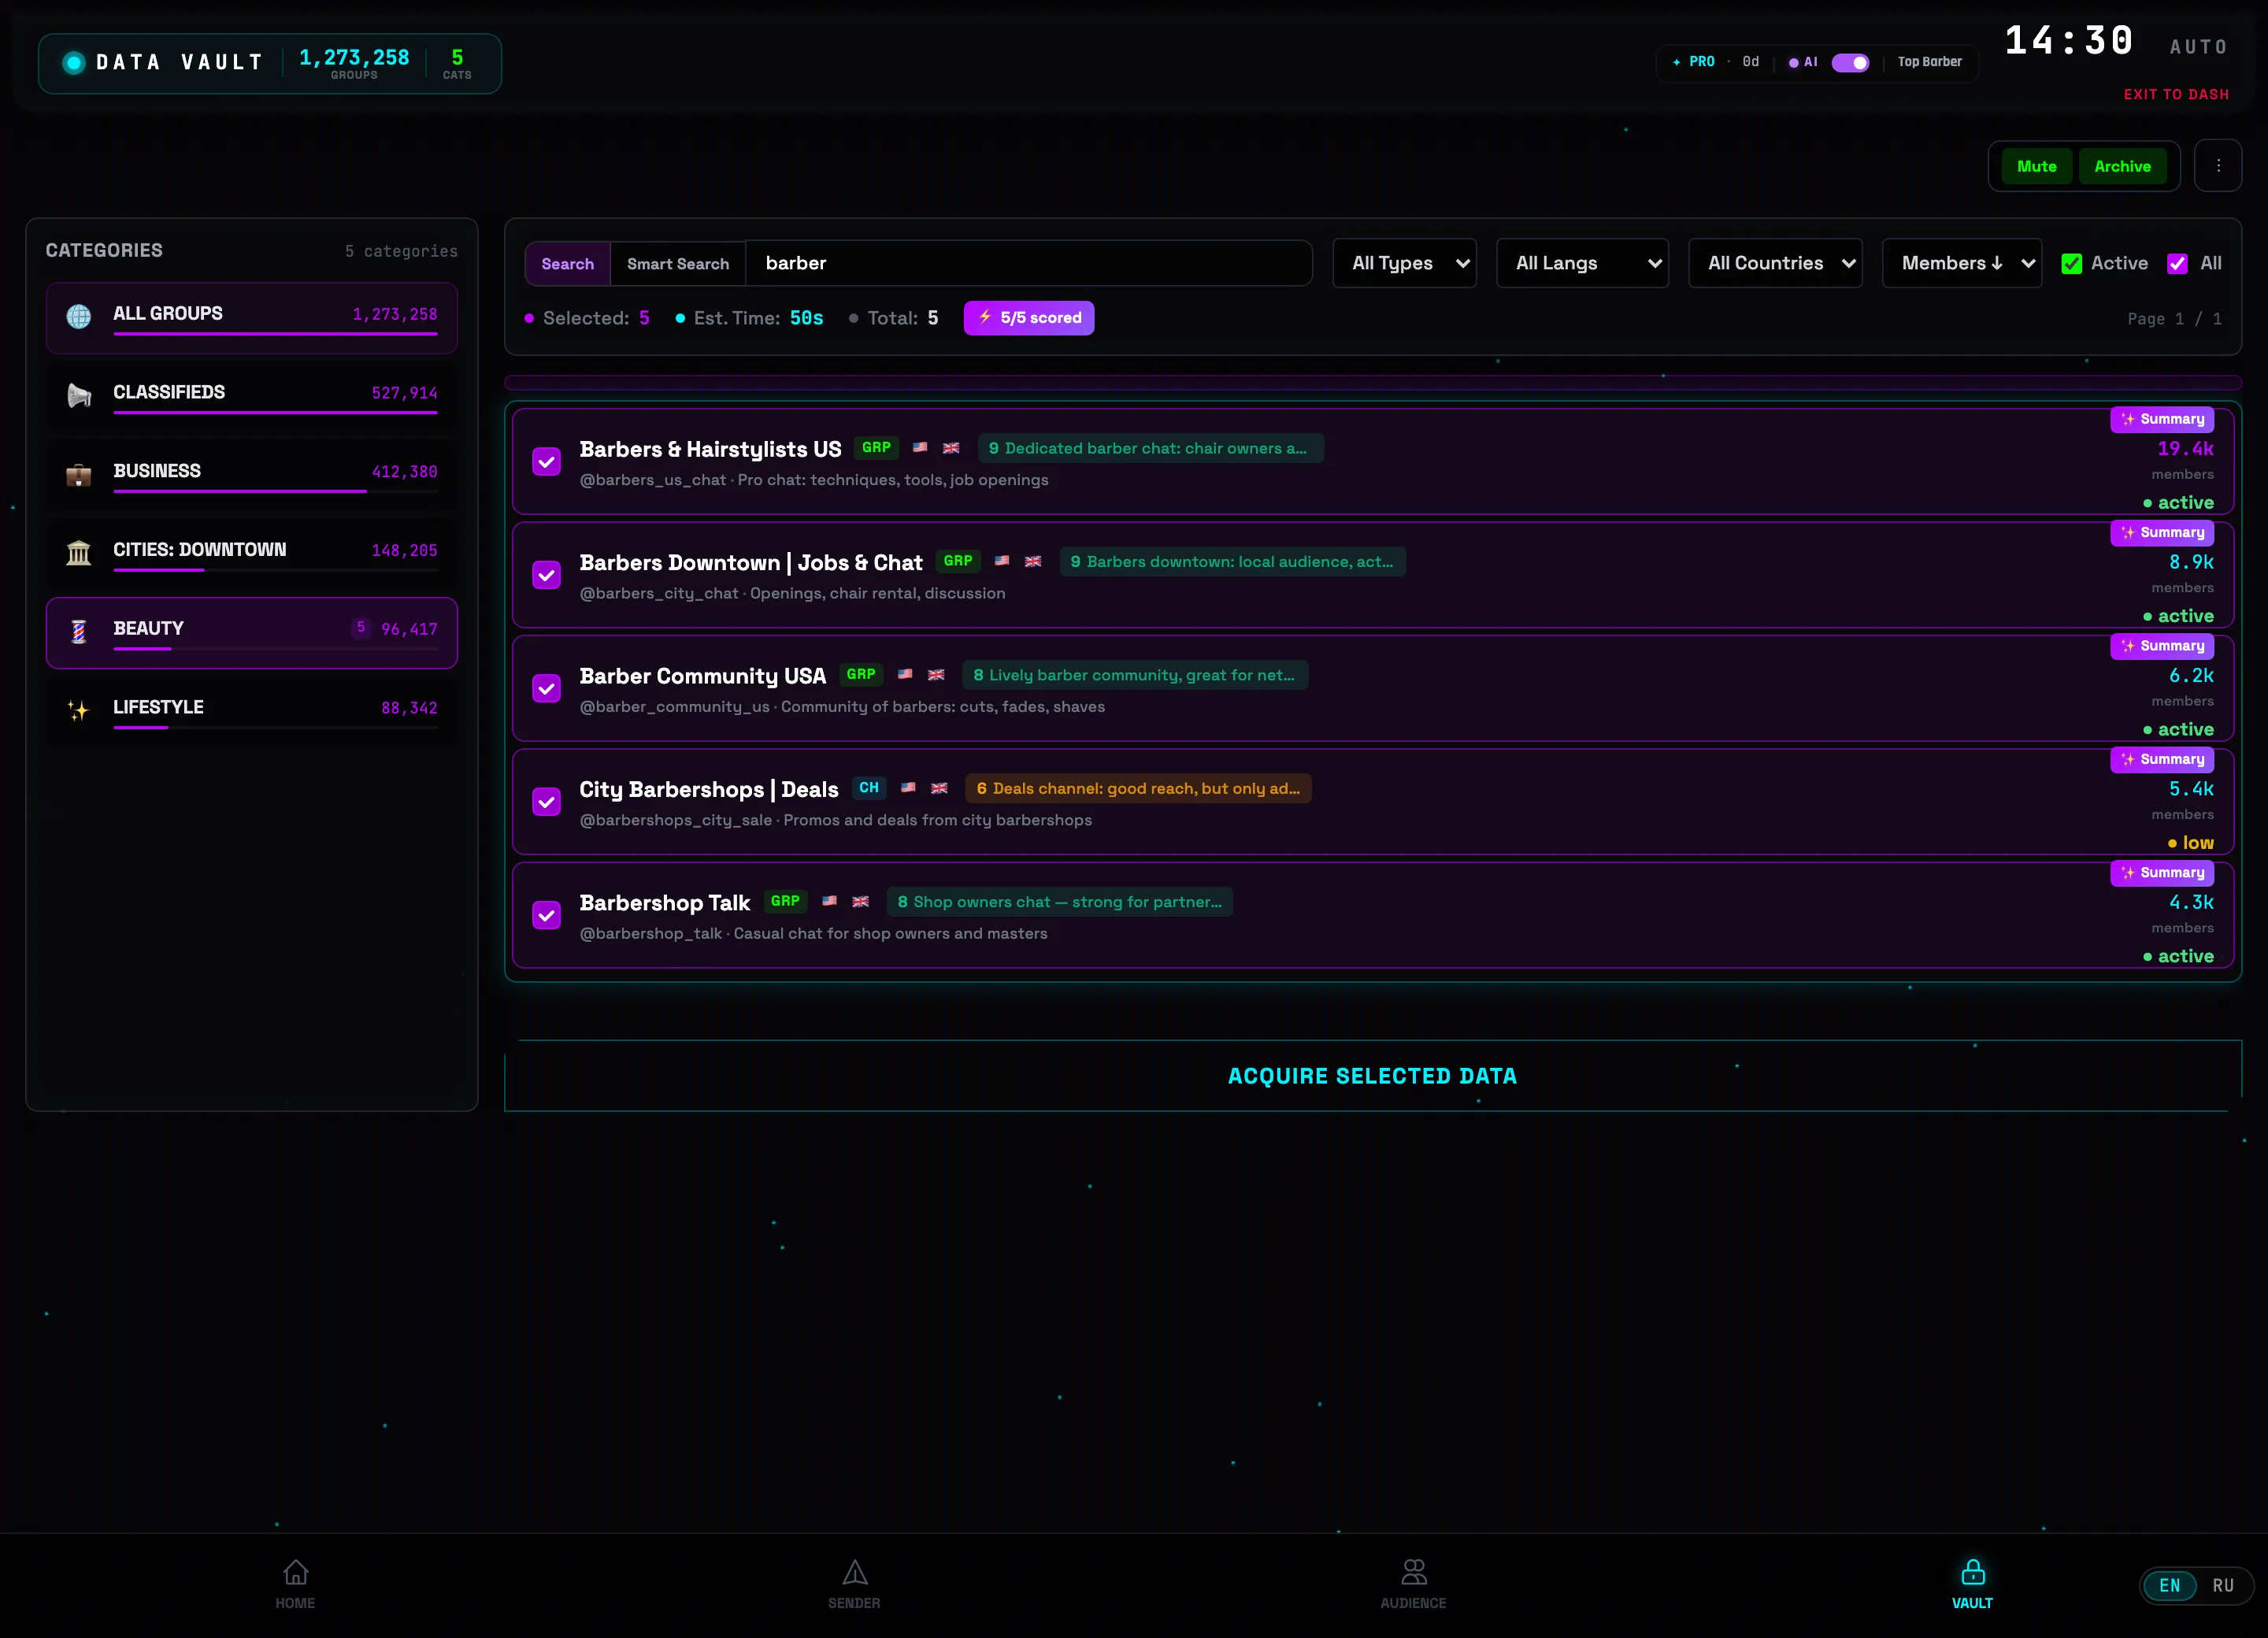
In the bottom navigation tap VAULT. The DATA VAULT header shows the size of the database — the GROUPS and CATEGORIES counters. On the left is the CATEGORIES panel with the number of groups in each, on the right are search and filters. While the query is empty, the directory prompts: “Enter a query to search across 2M+ entries”.
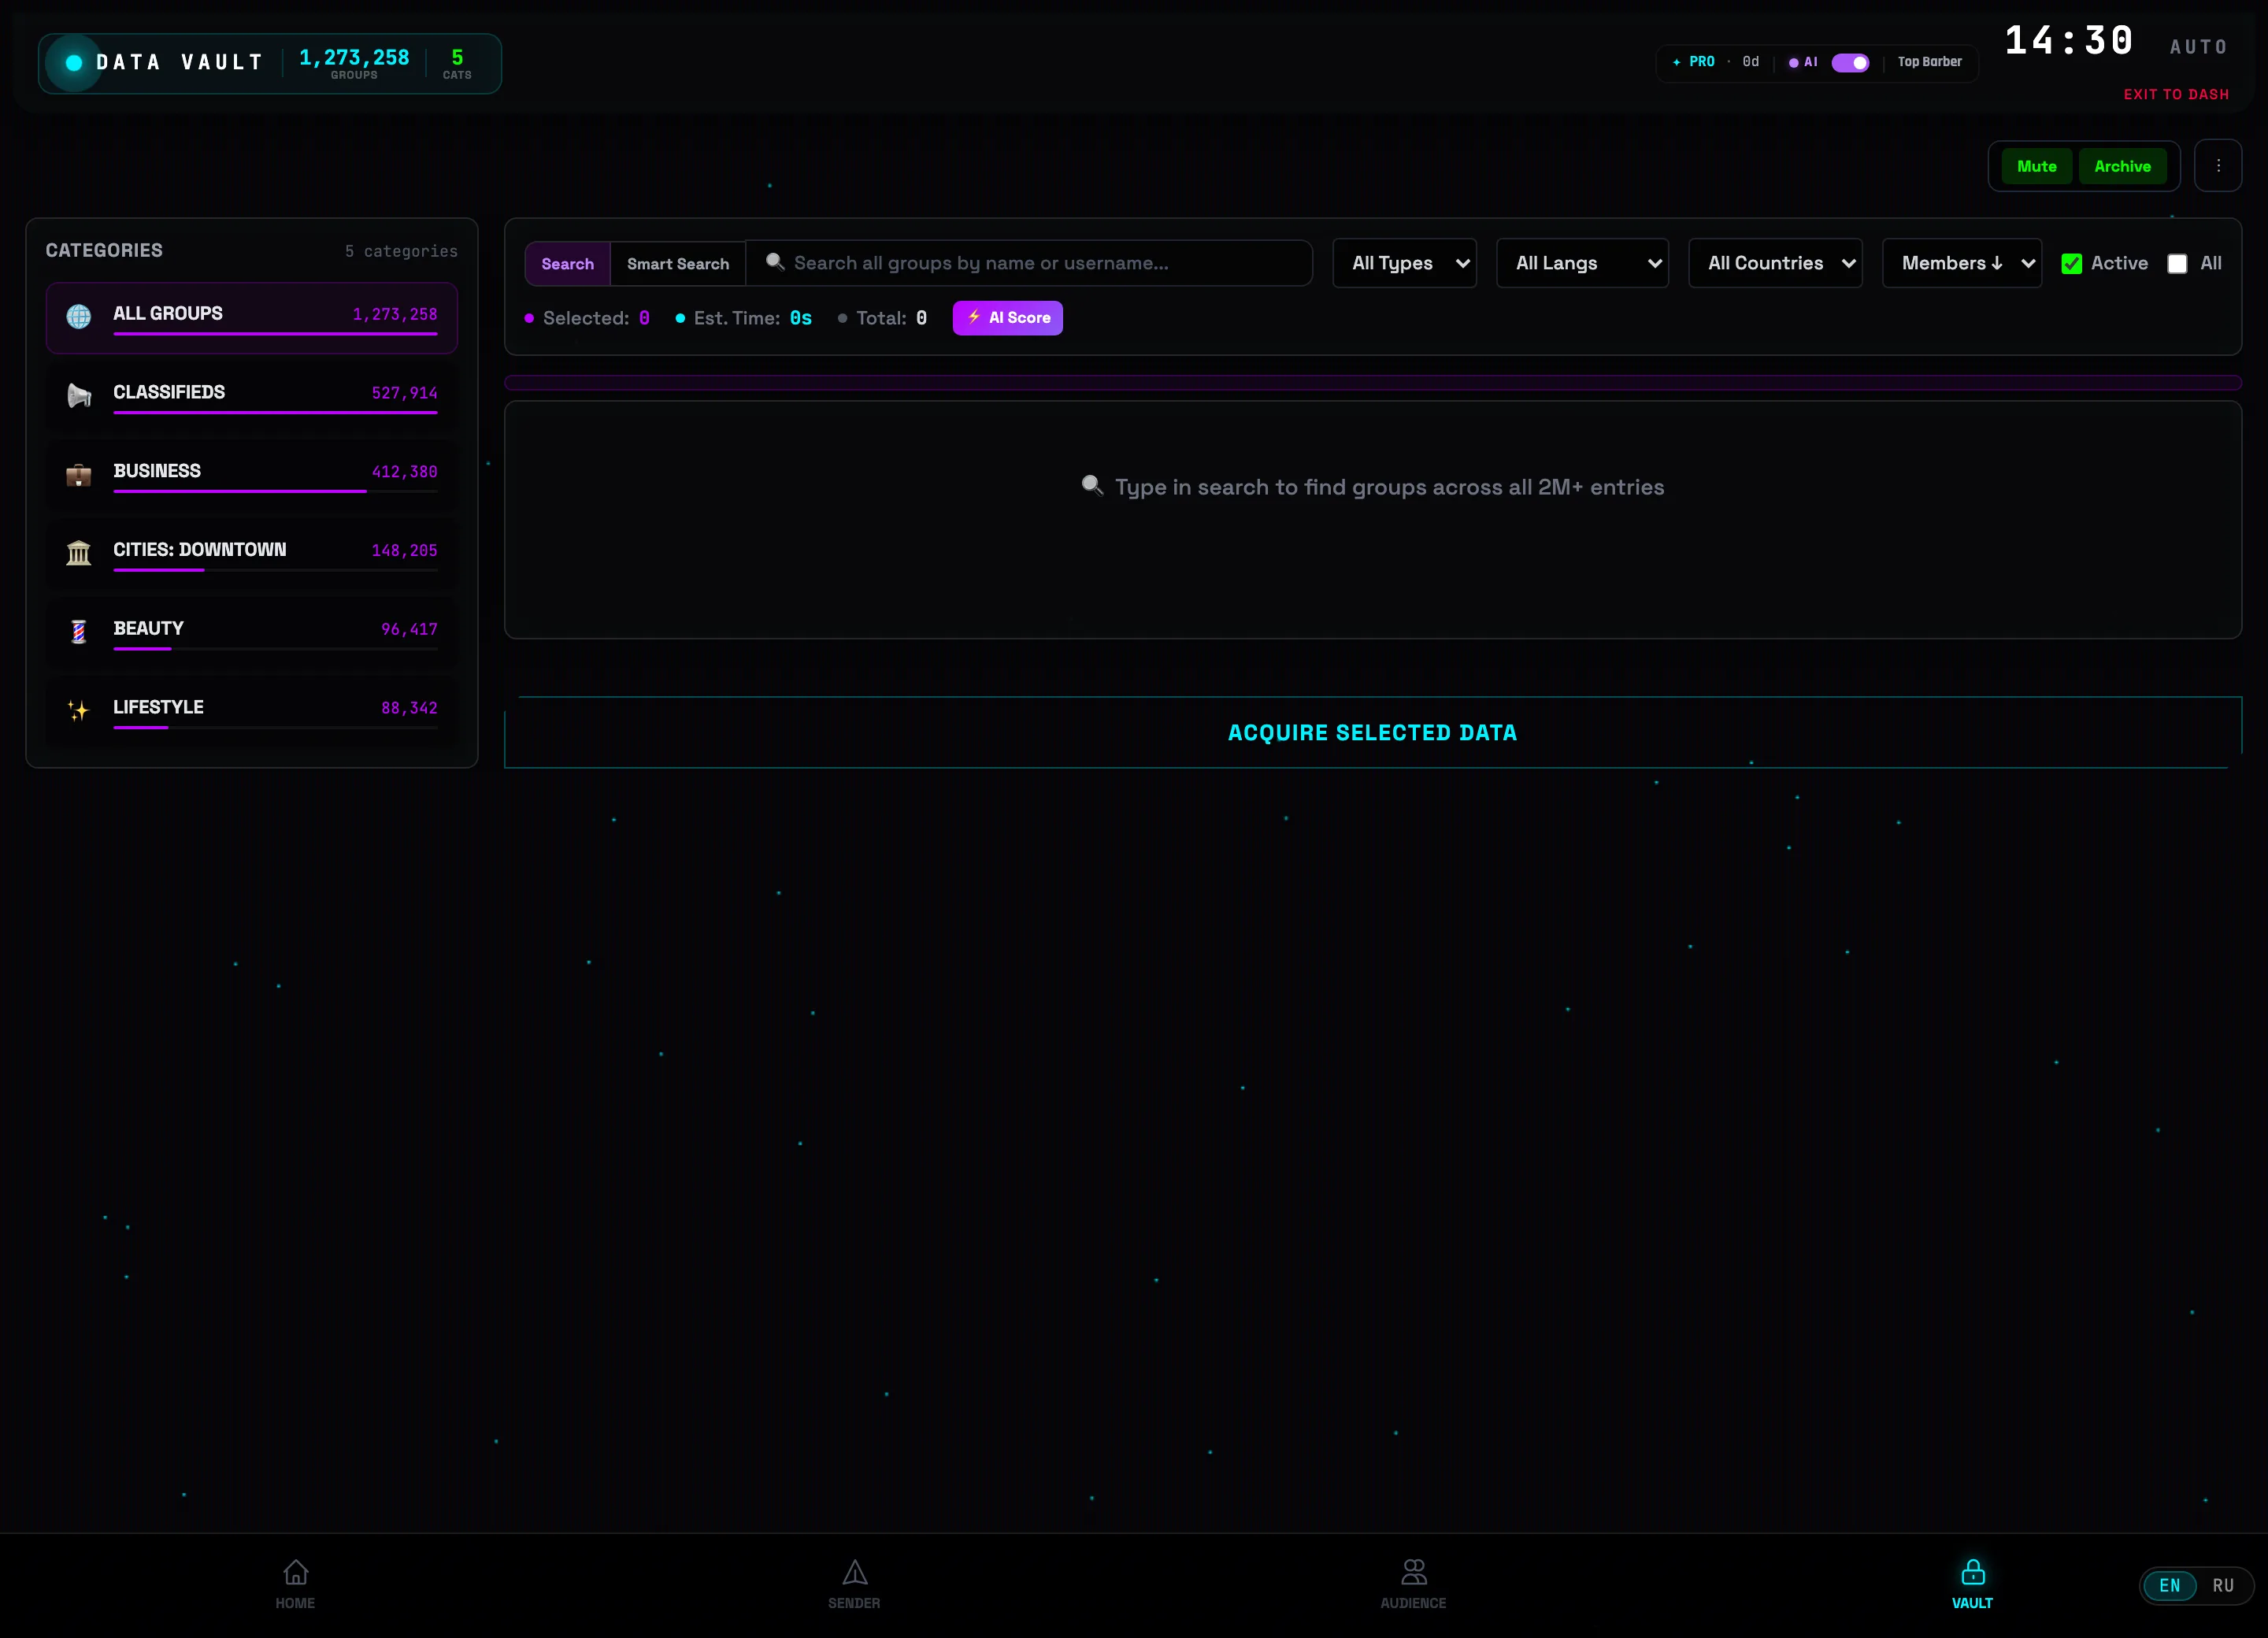 VAULT tabDirectory categories
 -
2
Pick a category
Click a category on the left — for example BEAUTY. The list of its groups loads on the right, sorted by member count. Each row shows the name, @username, description, a type badge GRP (group) or CH (channel), the number of members and the active activity indicator. The ✨ Summary button on a row opens the chat's AI summary.
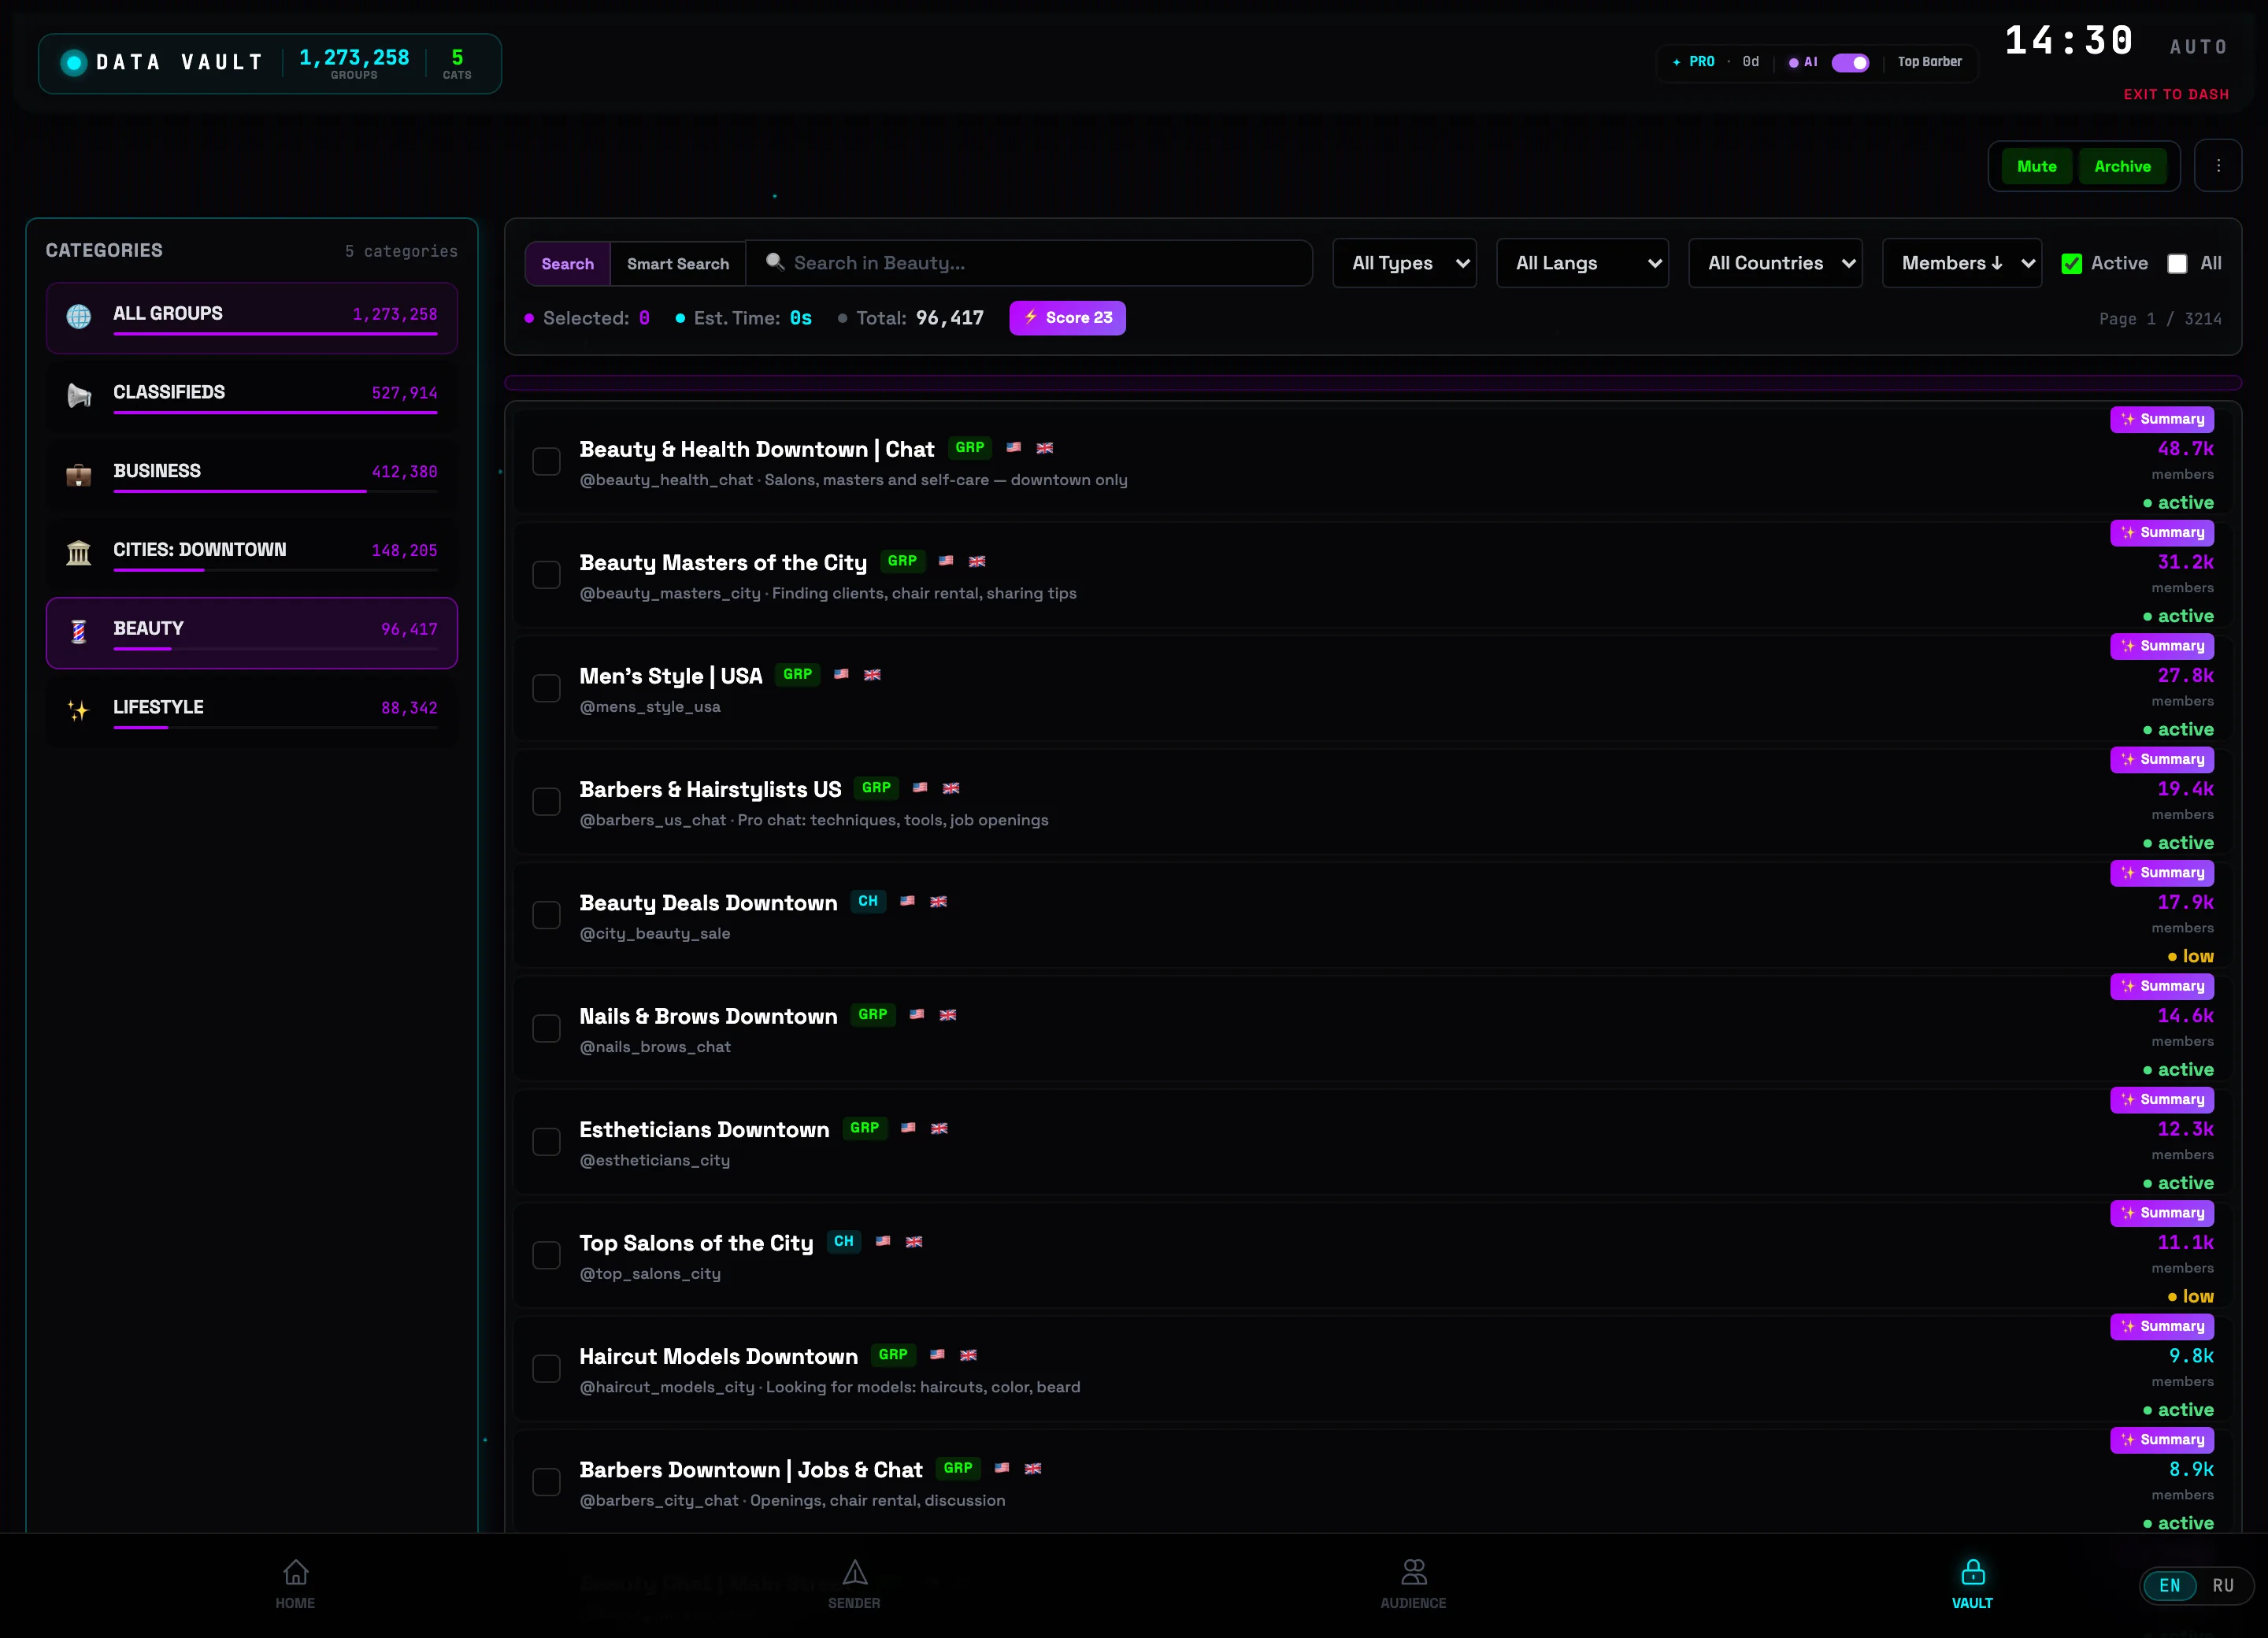 BEAUTY categoryList of groups💡Tip: for broadcasts pick groups (GRP) — in channels (CH) only an admin can post messages.
 -
3
Narrow the results with search and filters
Type a query into the search bar — for example “barber”; you can search by name and @username, and next to it the Search and Smart search modes toggle. To the right are the All types, All languages, All countries filters, the Members ↓ sort and the Active / All checkboxes. The Total: counter in the status bar shows how many groups were found.
 Search barFilters
 -
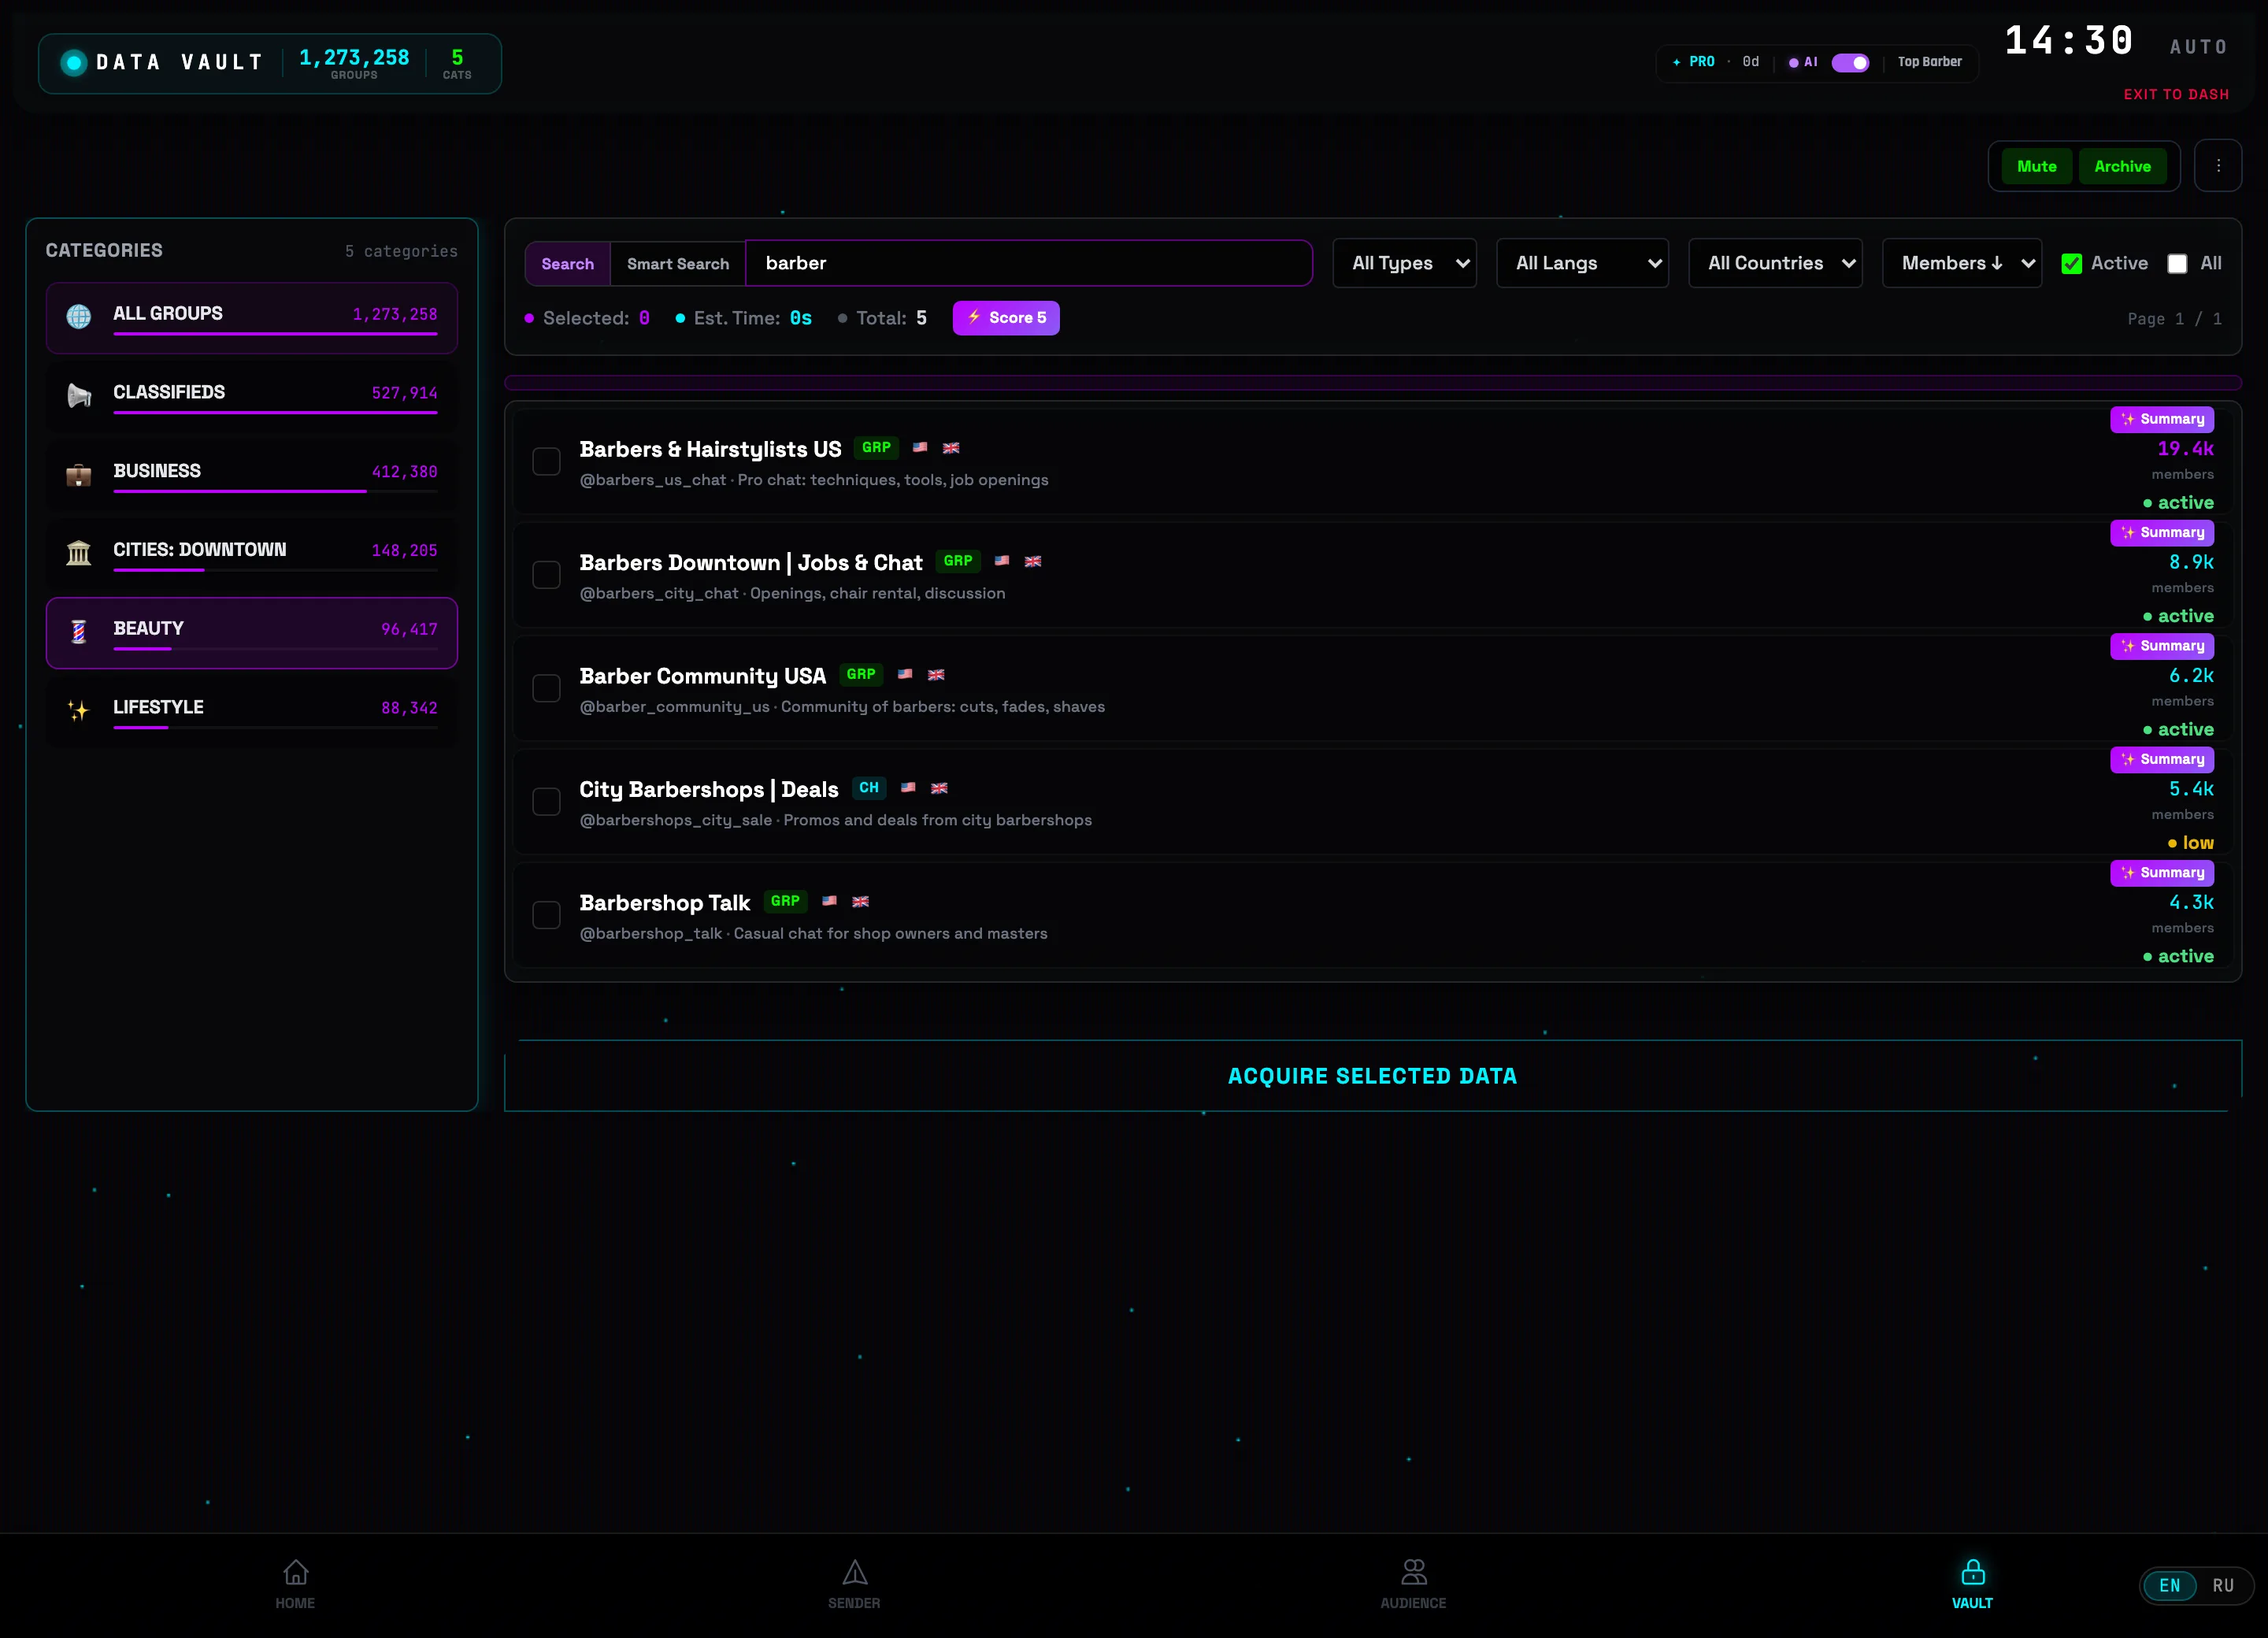
4
Check the groups you need
Click rows or checkboxes — selected groups are highlighted. The Selected: counter in the status bar grows, and Time: shows an estimate of how long it will take to join the marked groups — the same value appears in the confirmation dialog.
 Group checkboxSelection counters
 -
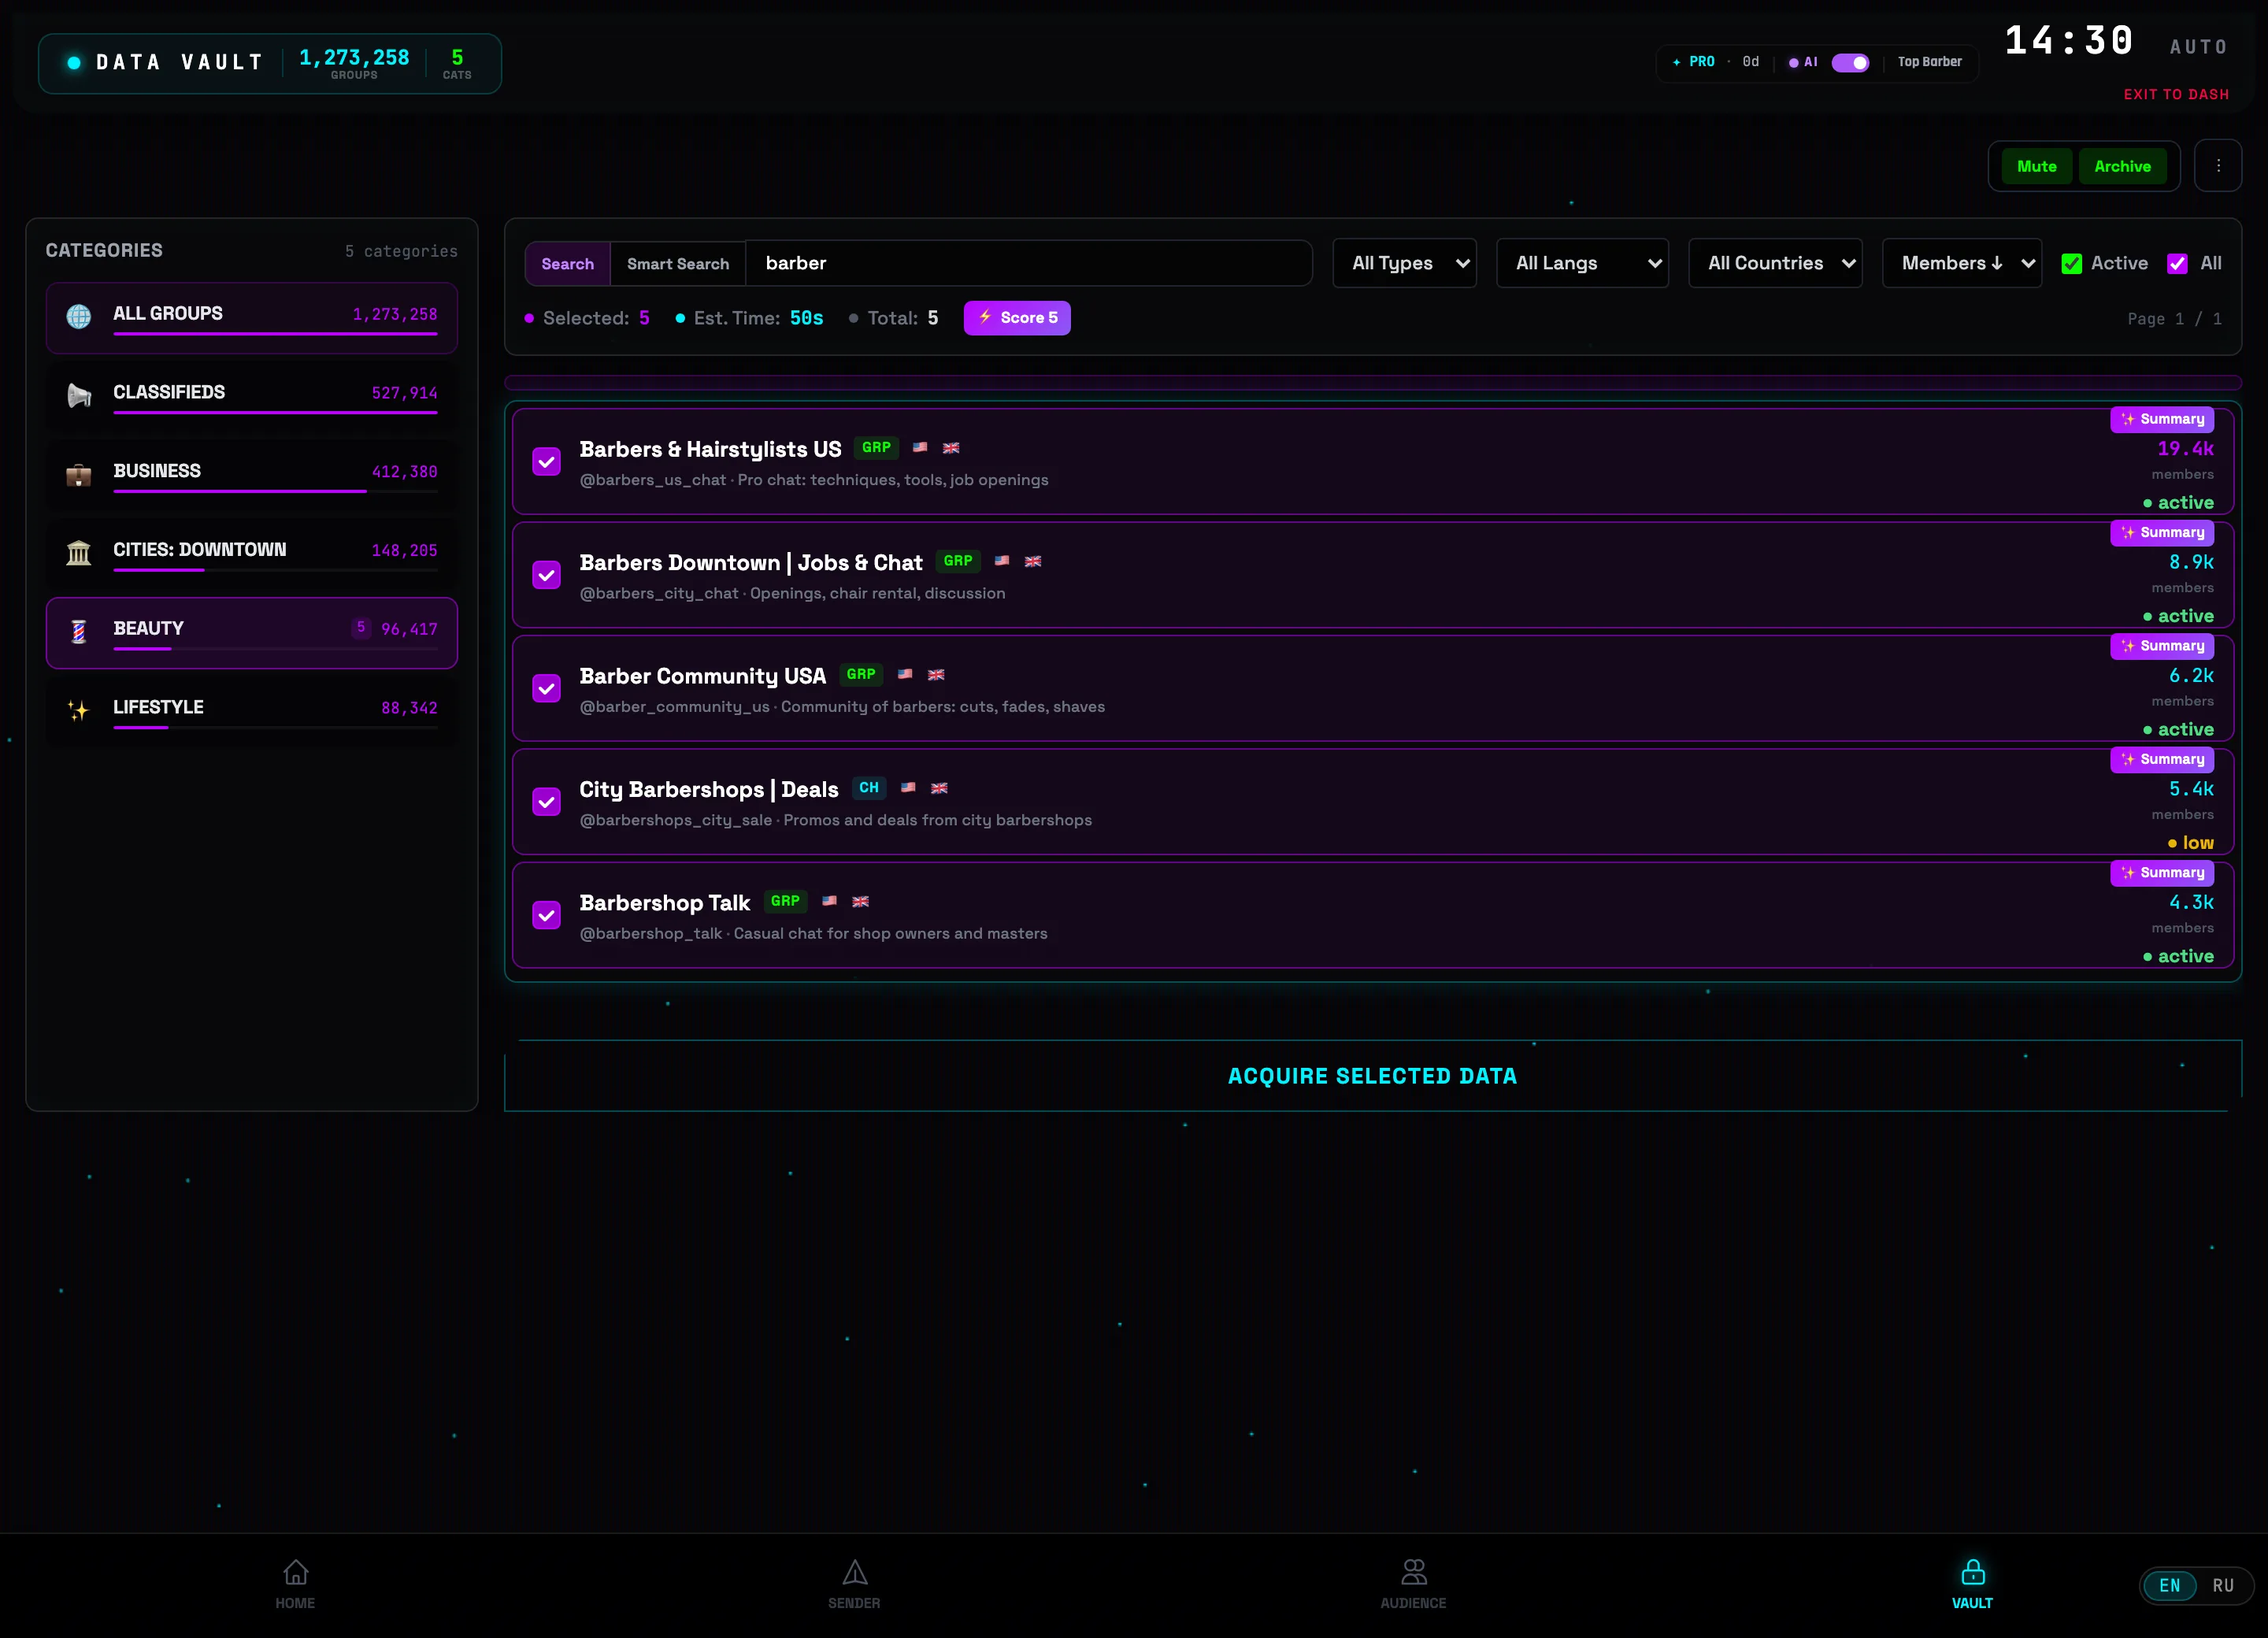
5
Rate your selection with “AI Score”
Press the ⚡ AI Score button in the status bar. In the What are you promoting? field describe your product — for example “a barbershop in St. Petersburg” — and press ⚡ Score 5 groups. Each group gets a rating with a short explanation of how well its audience fits your task, and the button changes to 5/5 scored.
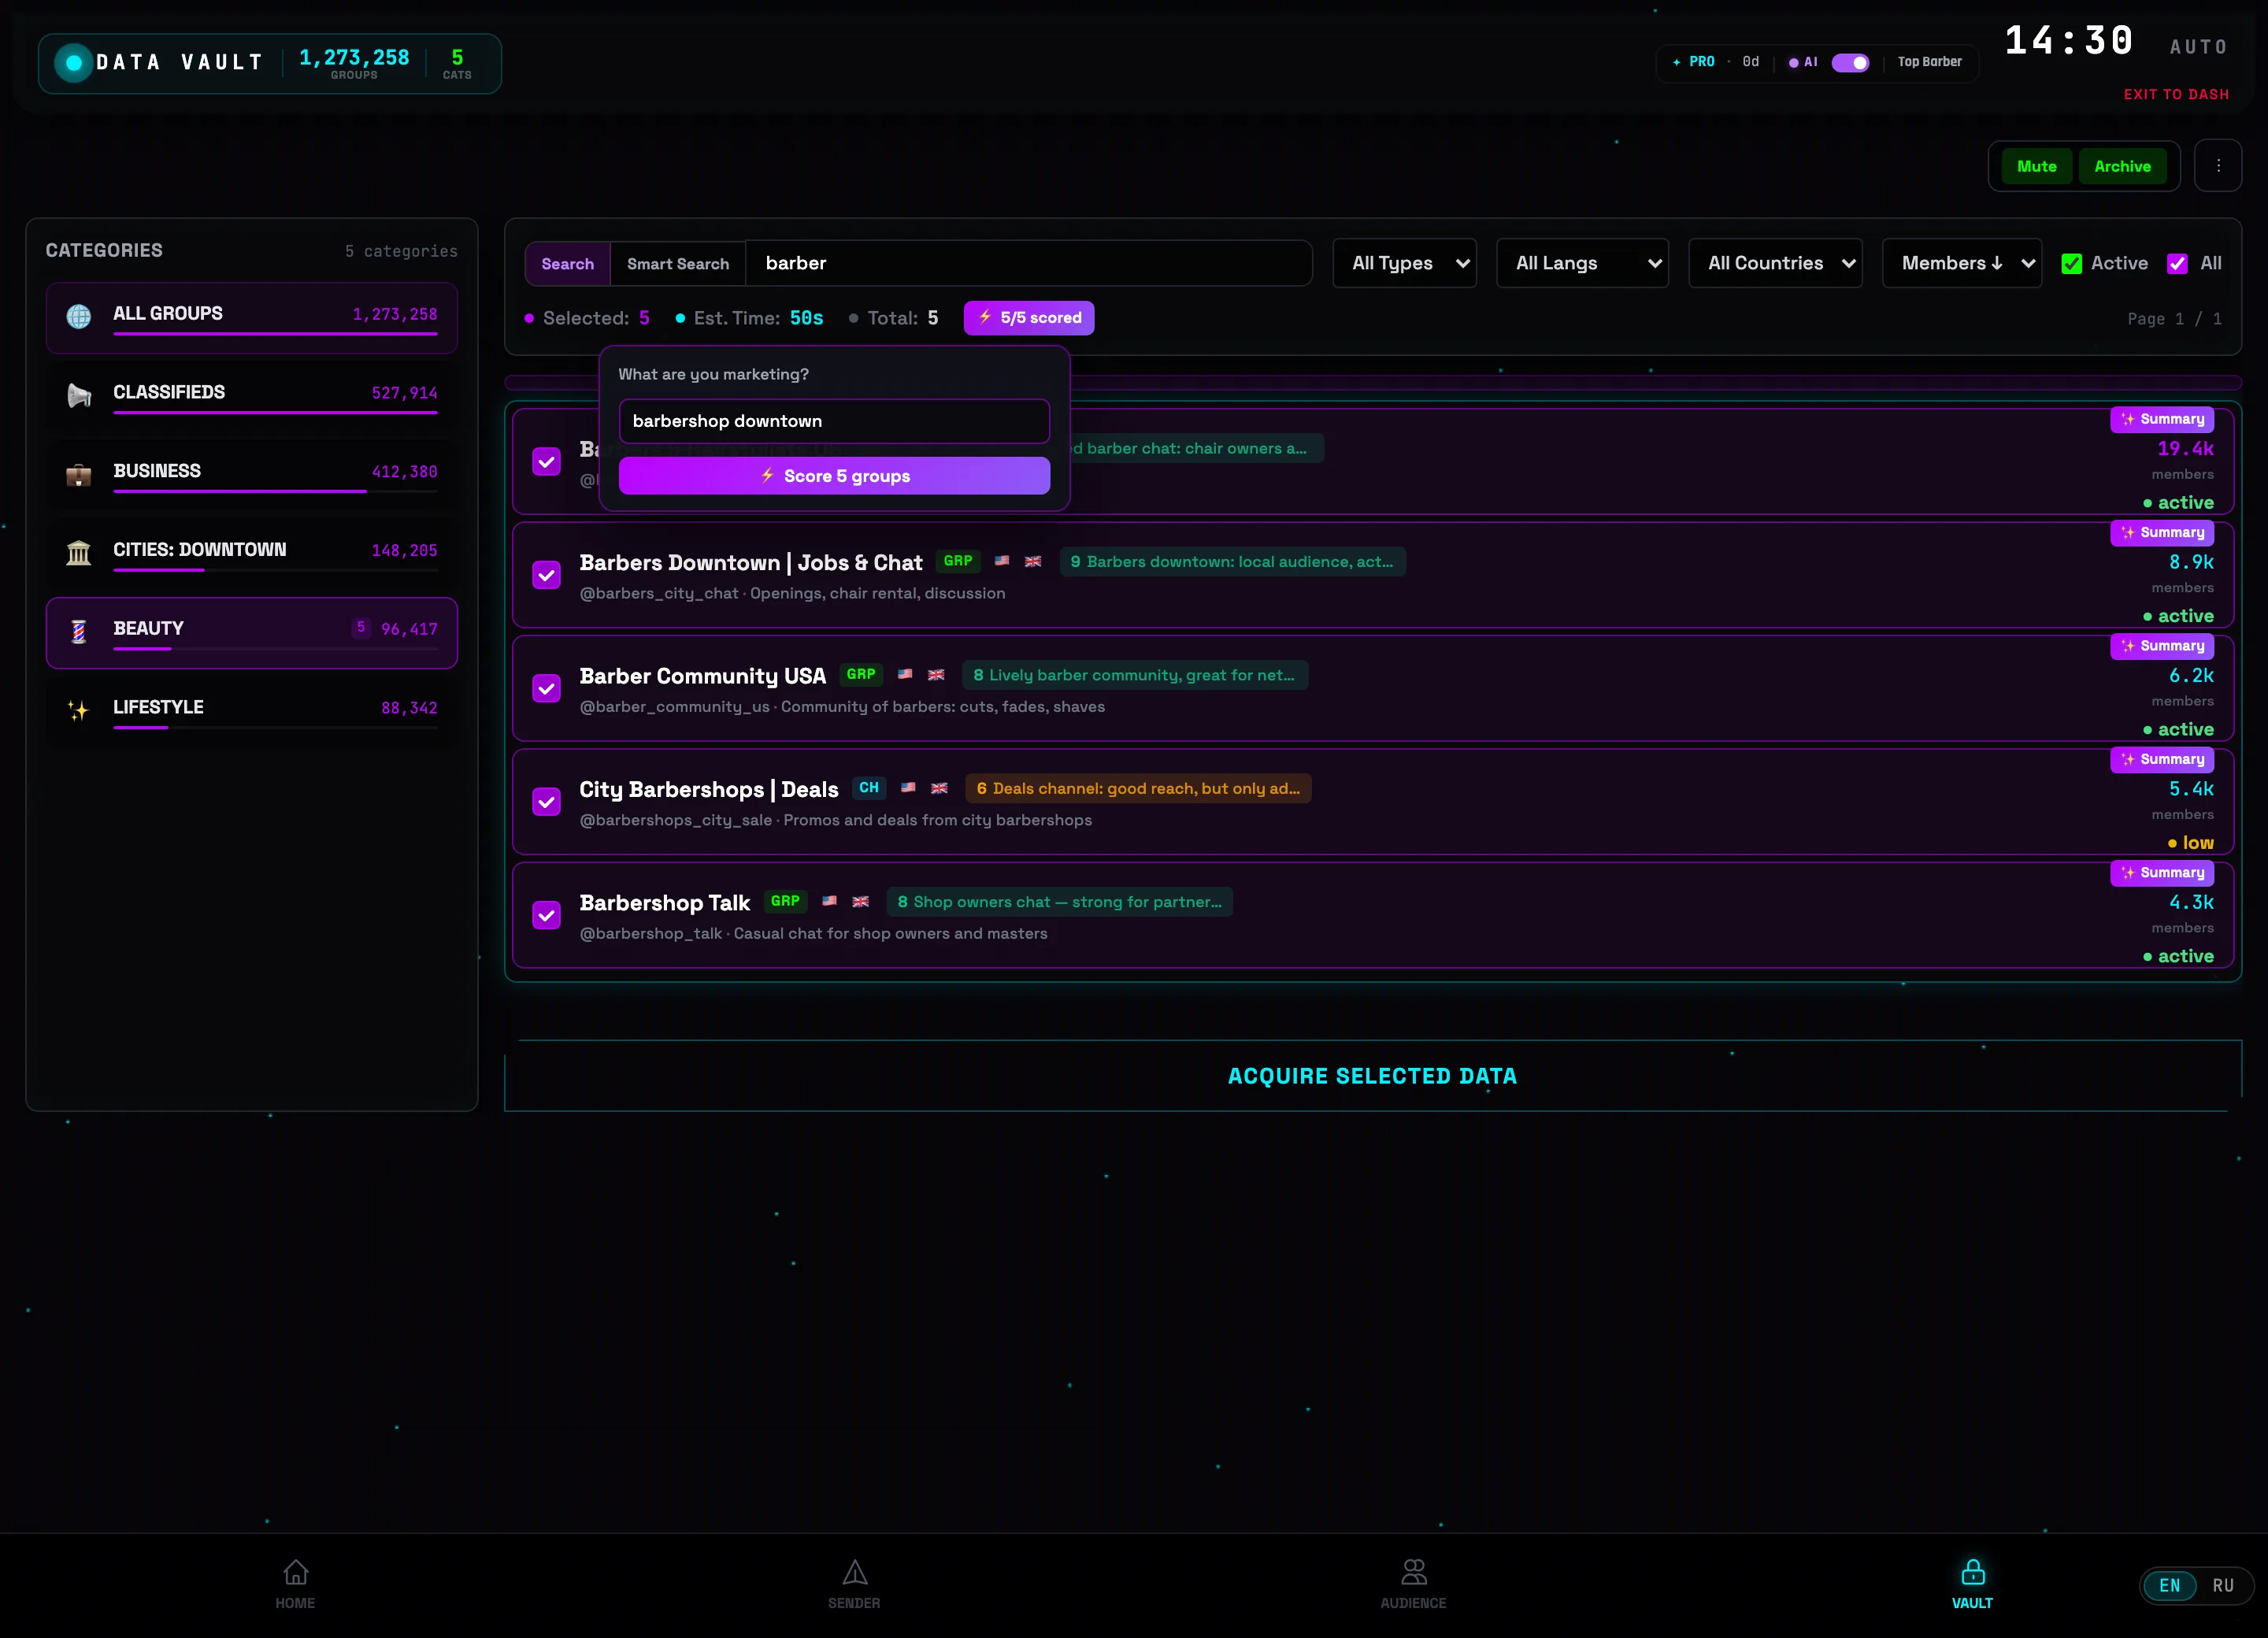 What are you promoting?Group rating💡Tip: the ratings stay as badges right in the list — uncheck weak venues before joining so you don't waste the account's limits.
 -
6
Press “ACQUIRE SELECTED”
In the top right check the Mute and Archive toggles (on by default): new chats are added without notifications and go straight to the Telegram archive, keeping your chat list clean. Then press ACQUIRE SELECTED at the bottom and confirm — the account queues the marked groups and starts joining, and the “Acquisition started” notification confirms the launch.
 Acquire selectedMute / Archive⚠️Important: joining happens in a queue with pauses — use the Time: estimate as a guide and don't launch hundreds of joins at once from a fresh account.
SETTINGS — tailor TG:ON to your needs
Time zone, send speed, AI provider, language, mobile access and backup — the settings worth checking before your first broadcast and when moving to another computer.
-
1
Click the clock in the header
The large clock in the top-right corner is the time zone setting. Next to it is the AUTO label — for now the zone is detected from your system. Click the clock to pick your own.
 Clock → time zone
 -
2
Pick your time zone
The Select time zone window holds a list of cities, each showing its current time. Keep Auto (browser) or click your city, for example Moscow.
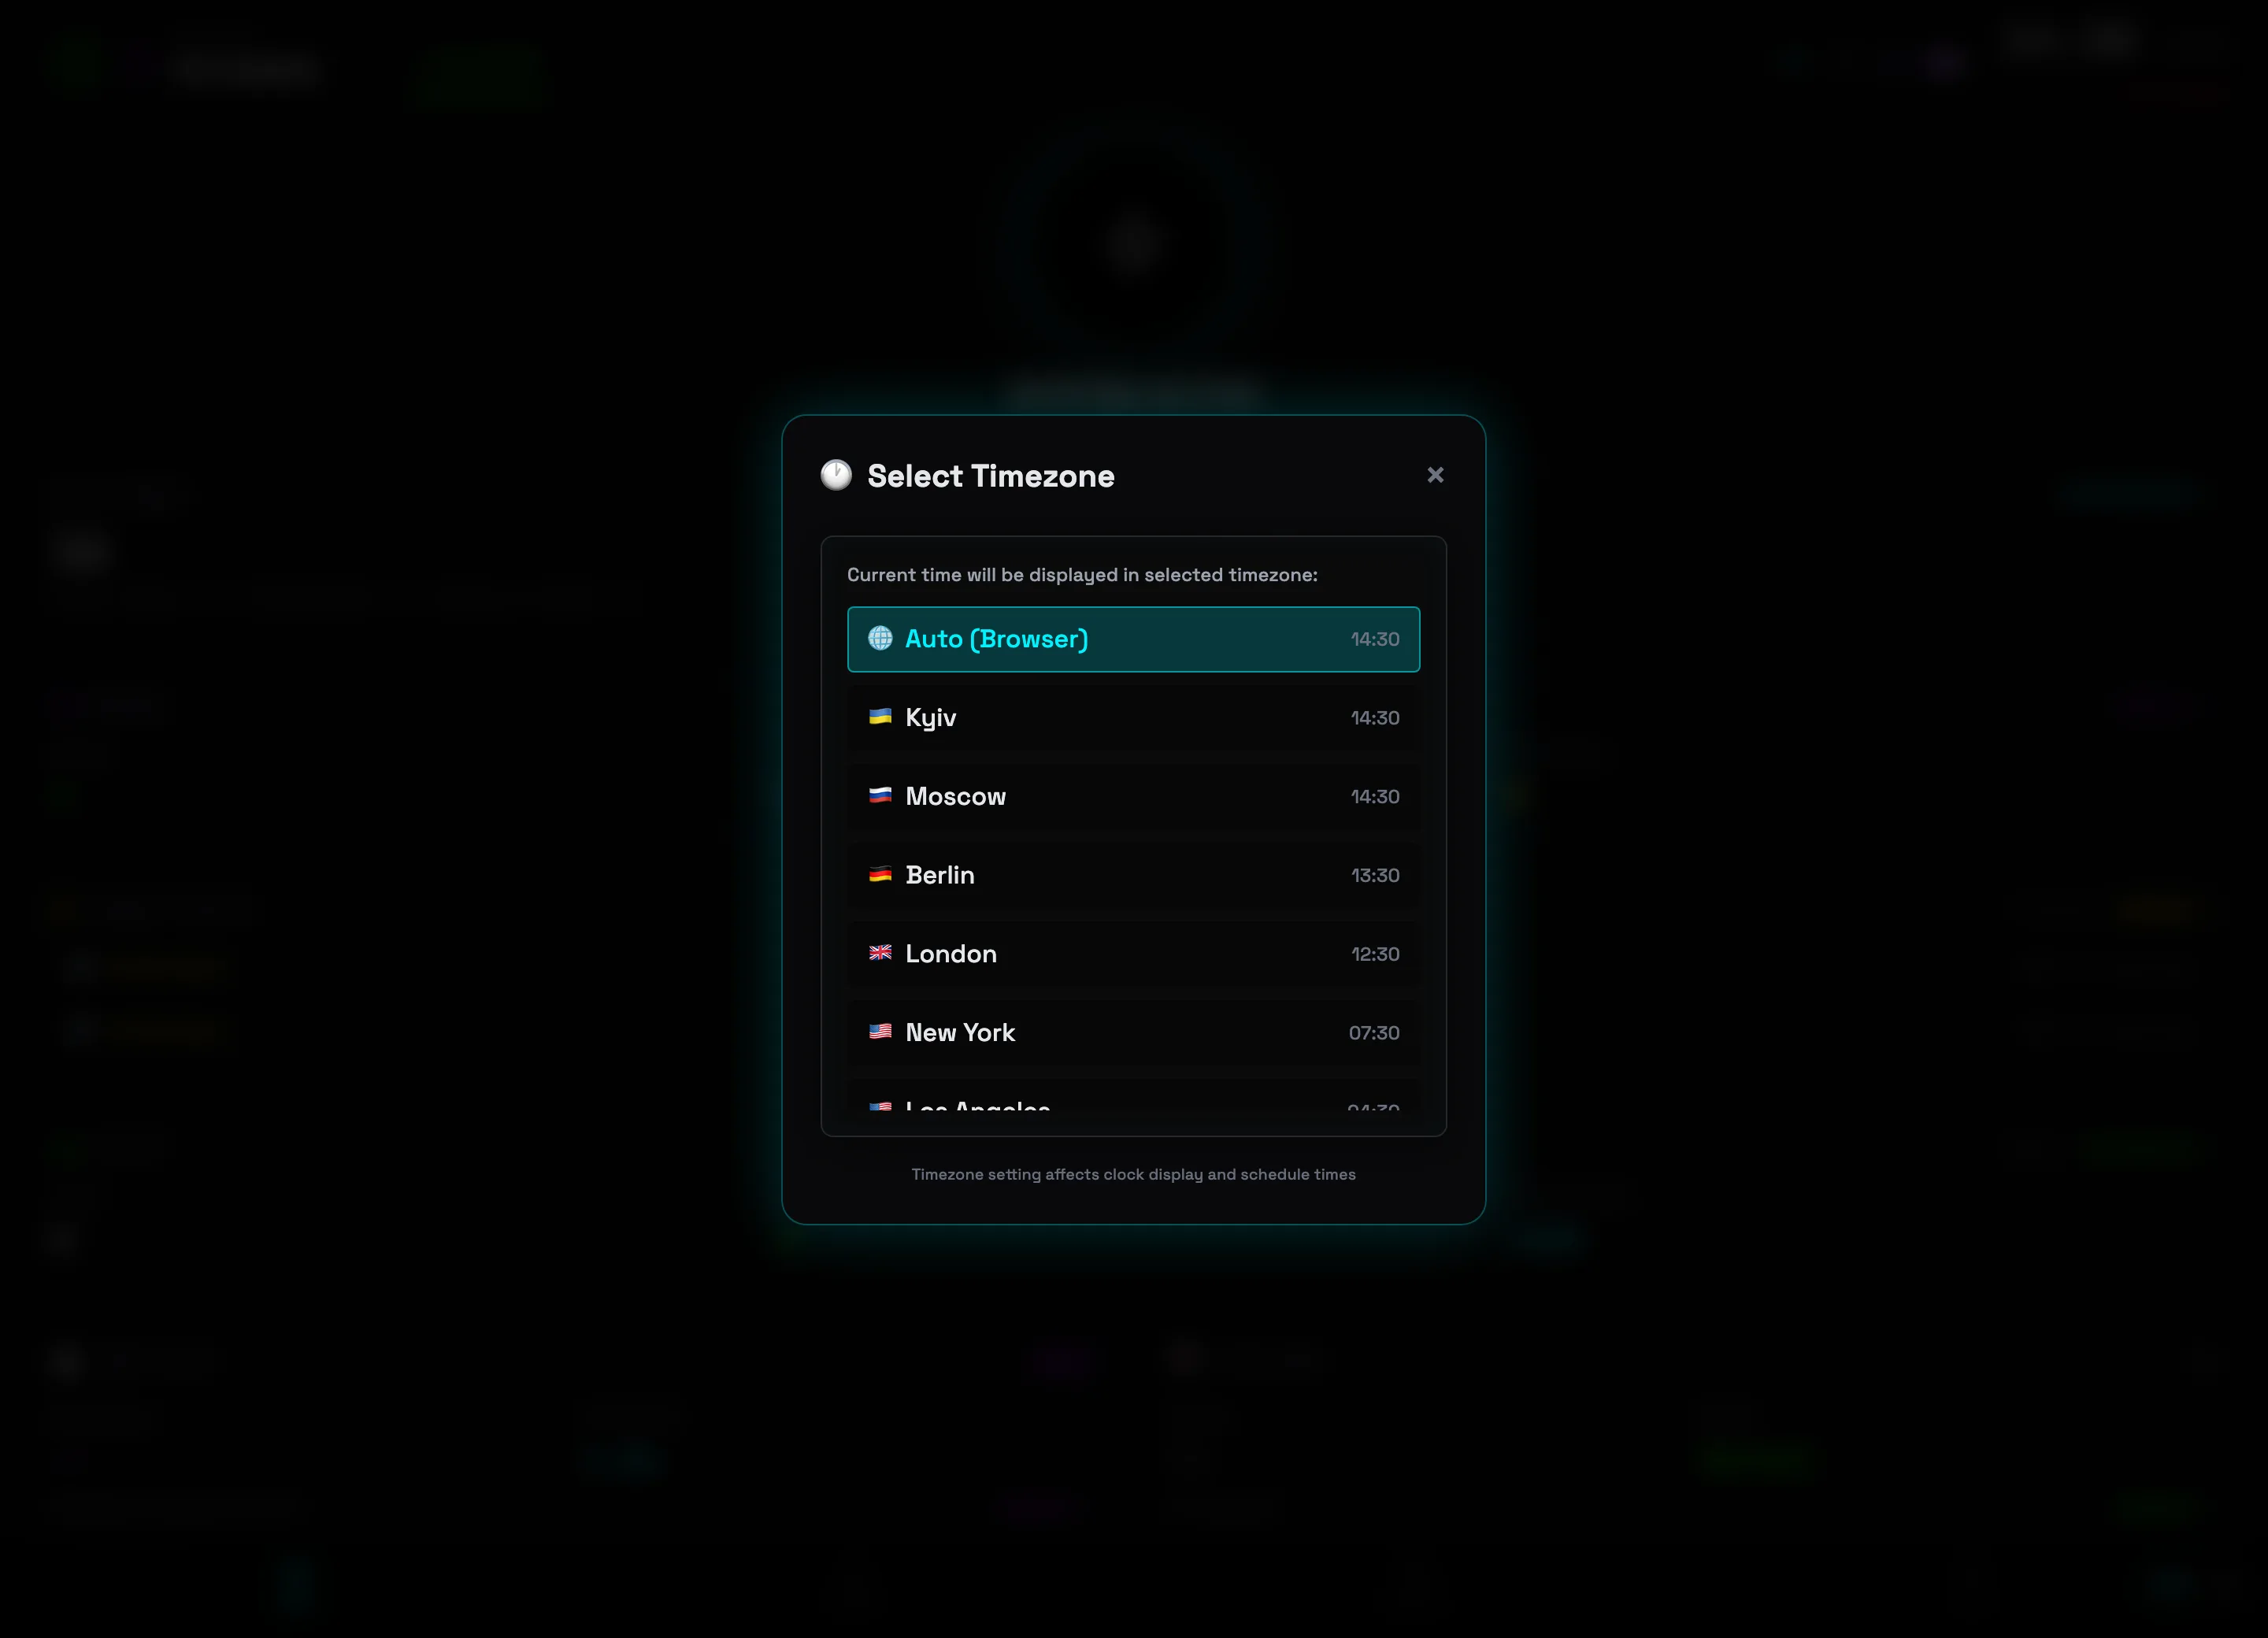 Moscow — your zone💡Tip: the time zone affects the clock and schedule times — a broadcast set for “19:00” goes out at 19:00 in the zone you chose.
 -
3
Set the send speed
On the HOME tab find the SMART DELAYS widget and click MANAGE →. The SEND SPEED slider sets the pause between messages: from 2s (fast) to 60s (safe). Below it is the DELAY MODES table with ready-made ranges.
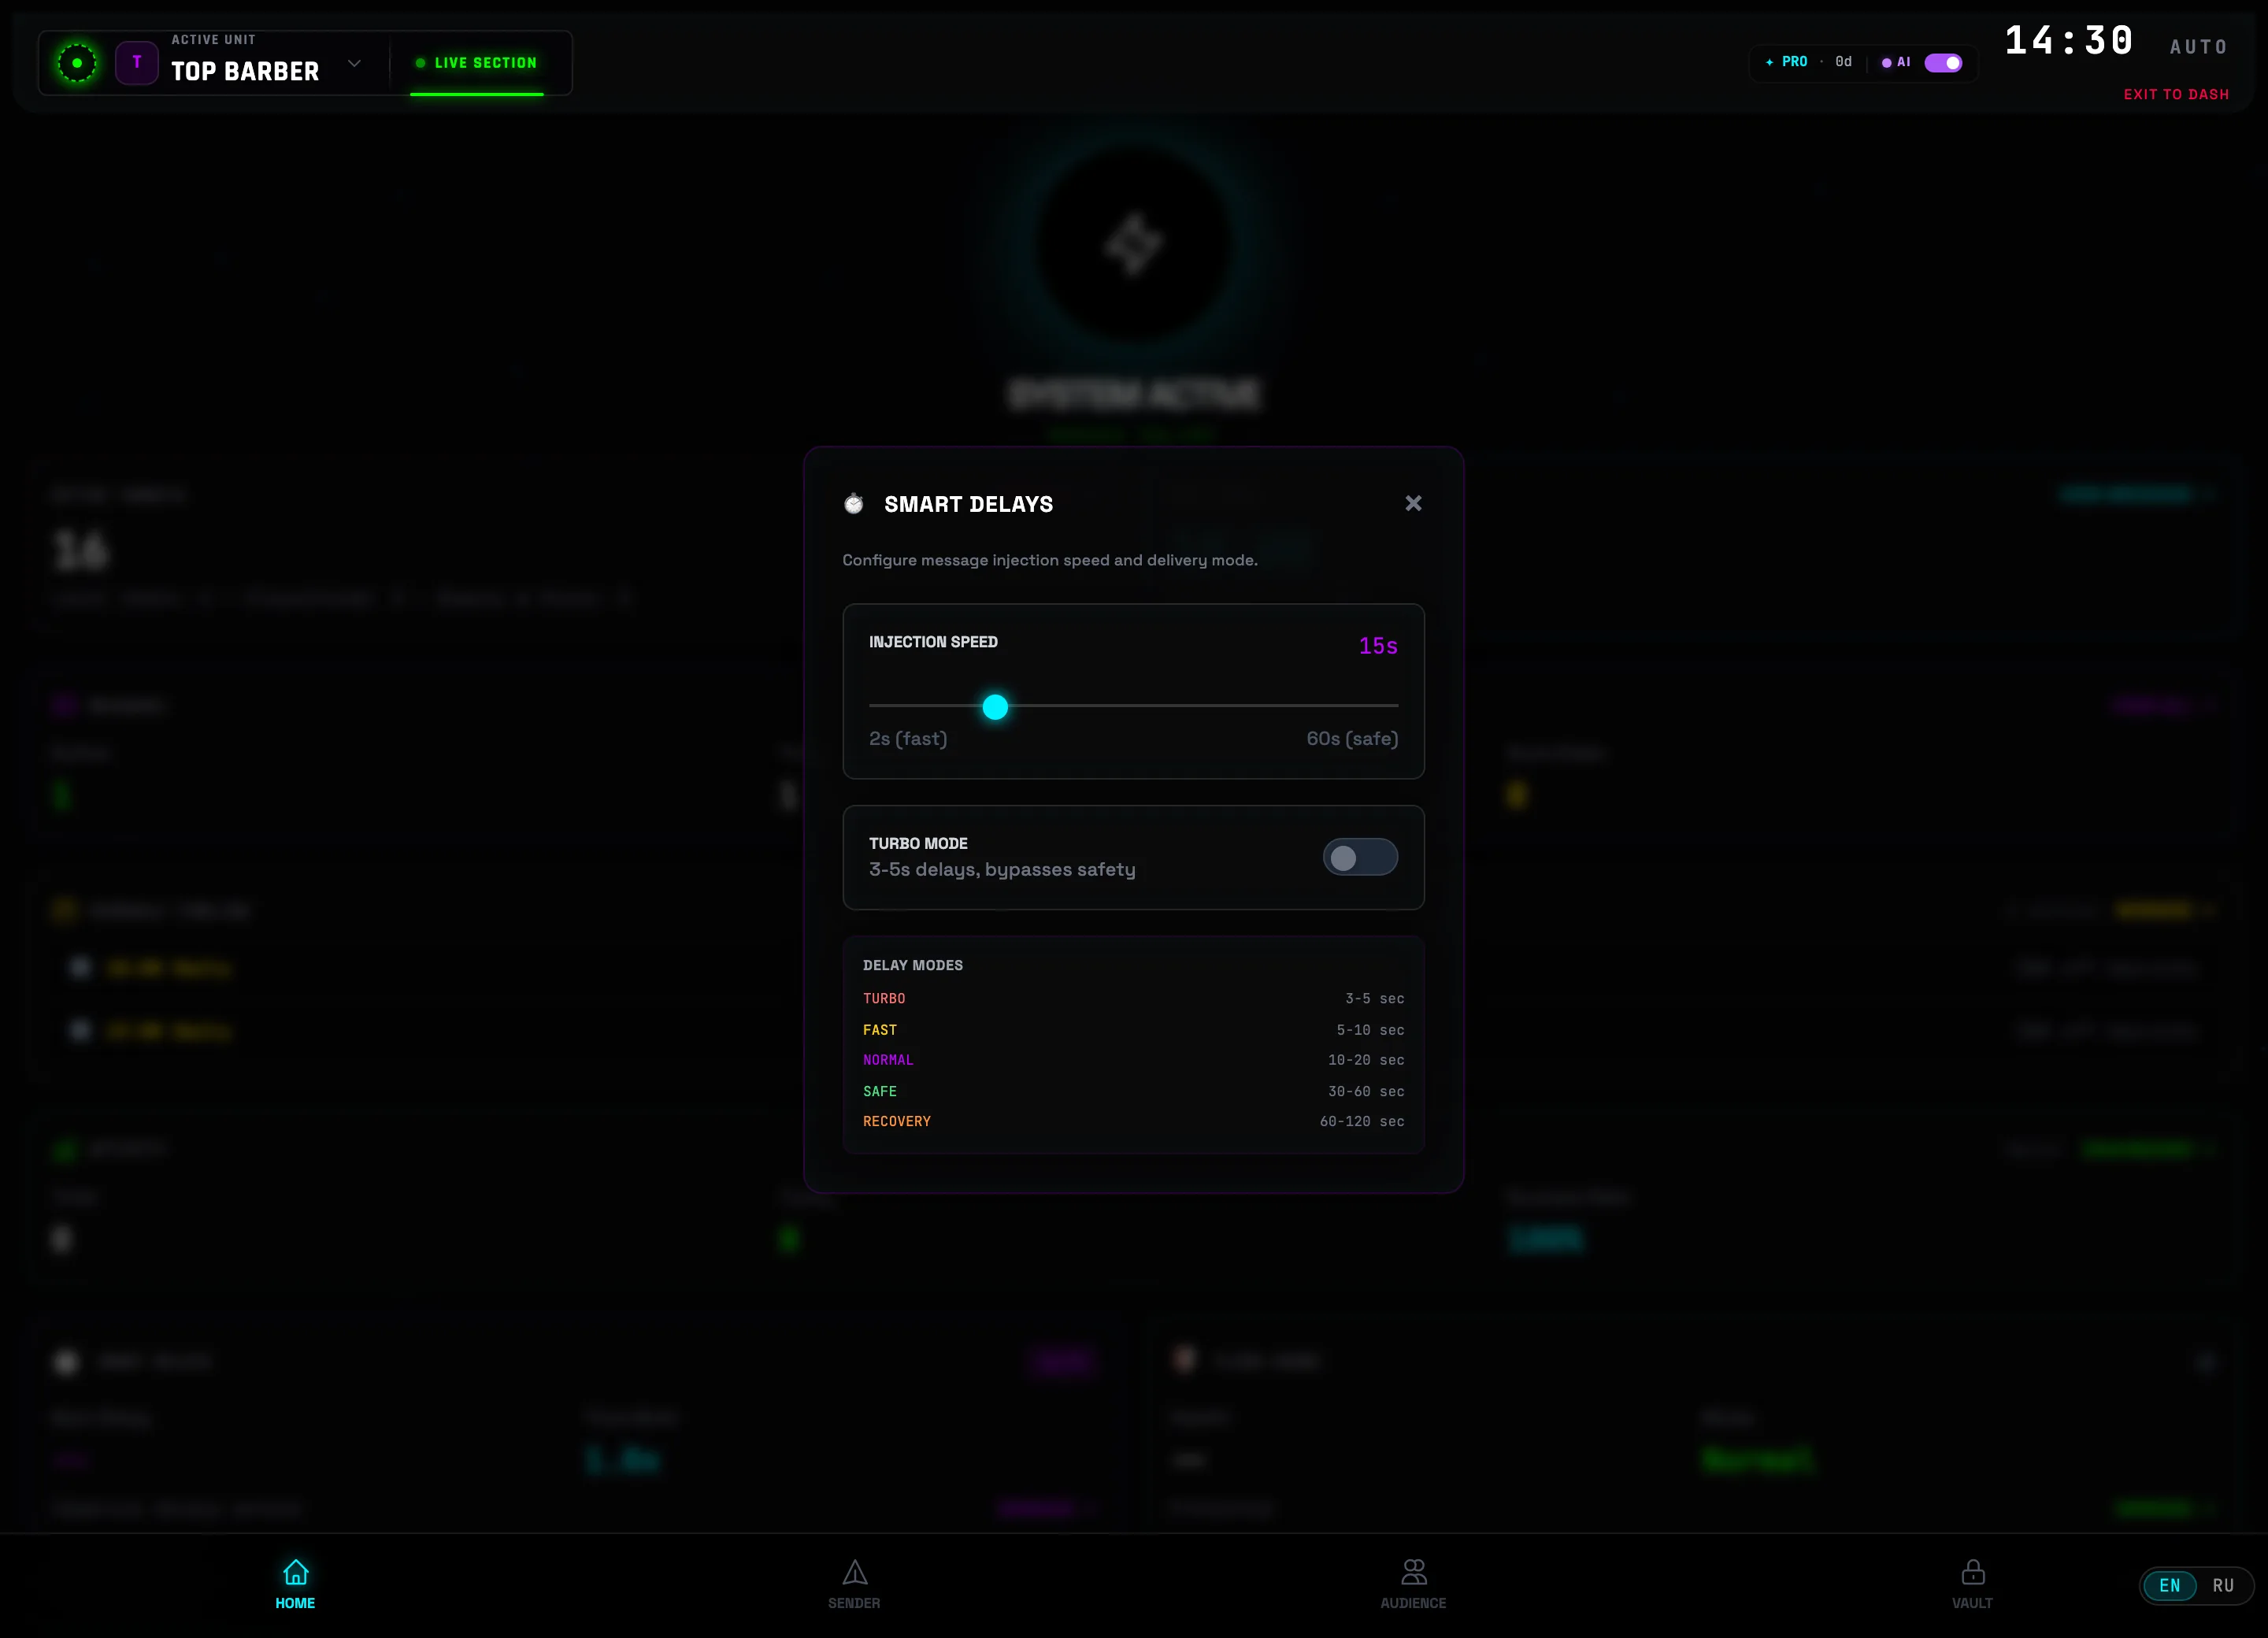 Send speedTurbo mode⚠️Caution: TURBO MODE (3–5 sec) bypasses ban protection. For new accounts keep 30–60 seconds — the SAFE mode.
 -
4
Connect the AI assistant
Click the AI indicator in the header (next to the PRO badge). In the AI ASSISTANT window choose a provider — Gemini (Google), OpenAI (GPT), Anthropic (Claude), DeepSeek or Groq (Llama). The GET KEY — GOOGLE AI STUDIO button opens the key-issuing page: paste it into the field and click VERIFY AND SAVE.
 ProviderVerify and save💡Tip: you can add keys for several providers at once — they appear in the SAVED API KEYS list, and your daily spend is shown in the USED TODAY block.
 -
5
Switch the interface language
The EN / RU toggle sits in the bottom-right corner, on the navigation bar. One click and the whole interface changes language instantly — no restart needed.
 Language EN / RU
 -
6
Control from your phone — “Mobile Access”
On the accounts dashboard click CONNECT PHONE — the MOBILE ACCESS window opens. Turn on the Remote access toggle and scan the QR code with your phone (iPhone: Safari → Share → “Add to Home Screen”; Android: Chrome → Menu → “Add to Home screen”). The link is permanent — you scan it once. The phone becomes a remote: your Telegram sessions never leave your computer, control runs over any network.
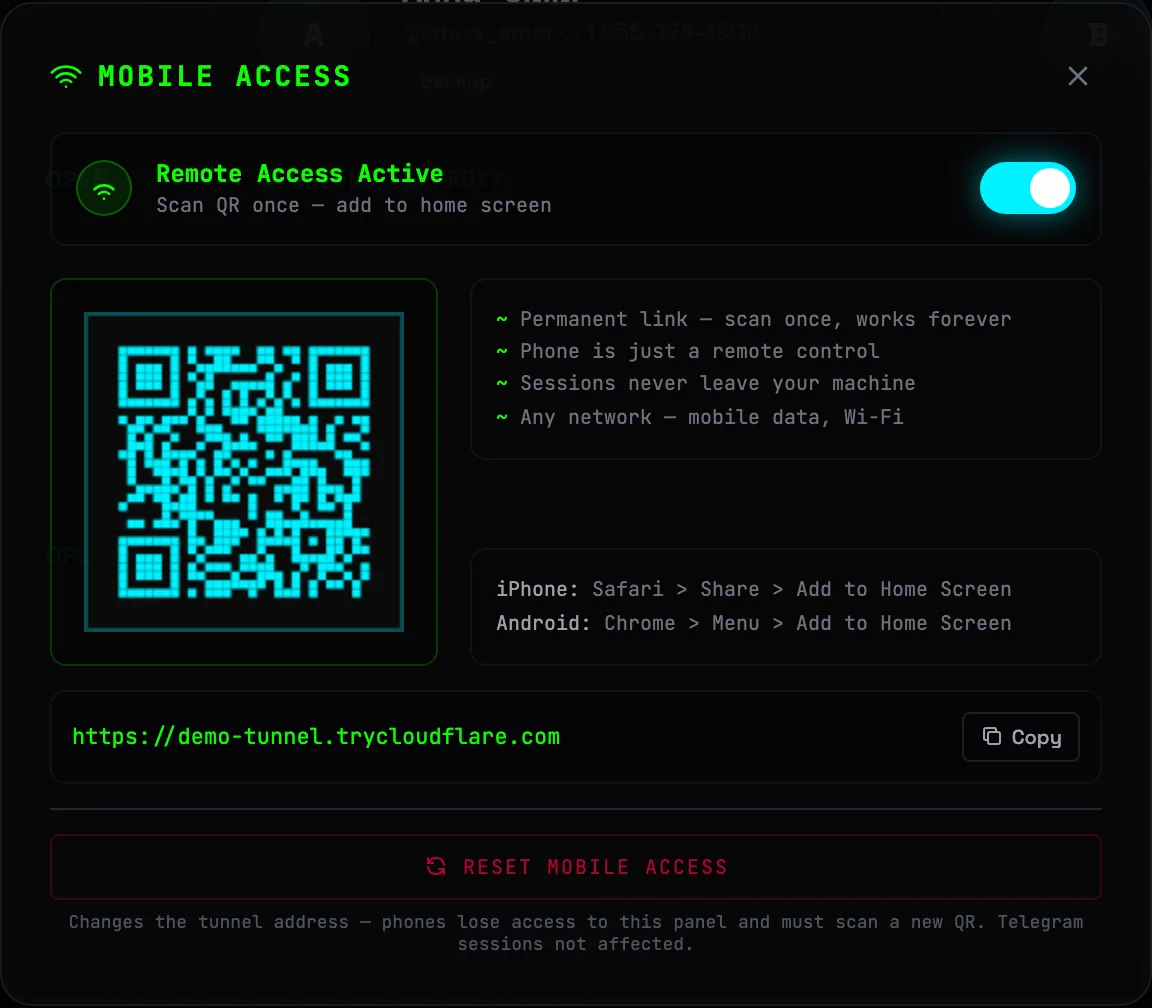 Scan the QR from your phone🛡Security: the RESET MOBILE ACCESS button changes the tunnel address — old phones lose access to the panel and must scan a new QR. Telegram sessions are not affected.
 -
7
Backup and moving to another PC
The BACKUP button on the dashboard opens BACKUP AND RESTORE. On the EXPORT tab set a MASTER PASSWORD (at least 4 characters), optionally check Include Telegram sessions and click EXPORT — you get an encrypted file with all your accounts, targets and messages. On the new PC choose the IMPORT tab and the same password.
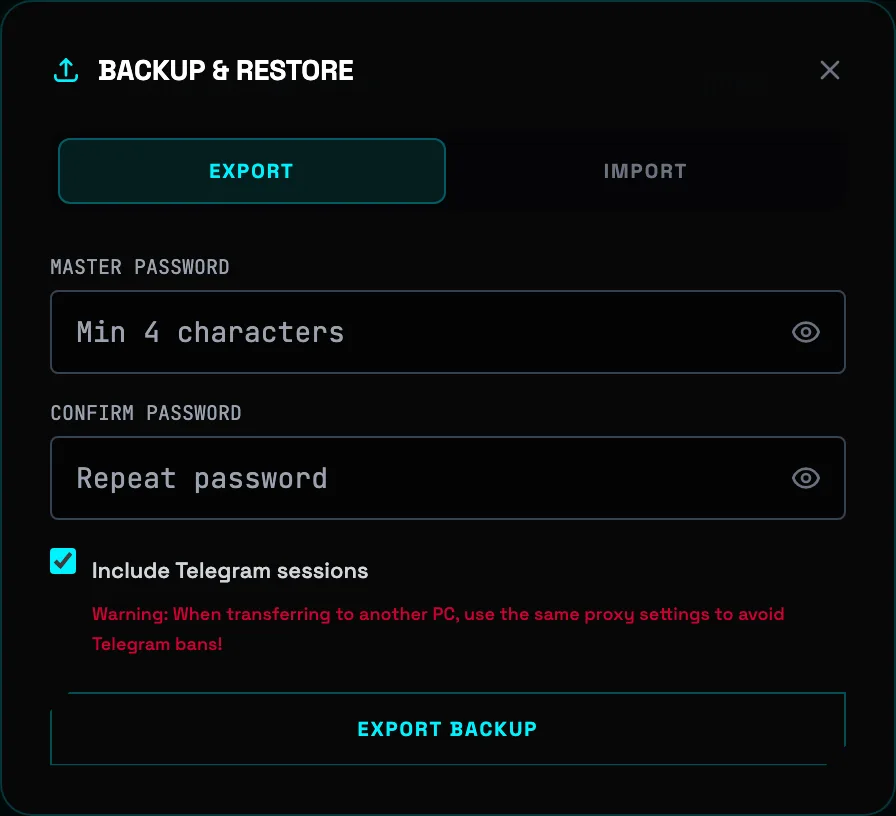 Export the backup⚠️Important when moving: on the new computer use the same proxy settings as on the old one — otherwise a sudden IP change for an account may lead to a Telegram block.
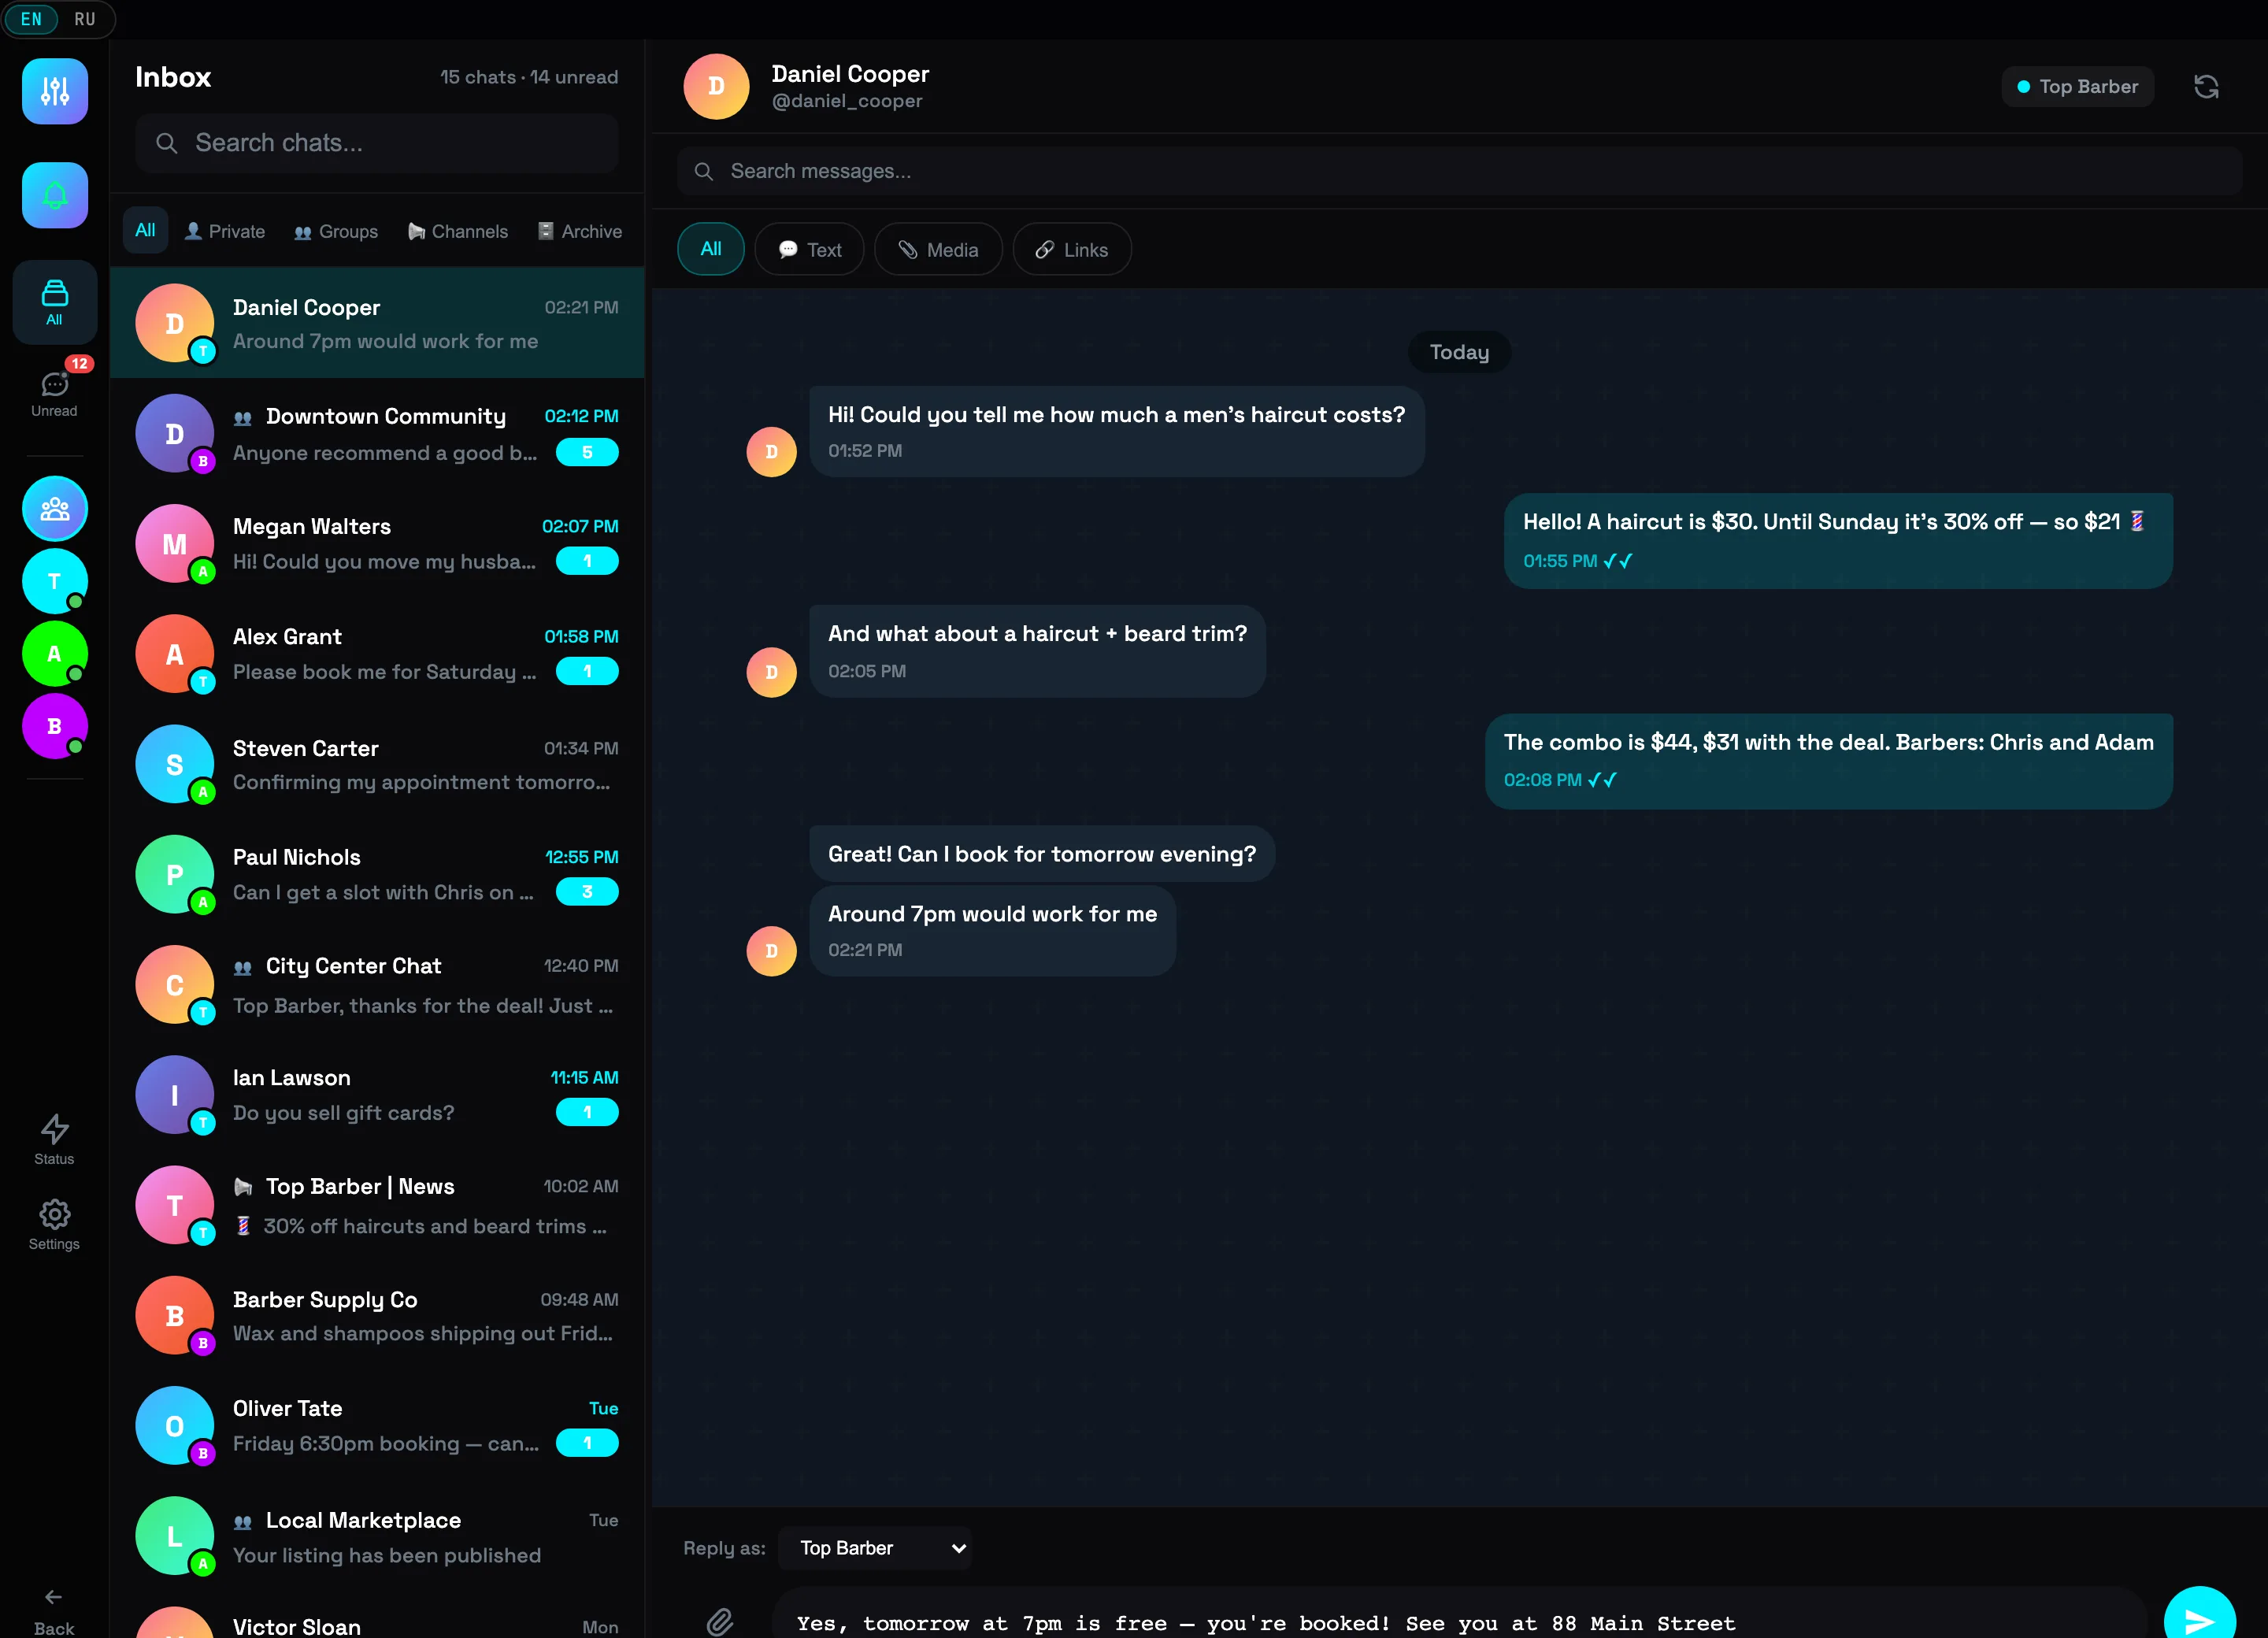
LIVE INBOX — every account in one window
The unified inbox gathers the conversations of all connected Telegram accounts into a single feed: reply to customers from any account without switching apps or losing a single unread message.
-
1
Open LIVE INBOX
Click LIVE SECTION in the left panel of the main screen. The Inbox feed combines the dialogs of all accounts: the counter at the top shows the total number of chats and unread, with a teal badge showing the count on unread ones. The colored dot on each avatar is the badge of the account the dialog belongs to.
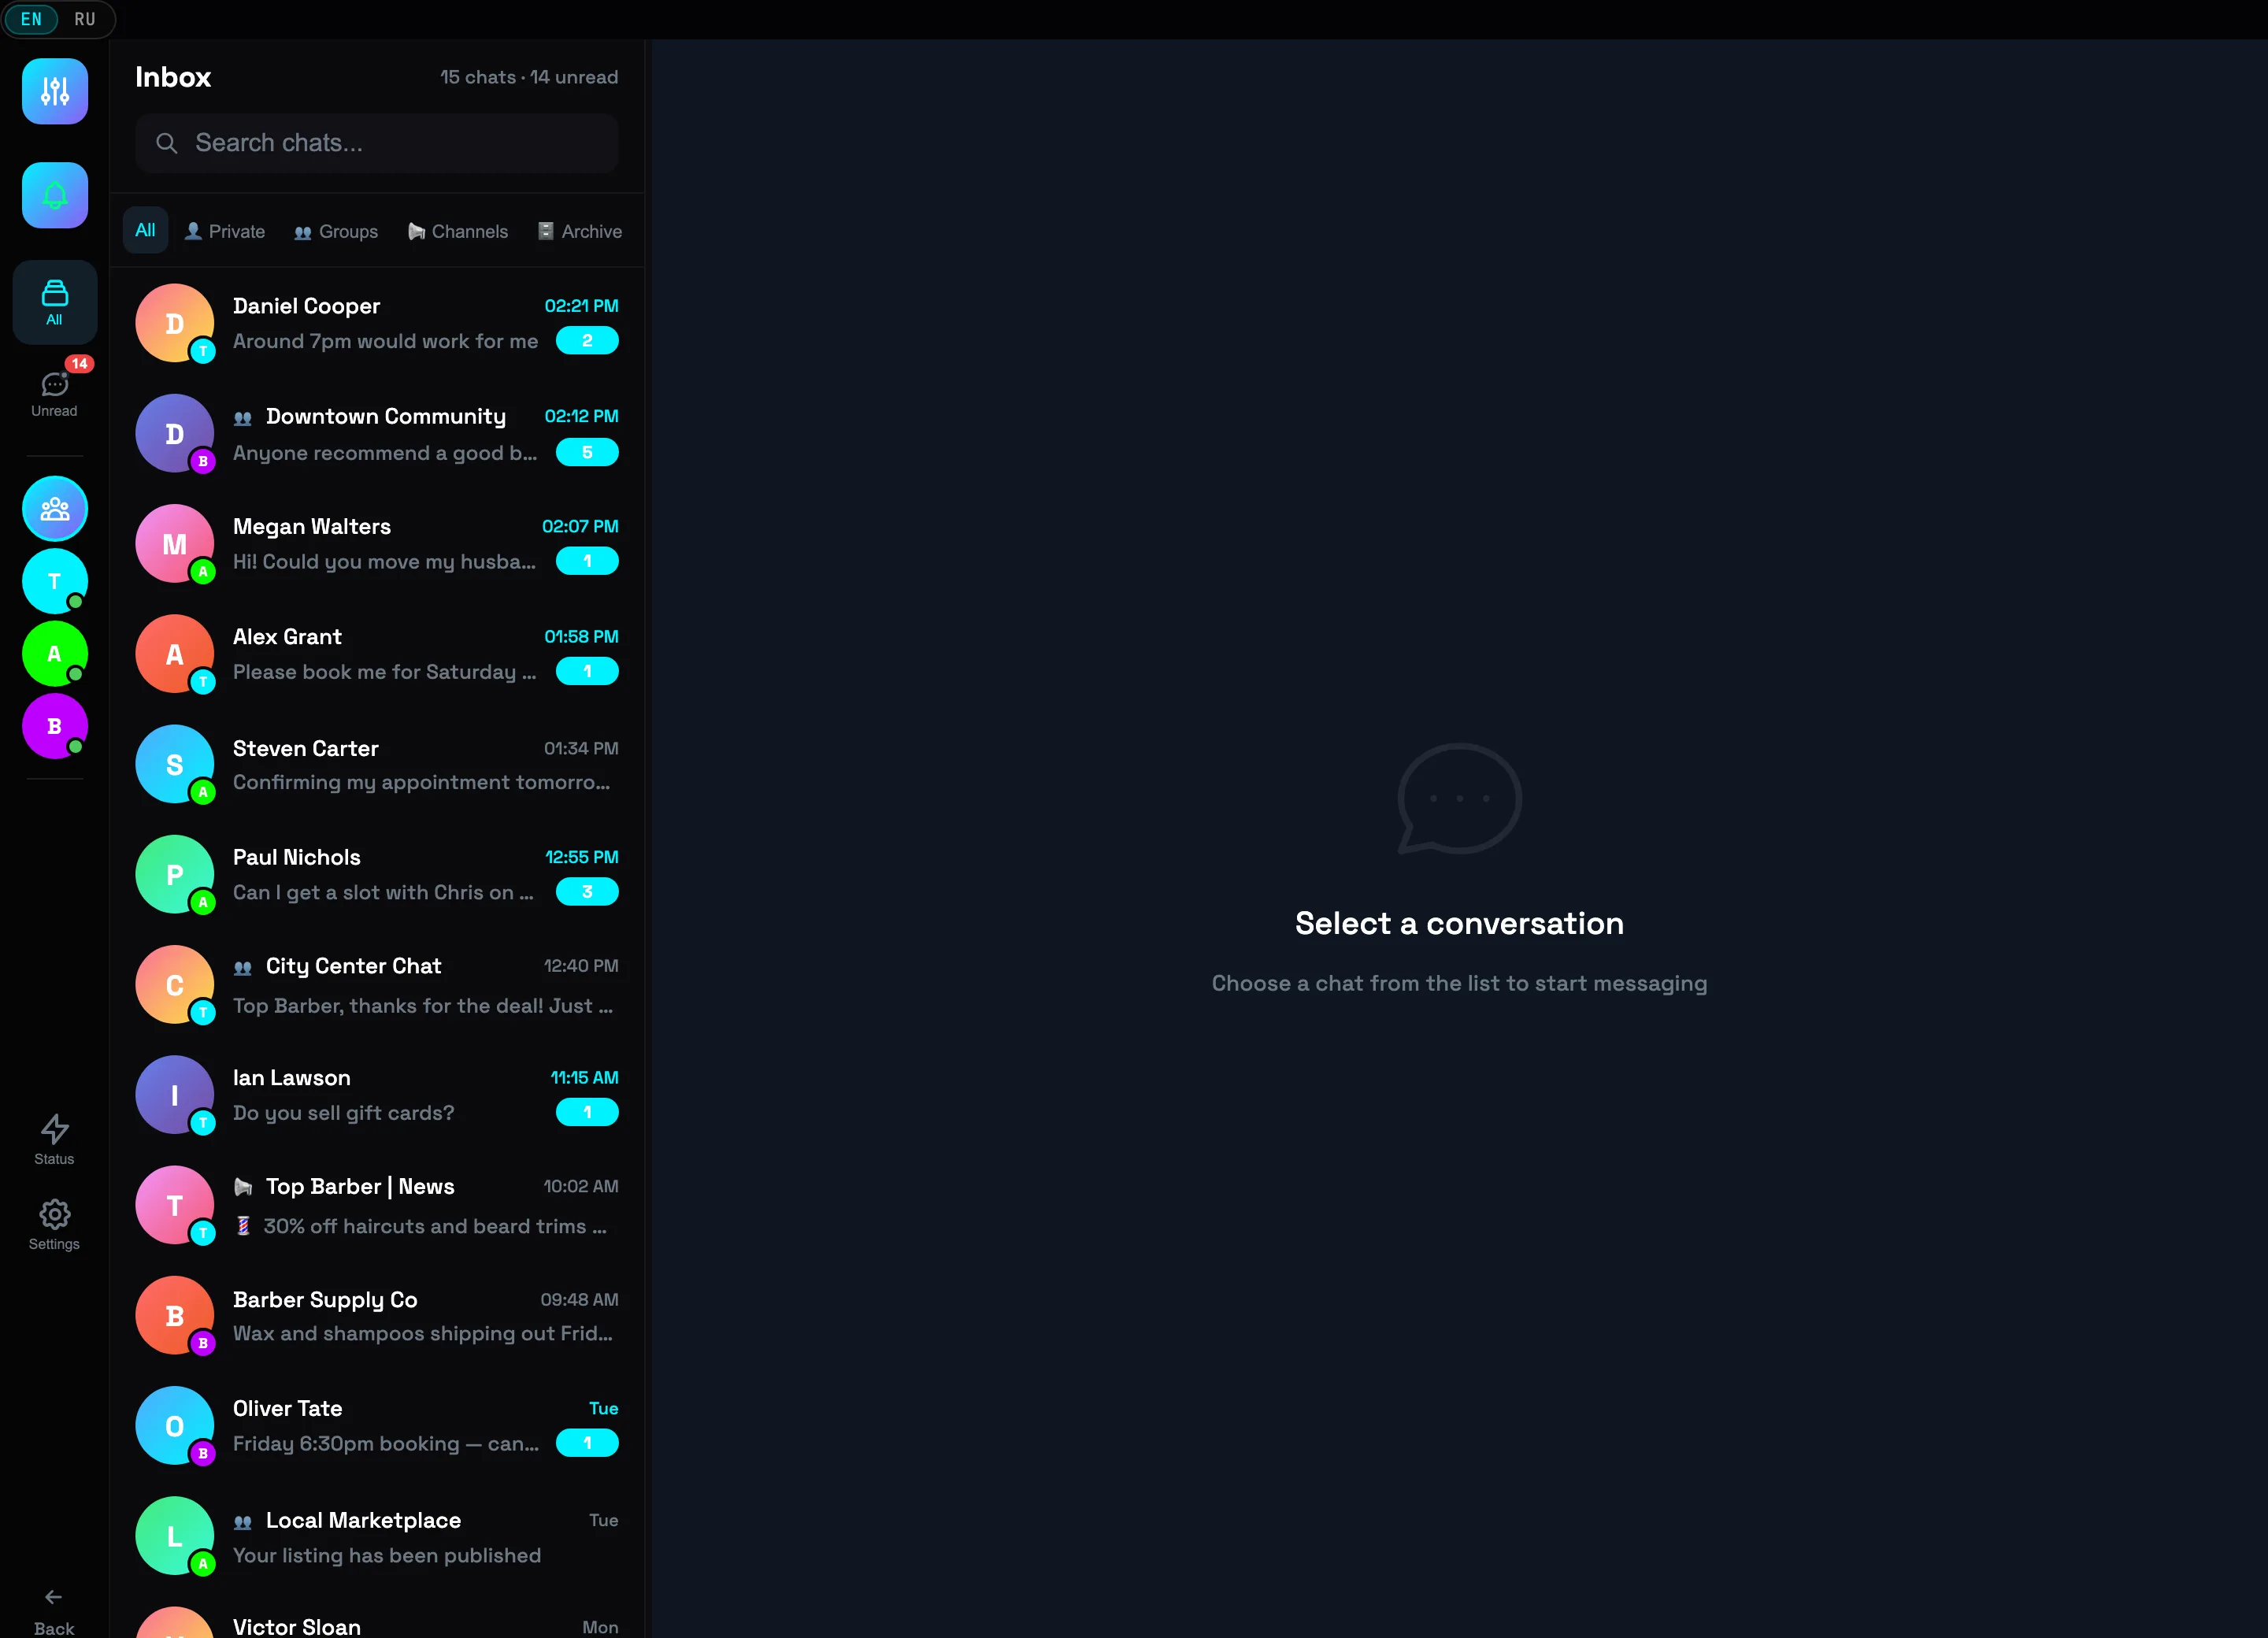 Dialogs of three accountsAccount badge
 -
2
Open a dialog
Click a dialog row. The full conversation opens on the right: incoming on the left, your replies on the right with a ✓✓ read mark. The badge in the header shows which account the dialog belongs to. Unread messages are automatically marked as read when opened.
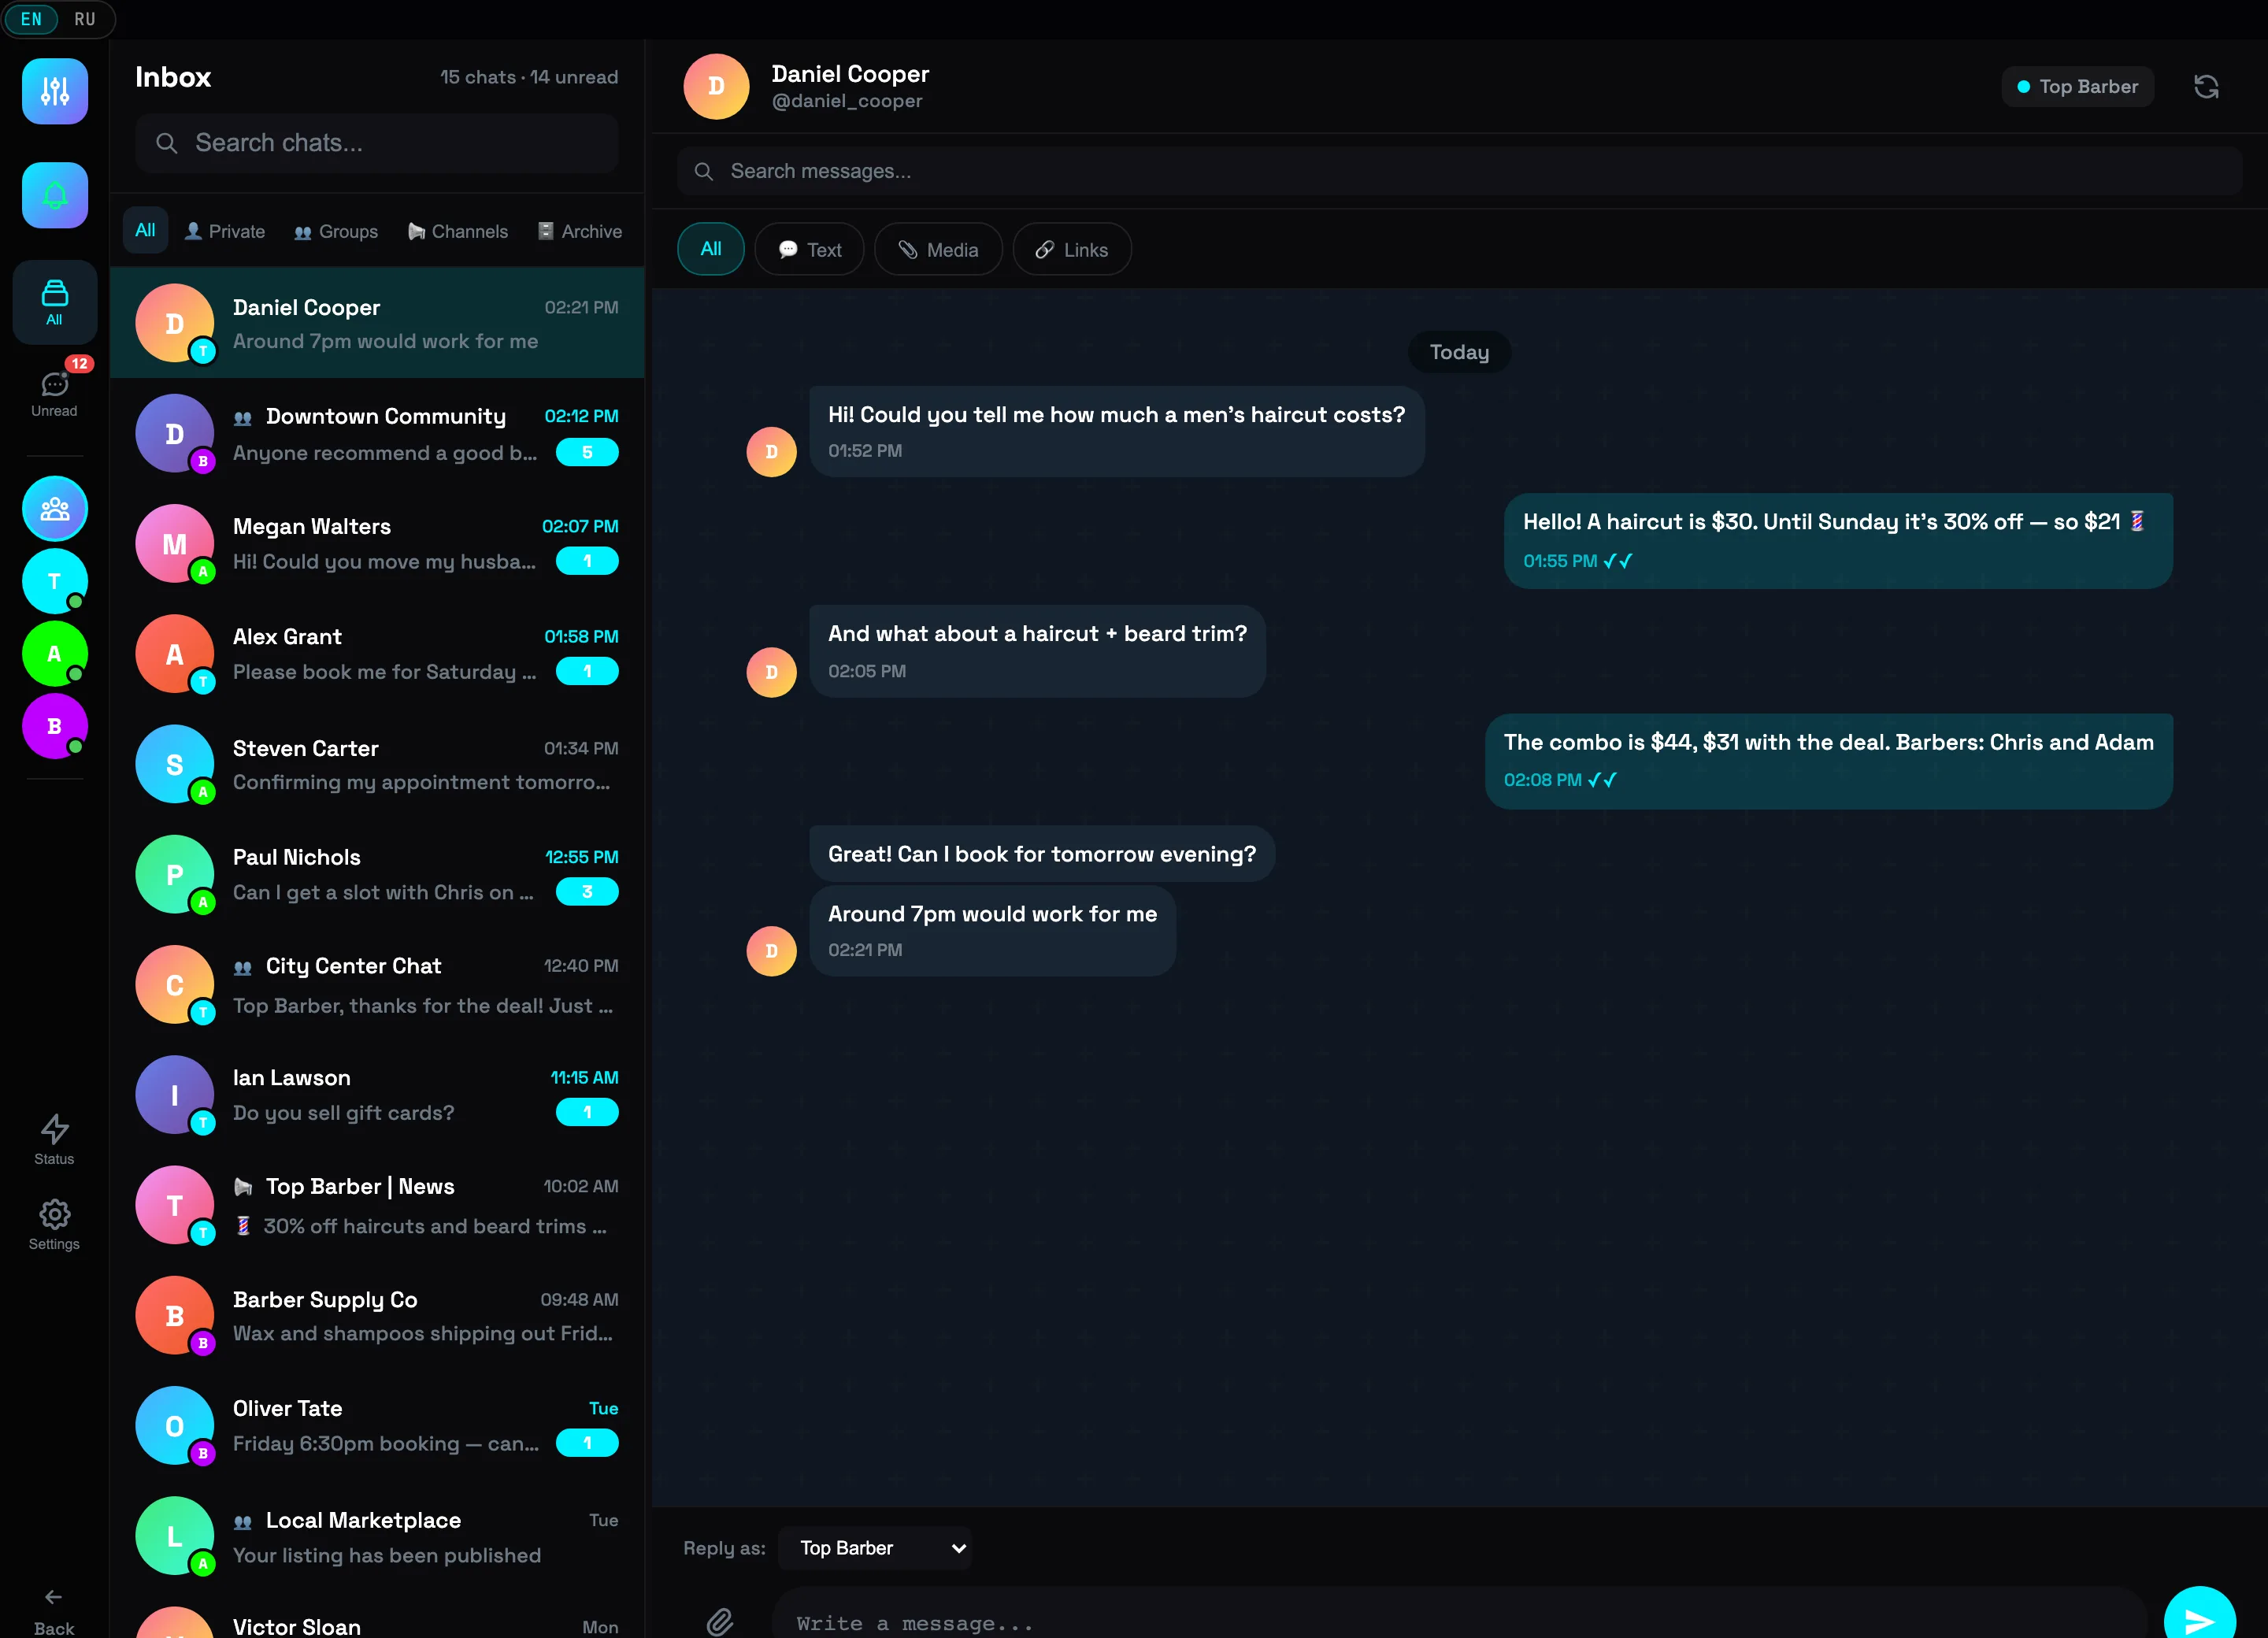 Dialog accountConversation with ✓✓
 -
3
Reply without leaving the inbox
Type your reply in the Write a message… field at the bottom of the dialog. The Reply as: selector above the field determines which account the message is sent from — you can even reply from a different account.
 Reply fieldAccount selector💡Tip: Enter sends the message instantly, Shift+Enter inserts a line break.
 -
4
Filter the feed
The tabs All · Private · Groups · Channels · Archive sort chats by type — the Groups filter is active in this frame. The Unread button in the left panel leaves only chats with new messages. The Search chats… field searches chats across all of Telegram — just like Telegram Desktop.
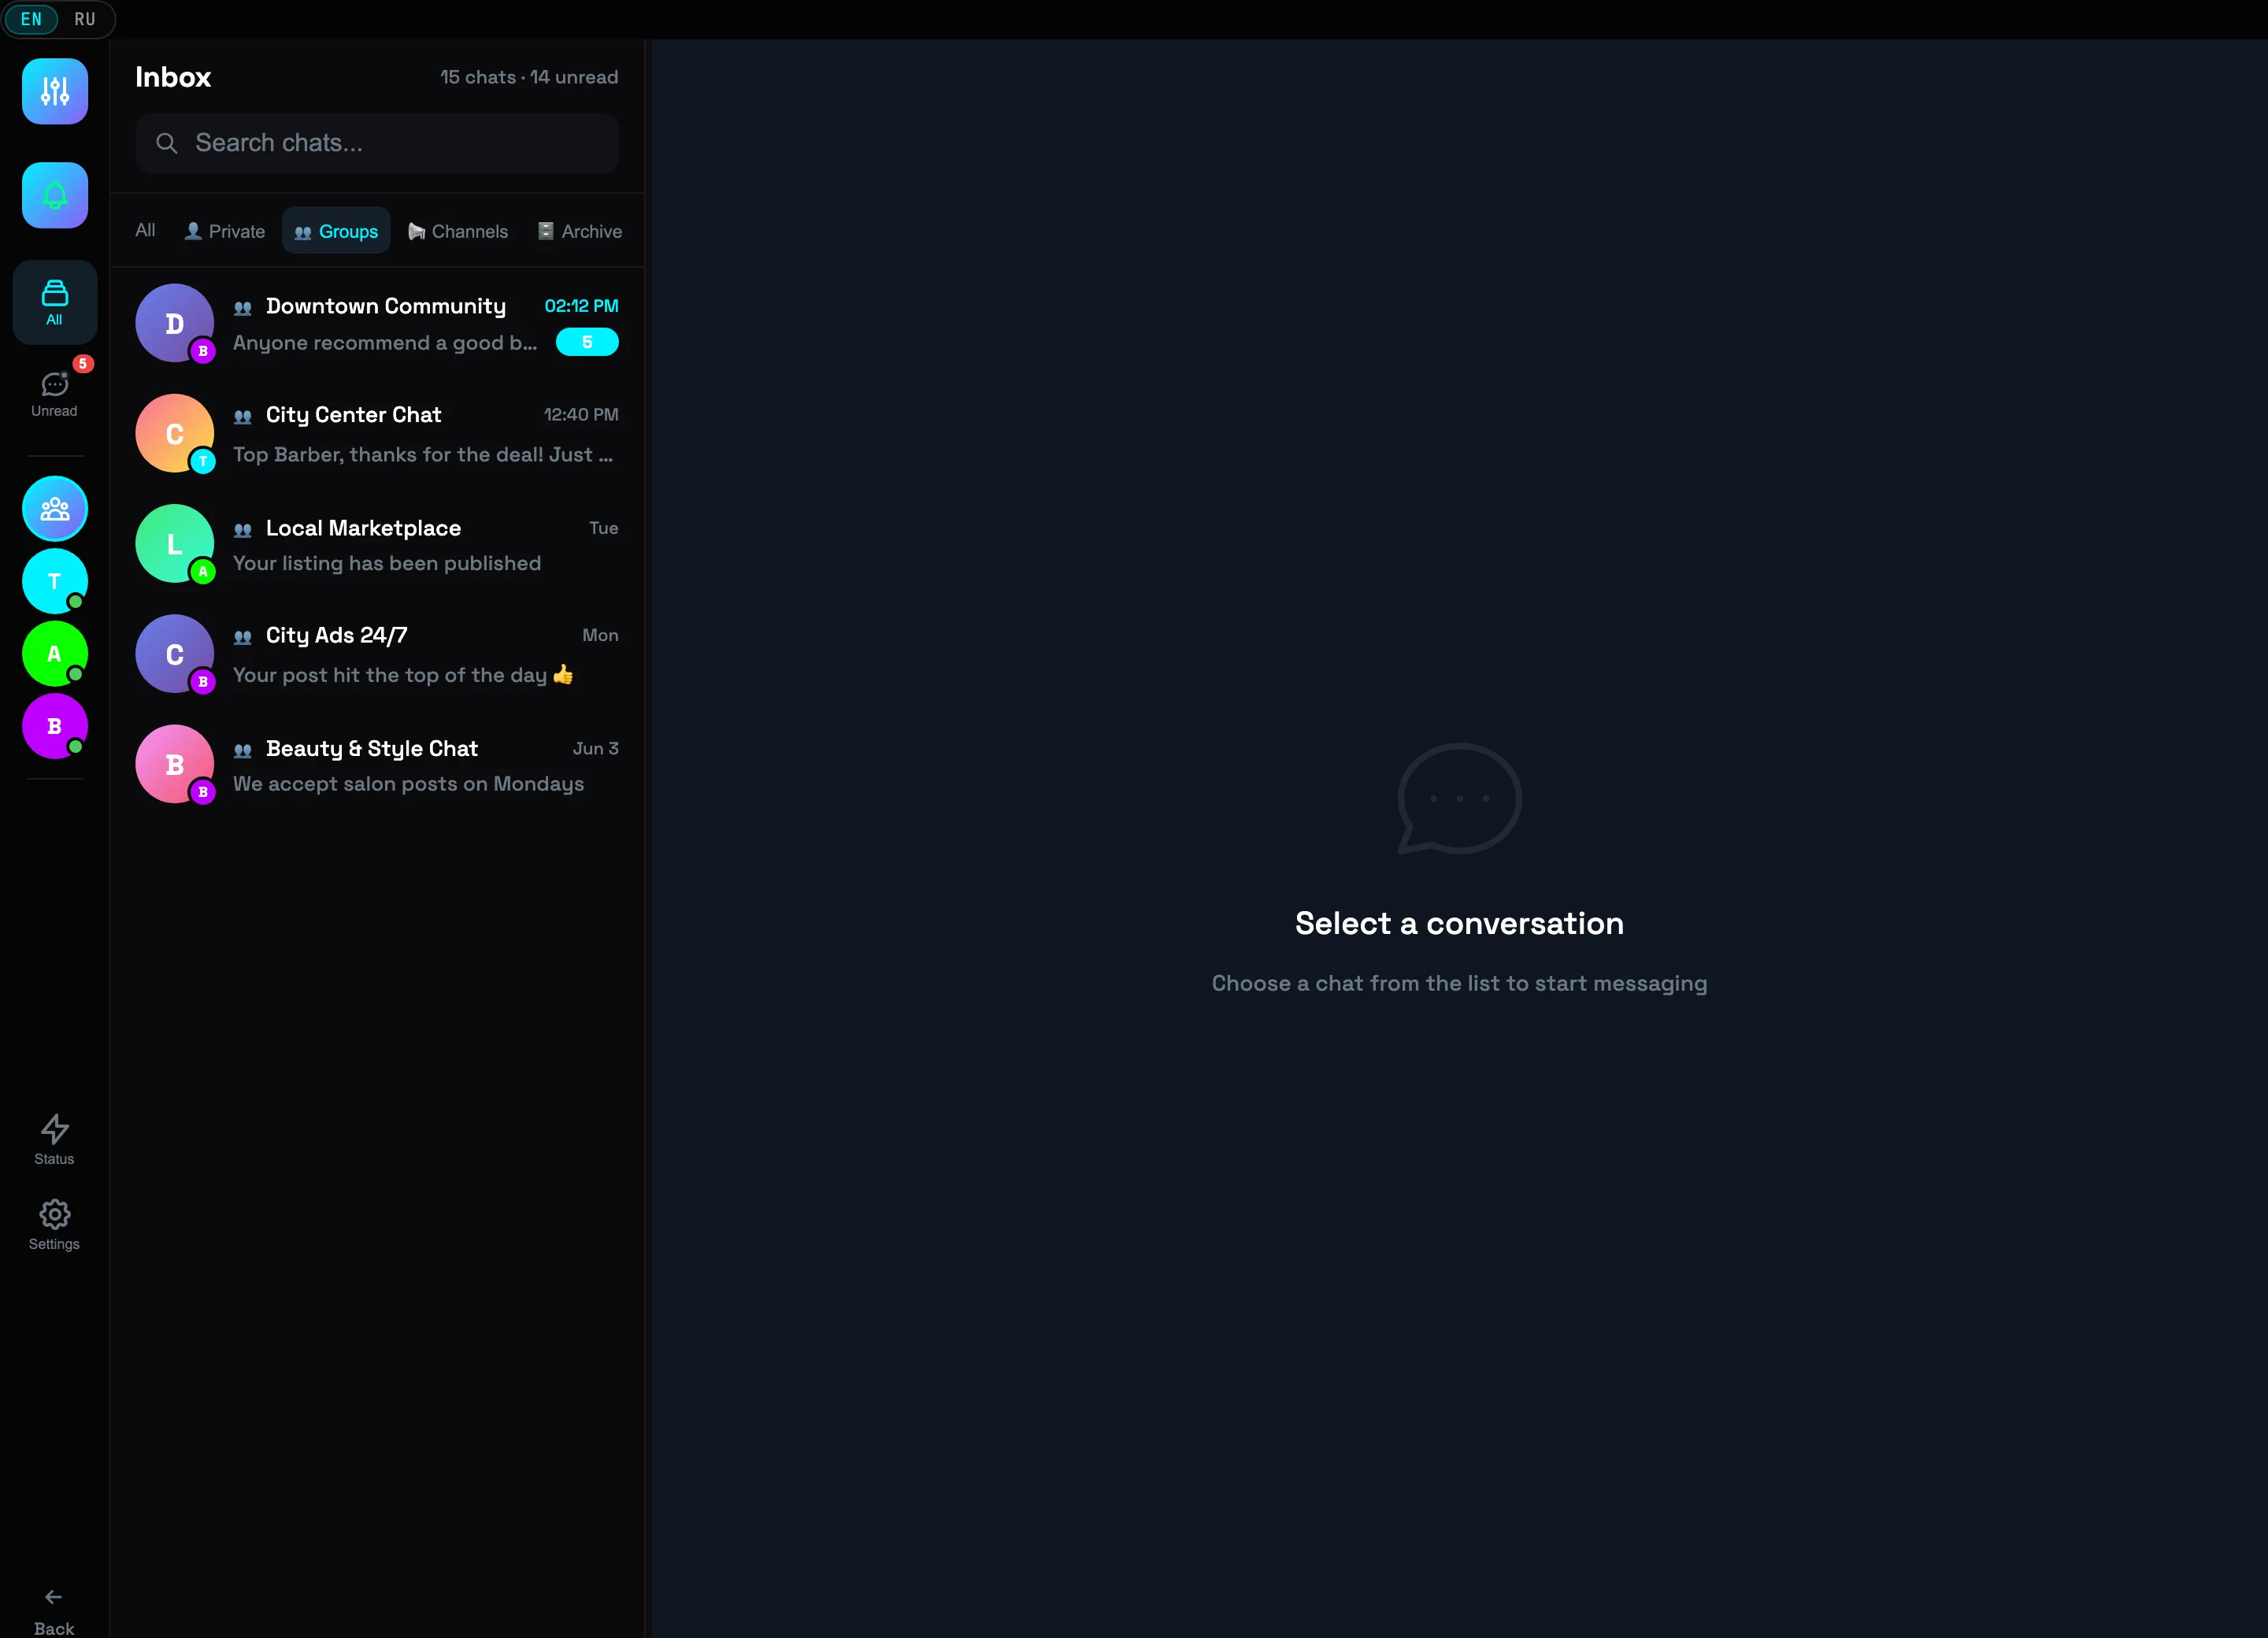 Chat filtersChat search
 -
5
Switch between accounts
The circles in the left panel are your accounts. Clicking an avatar leaves only that account's dialogs in the feed (in this frame the recording account is selected — only its 4 chats are visible). The top gradient button restores the "all accounts" mode. A green dot on the avatar means the account is connected.
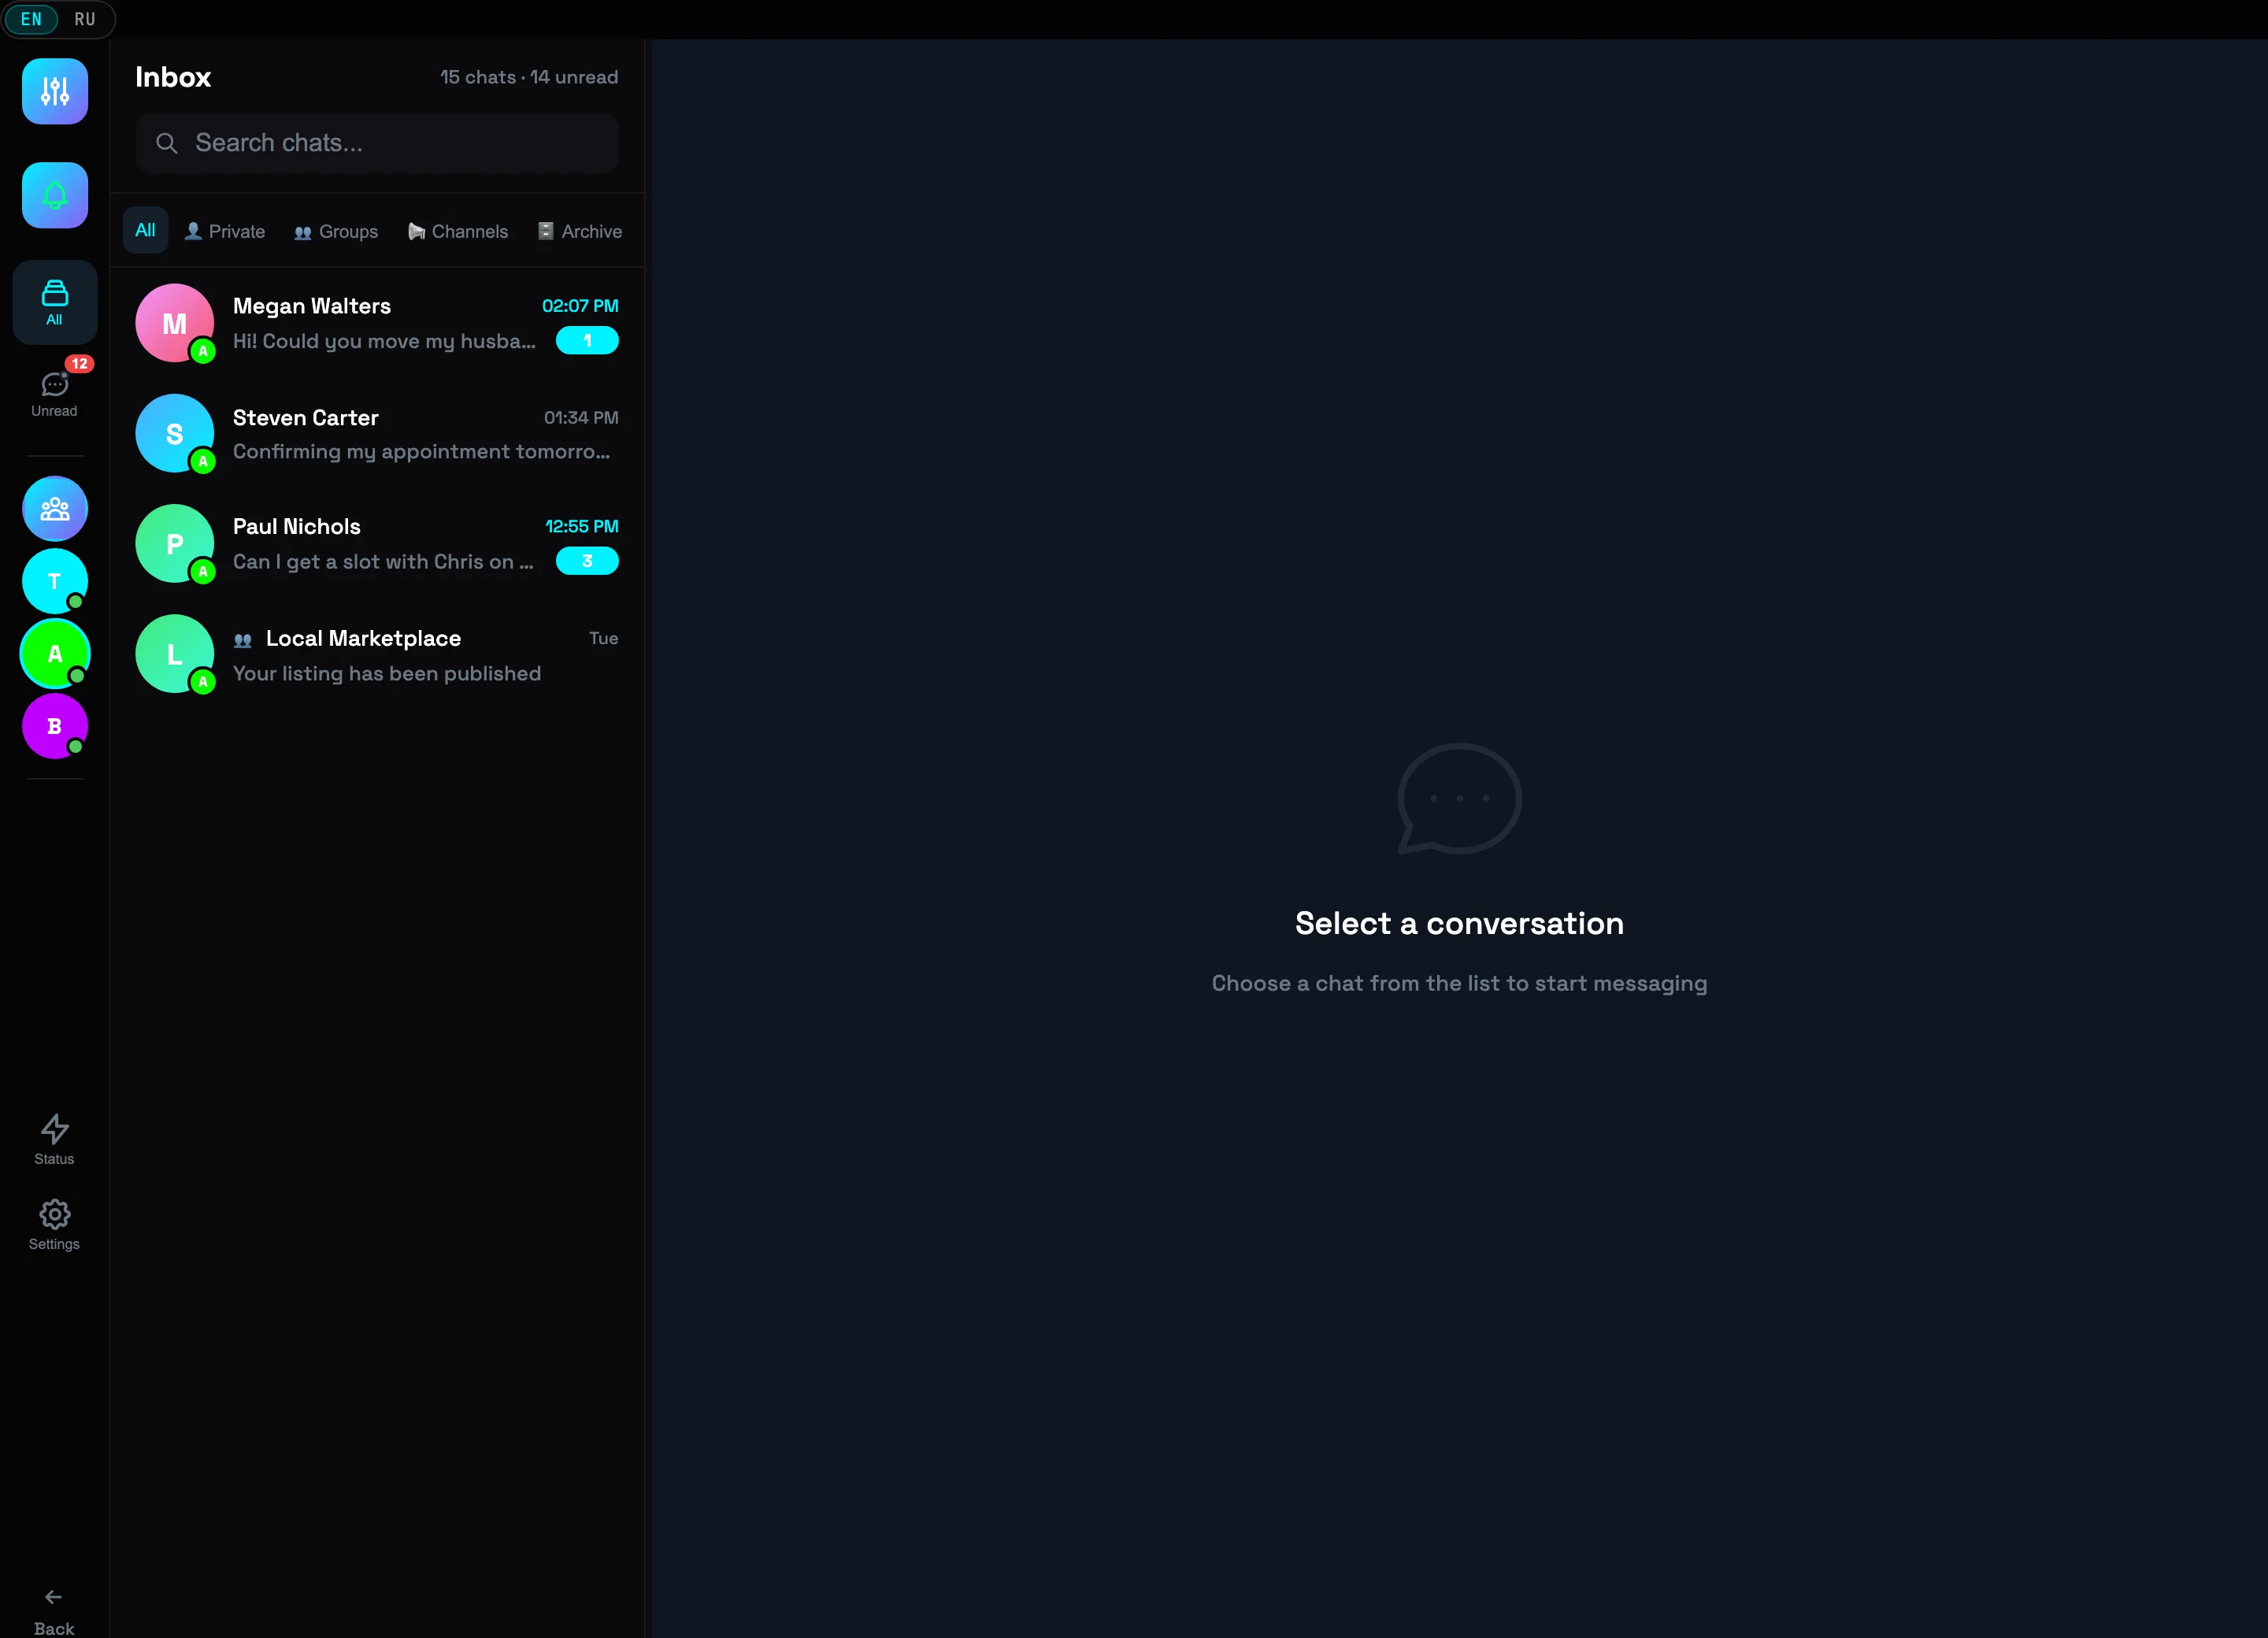 AccountsActive account💡Tip: filters stack — pick an account and the Groups tab to see only that account's group chats.
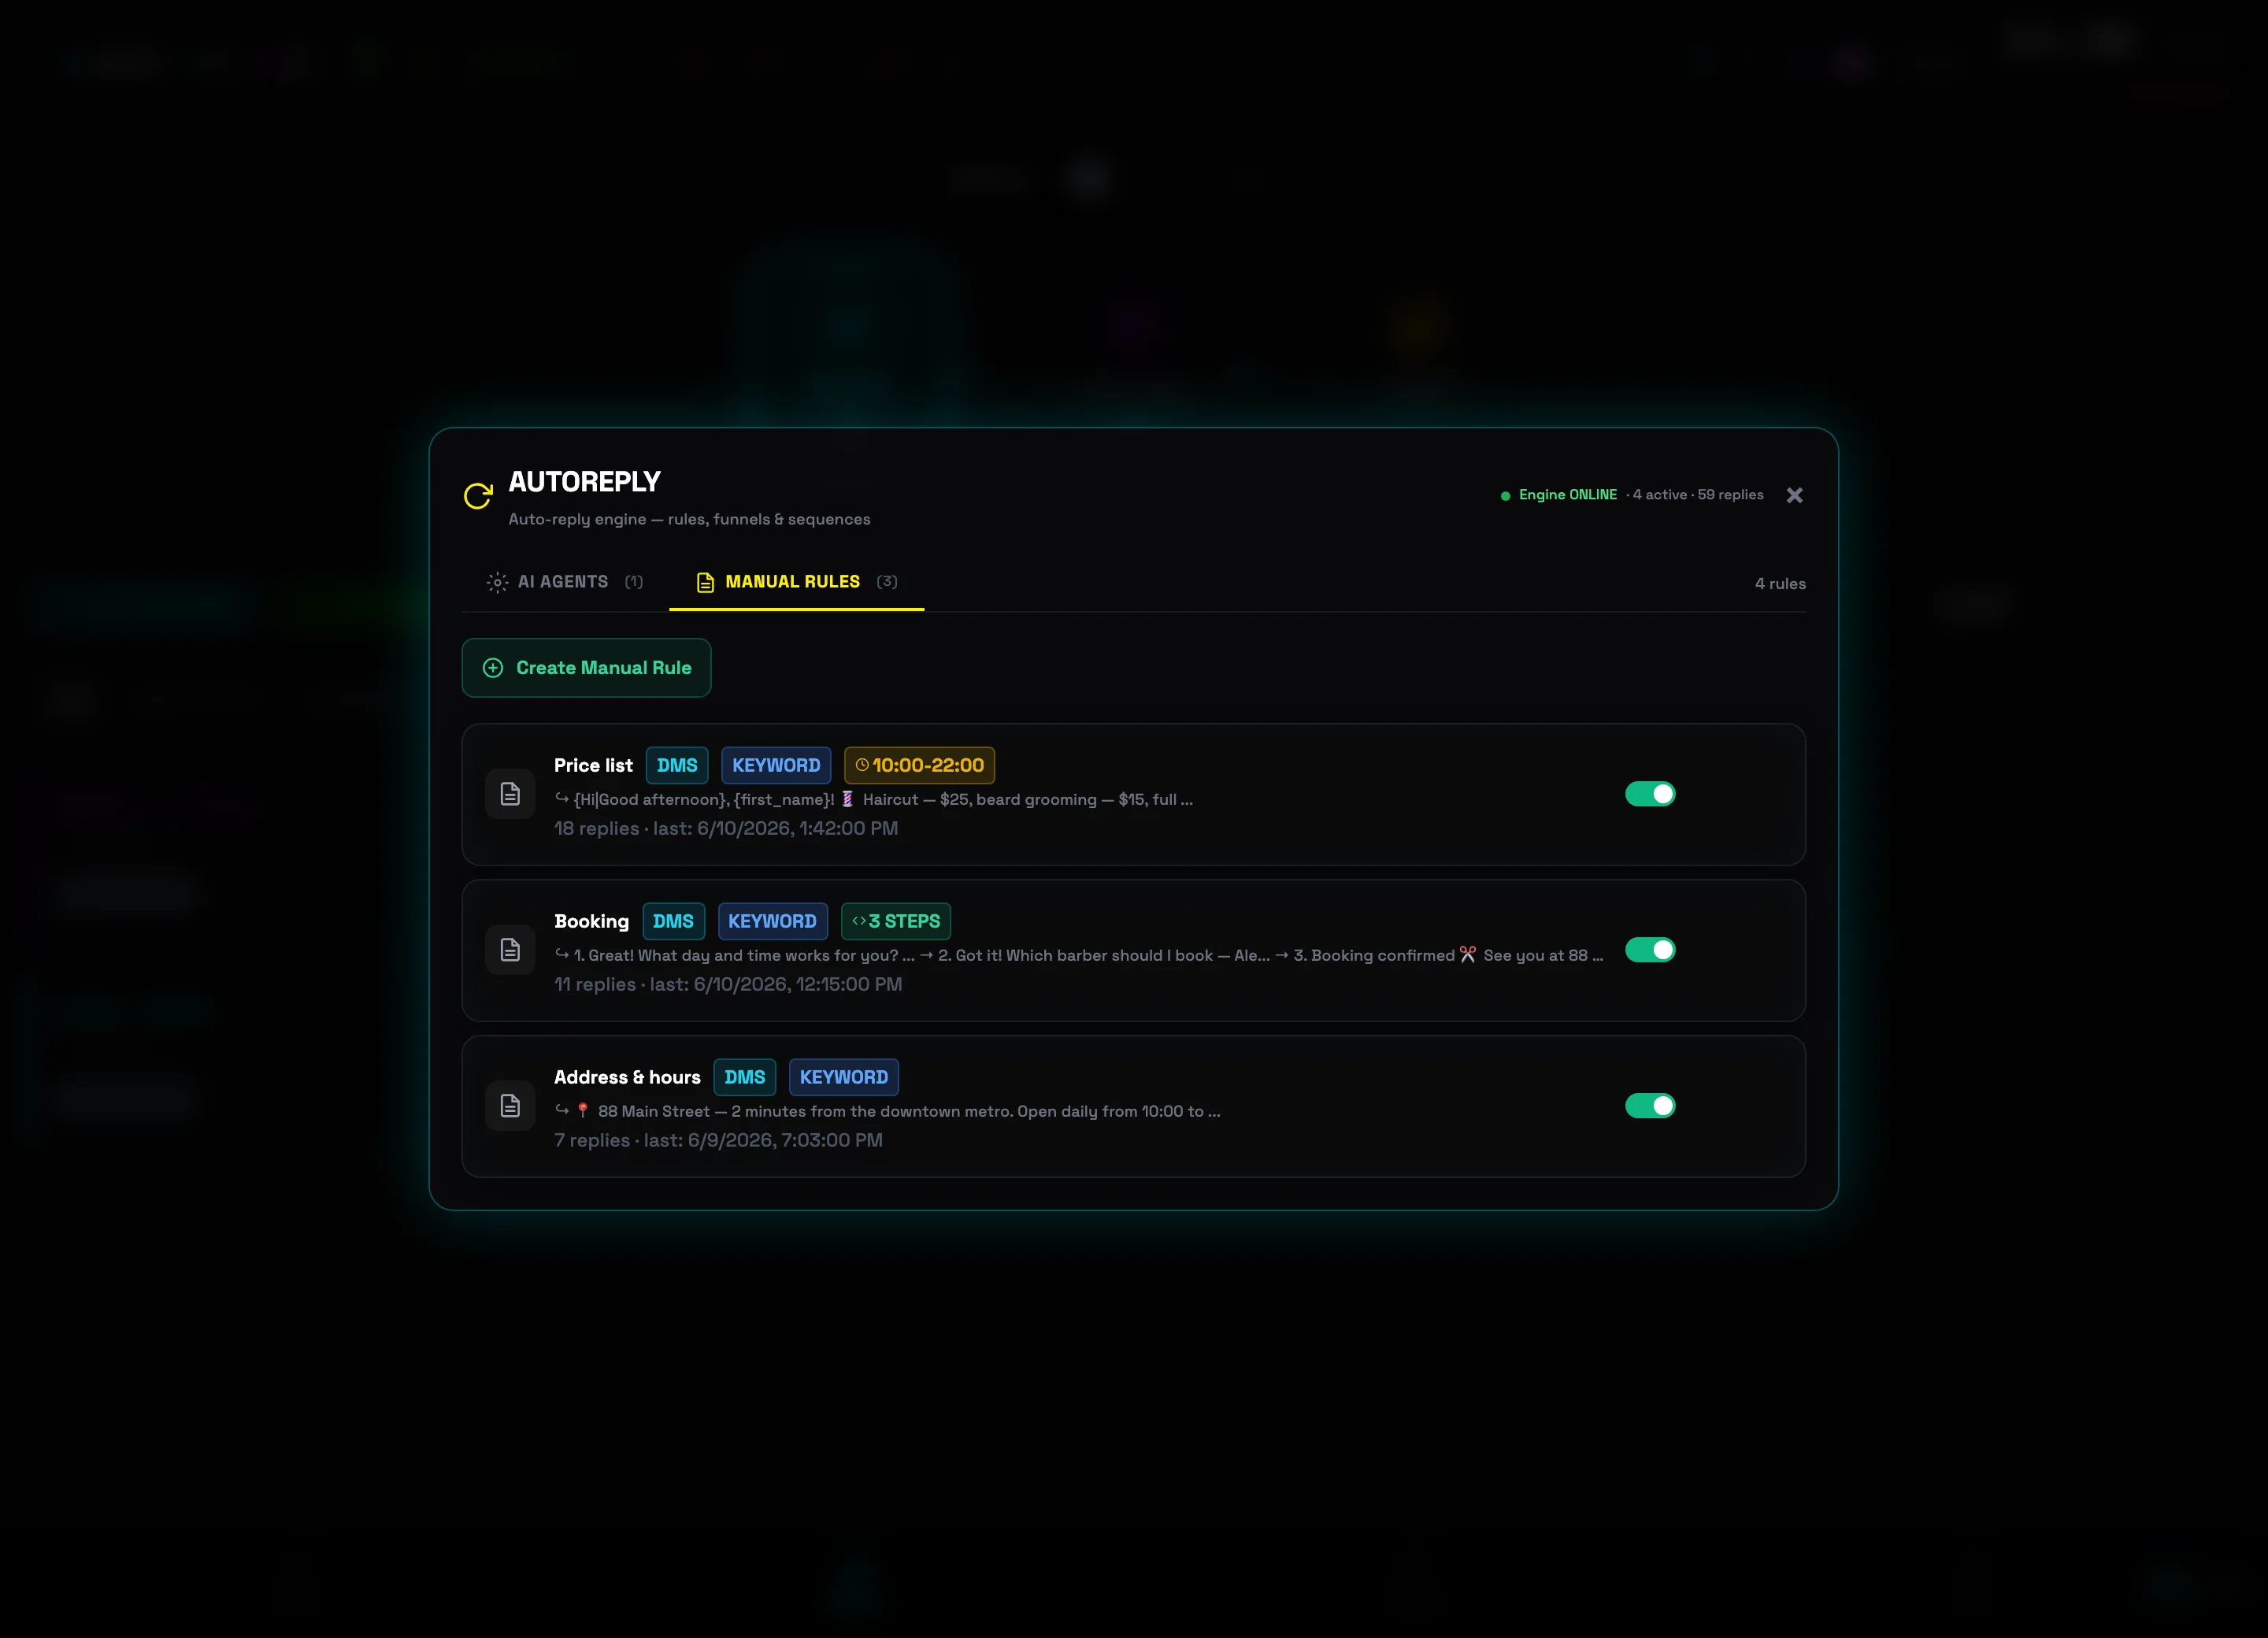
AUTORESPONDER — replies without you, 24/7
The autoresponder answers incoming messages on its own, following your rules: a keyword triggers an instant reply with a price list, address, or booking link. While you're cutting a client's hair, the account handles inquiries.
-
1
Open the autoresponder from the header
In the HUD panel above the SENDER tab, click AUTOREPLY. While there are no rules, the indicator shows OFF; when the engine is running, it shows the number of active rules.
 AUTOREPLY button
 -
2
Click "Create rule" on the "Manual rules" tab
The AUTORESPONDER window opens with two tabs: AI AGENTS and MANUAL RULES. In the top right is the Engine ONLINE status with counters of active rules and replies sent. The Create rule button opens the editor.
 Create ruleEngine status
 -
3
Name the rule and choose where to reply
Enter a NAME (for example, "Price list") and the WHERE TO REPLY scope: Incoming DMs, My groups, Specific chats, or Everywhere. In the 2. FILTERS block you can reply to New dialogs only and Skip contacts — the Skip bots filter is on by default.
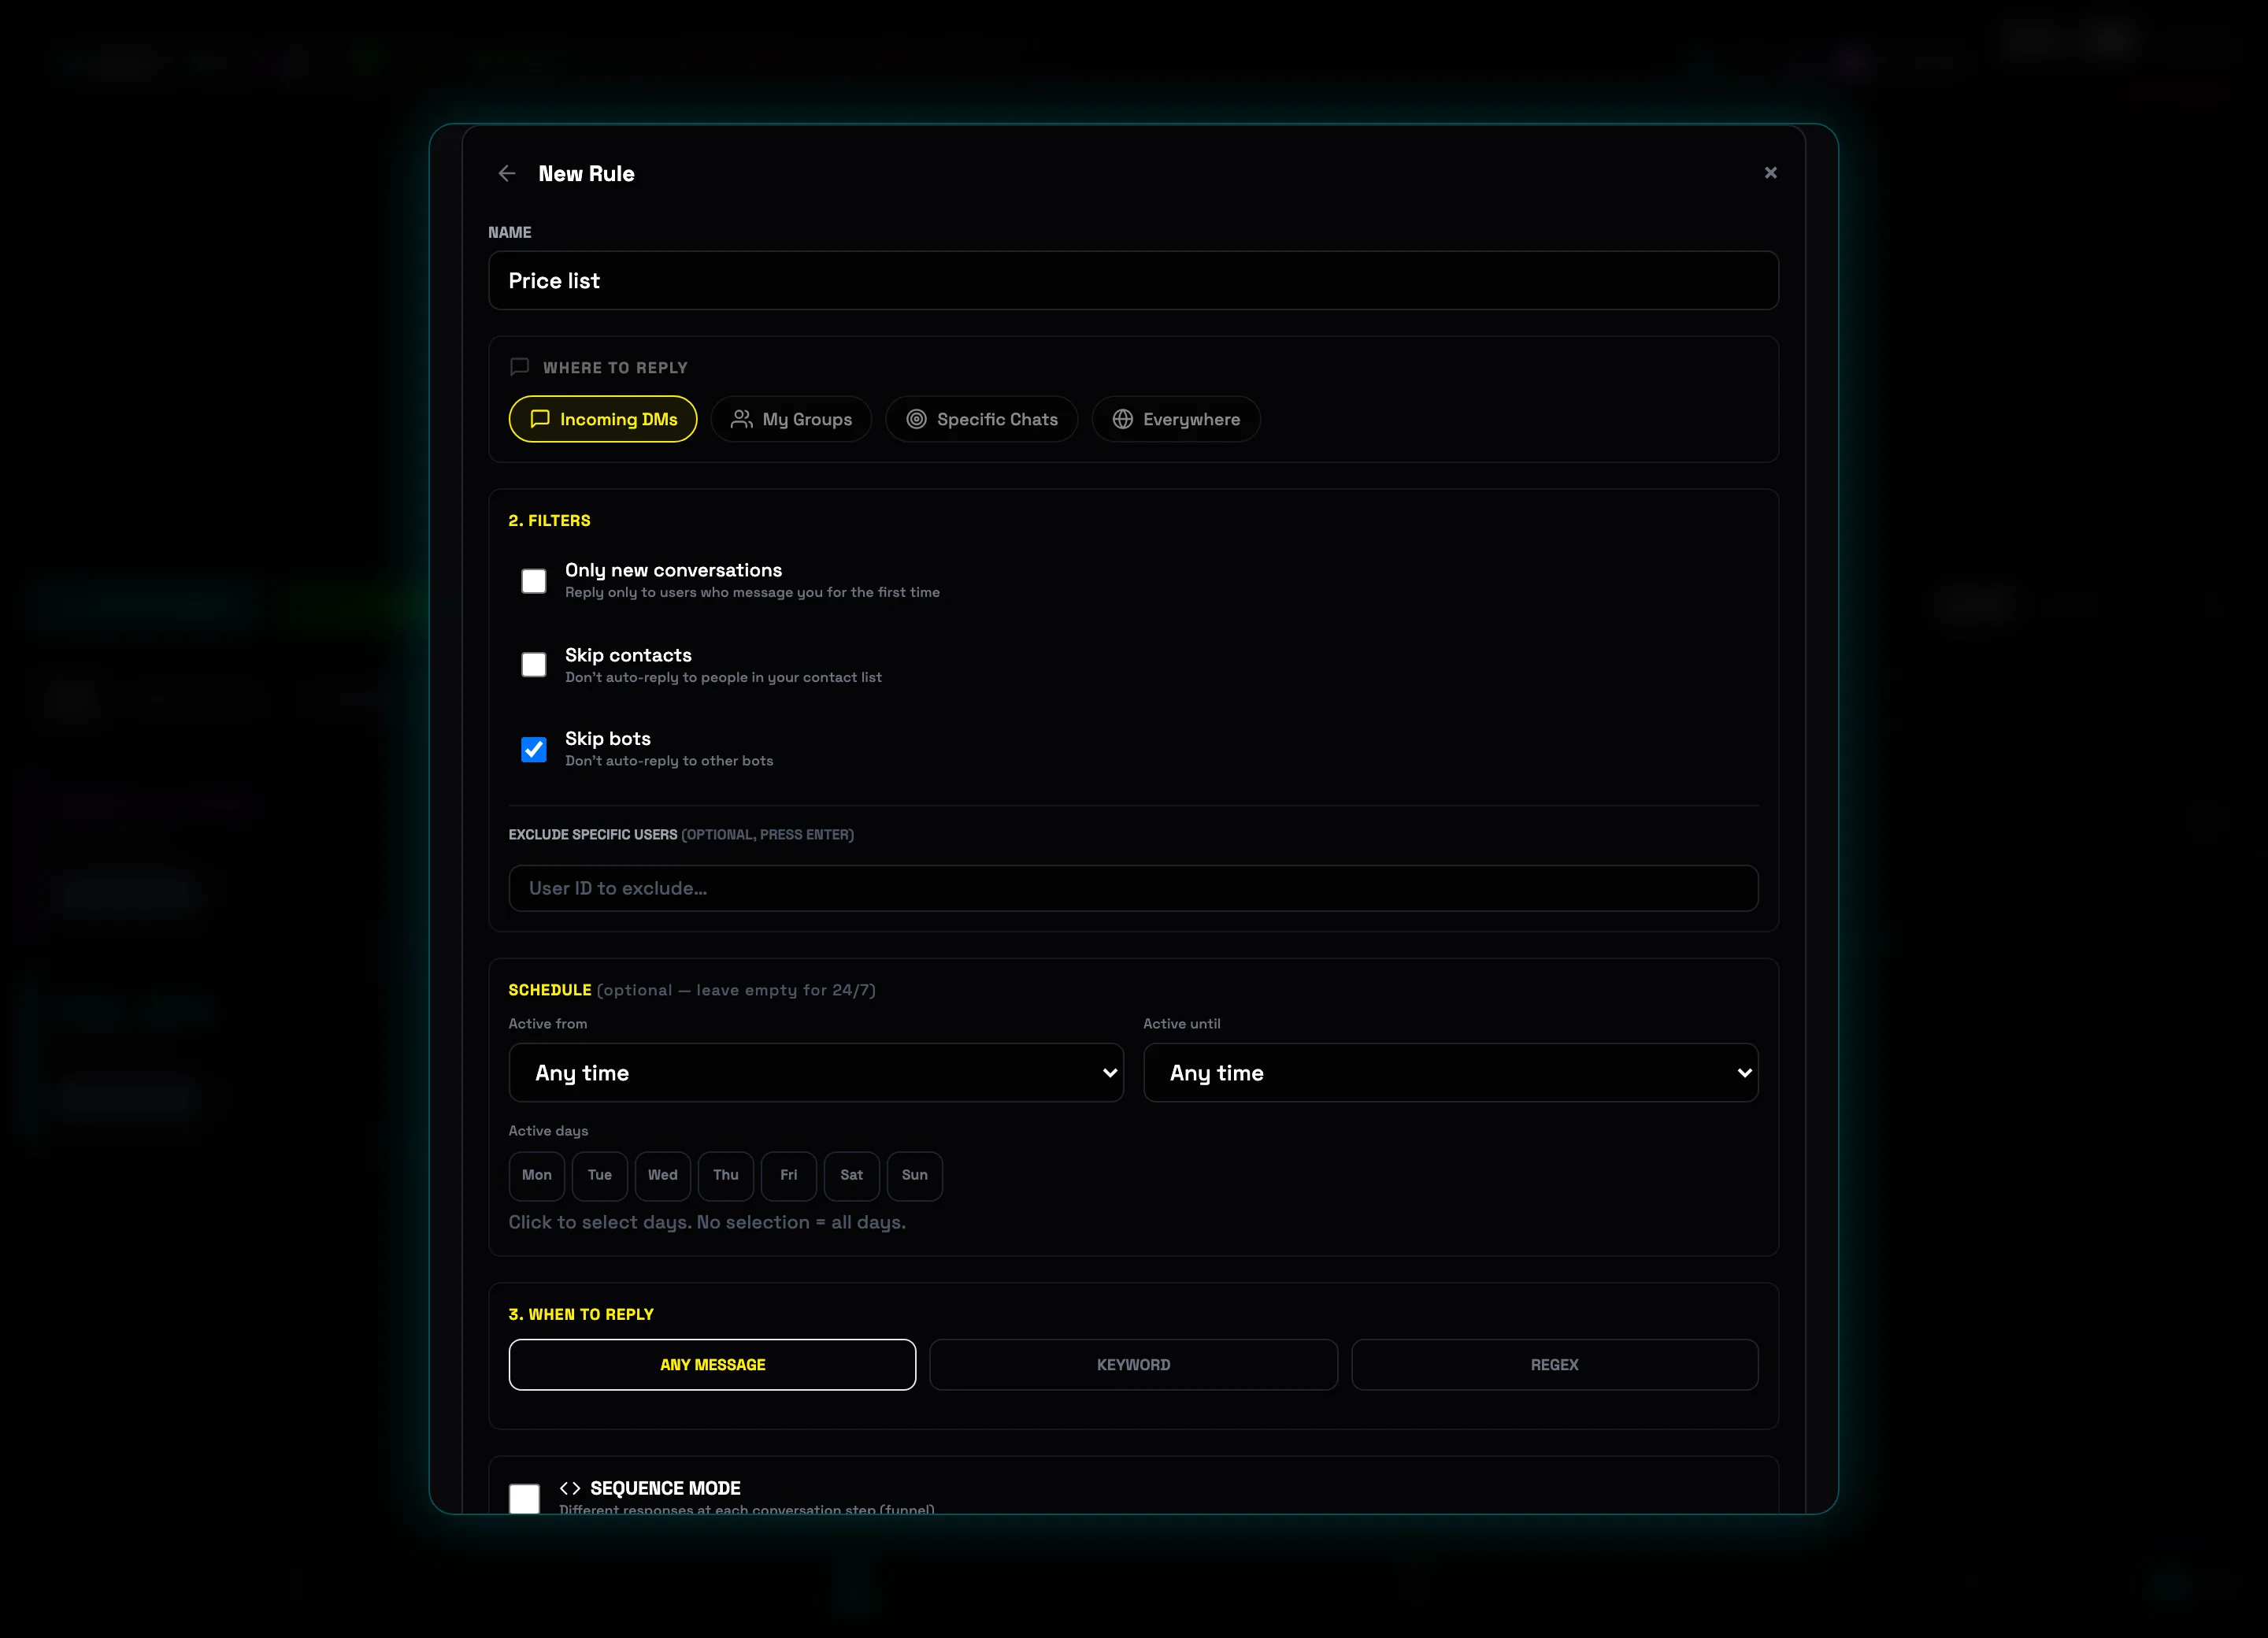 Rule nameWhere to reply💡Tip: for ad campaigns, start with the Incoming DMs scope — these are replies to people who messaged you after the campaign. That way the autoresponder doesn't spam in groups.
 -
4
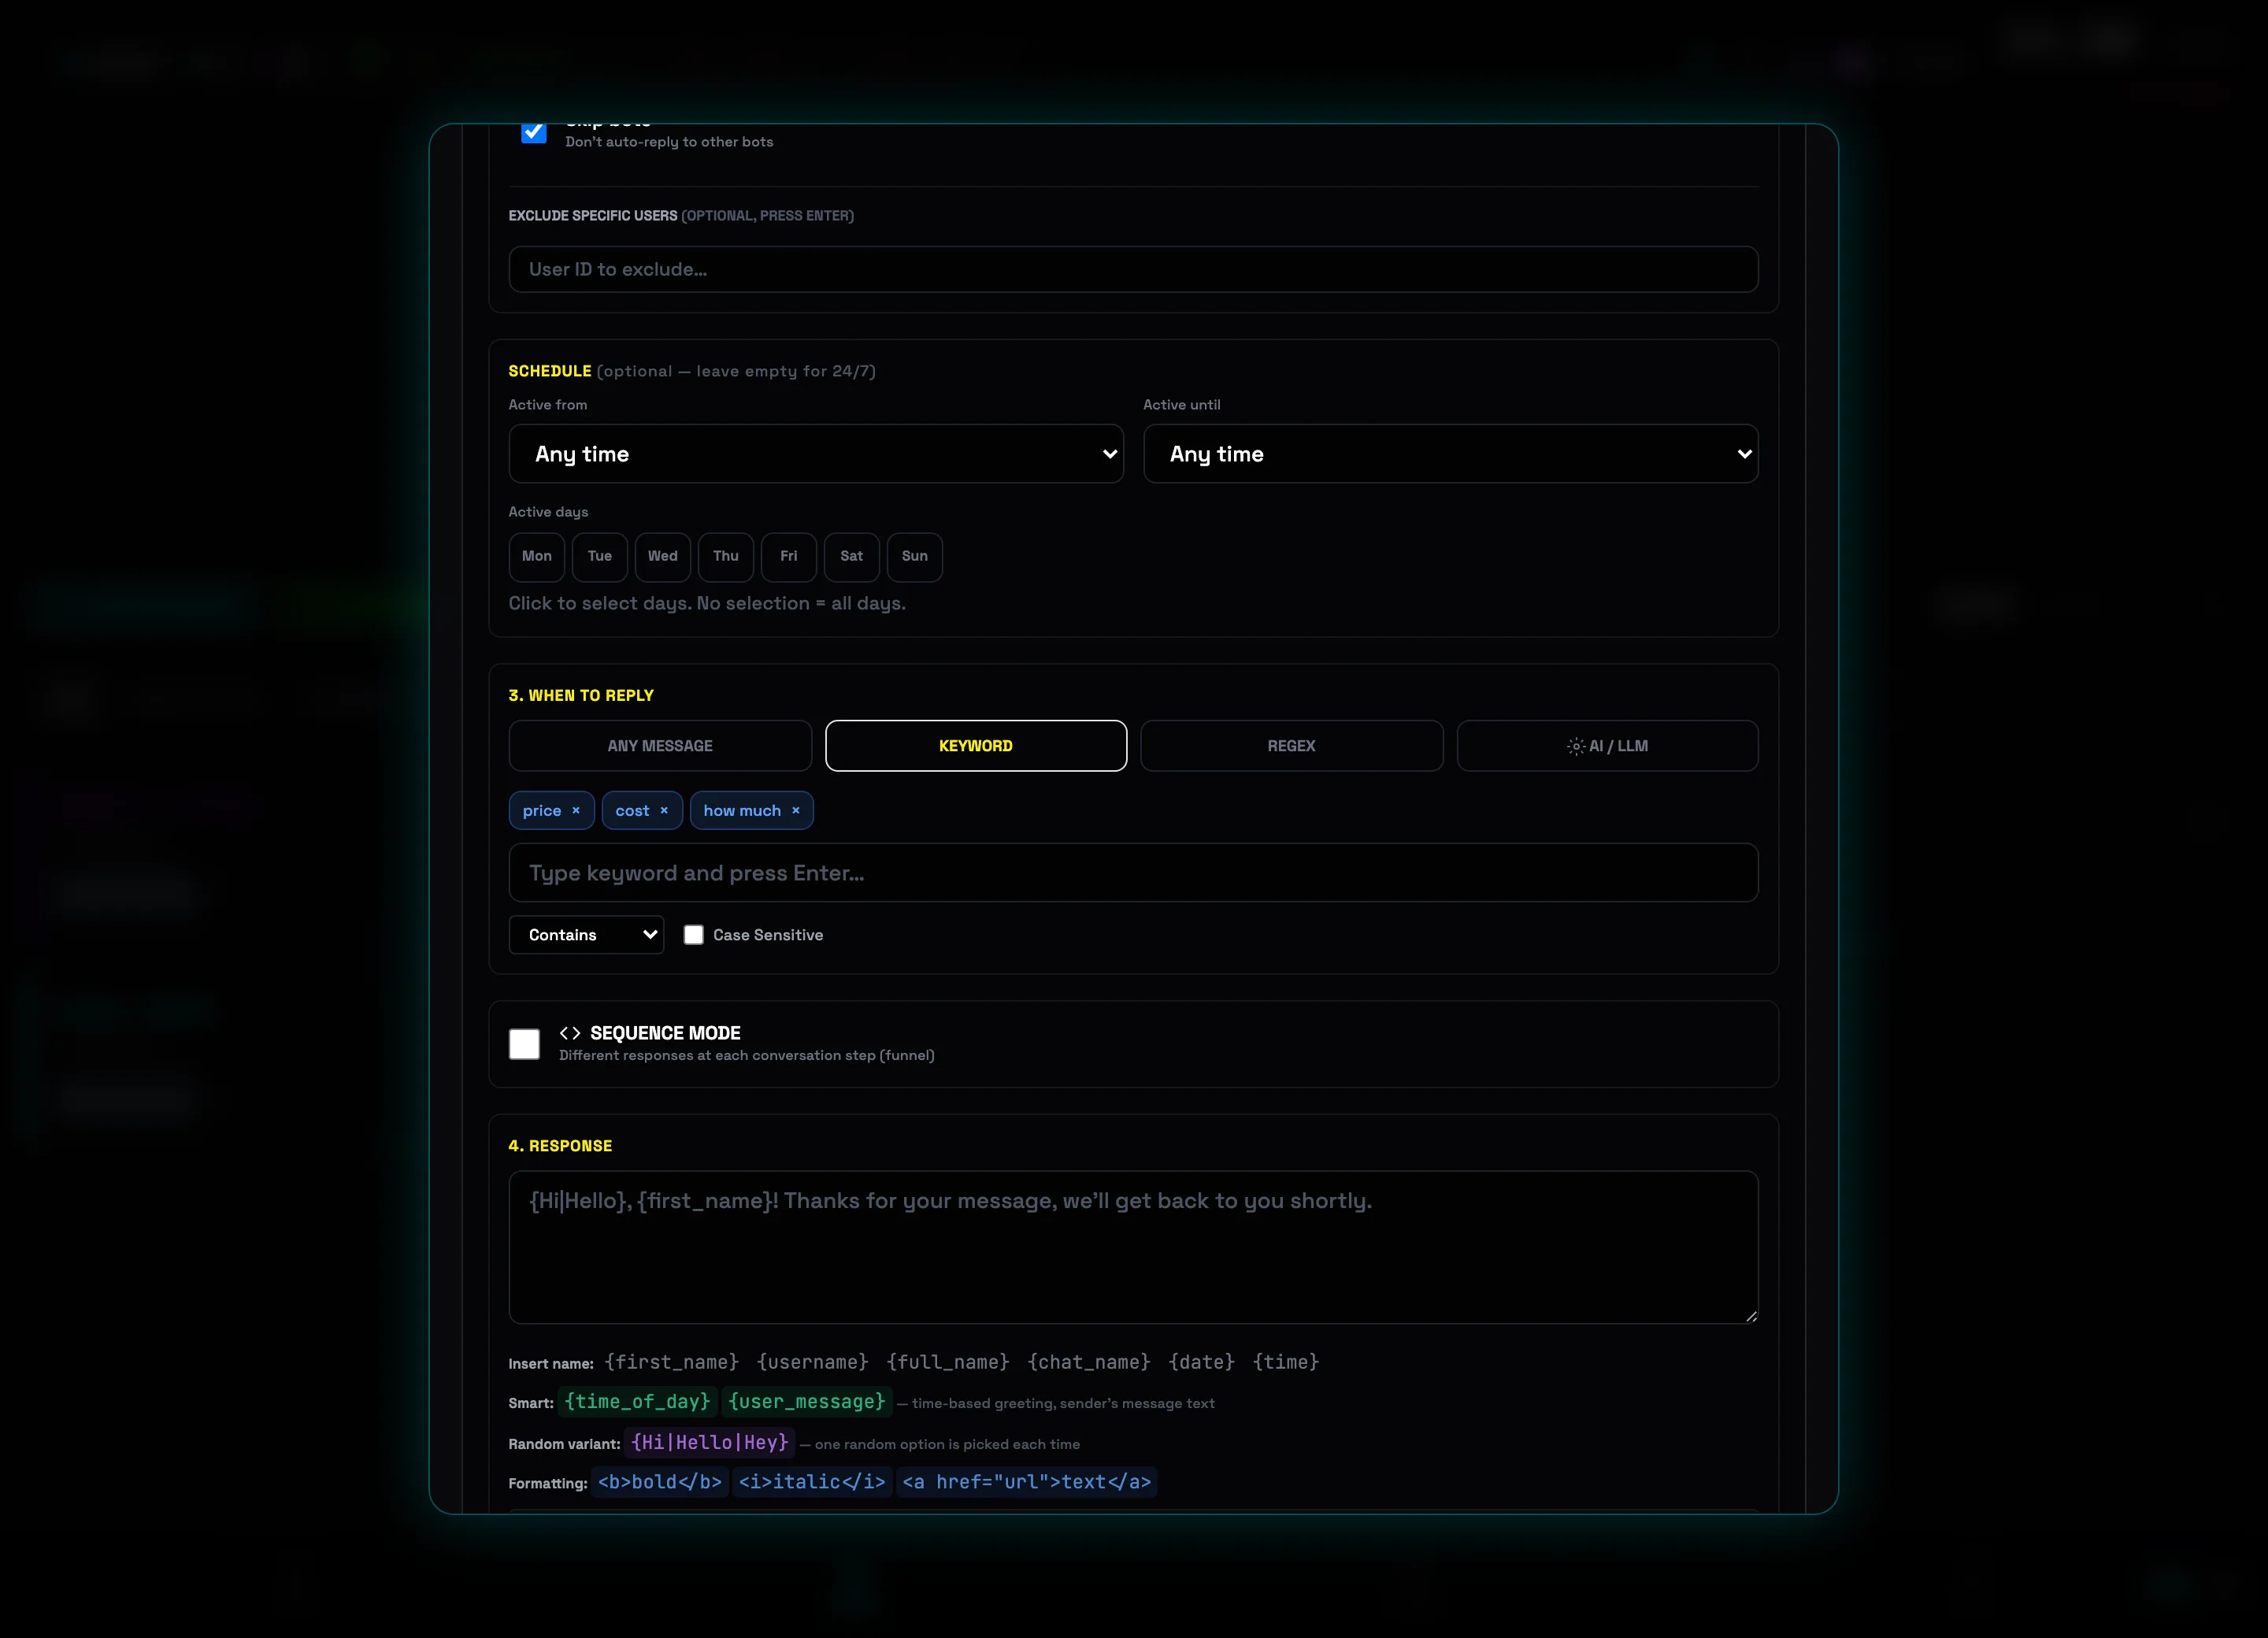
Set the trigger: "KEYWORD" + trigger words
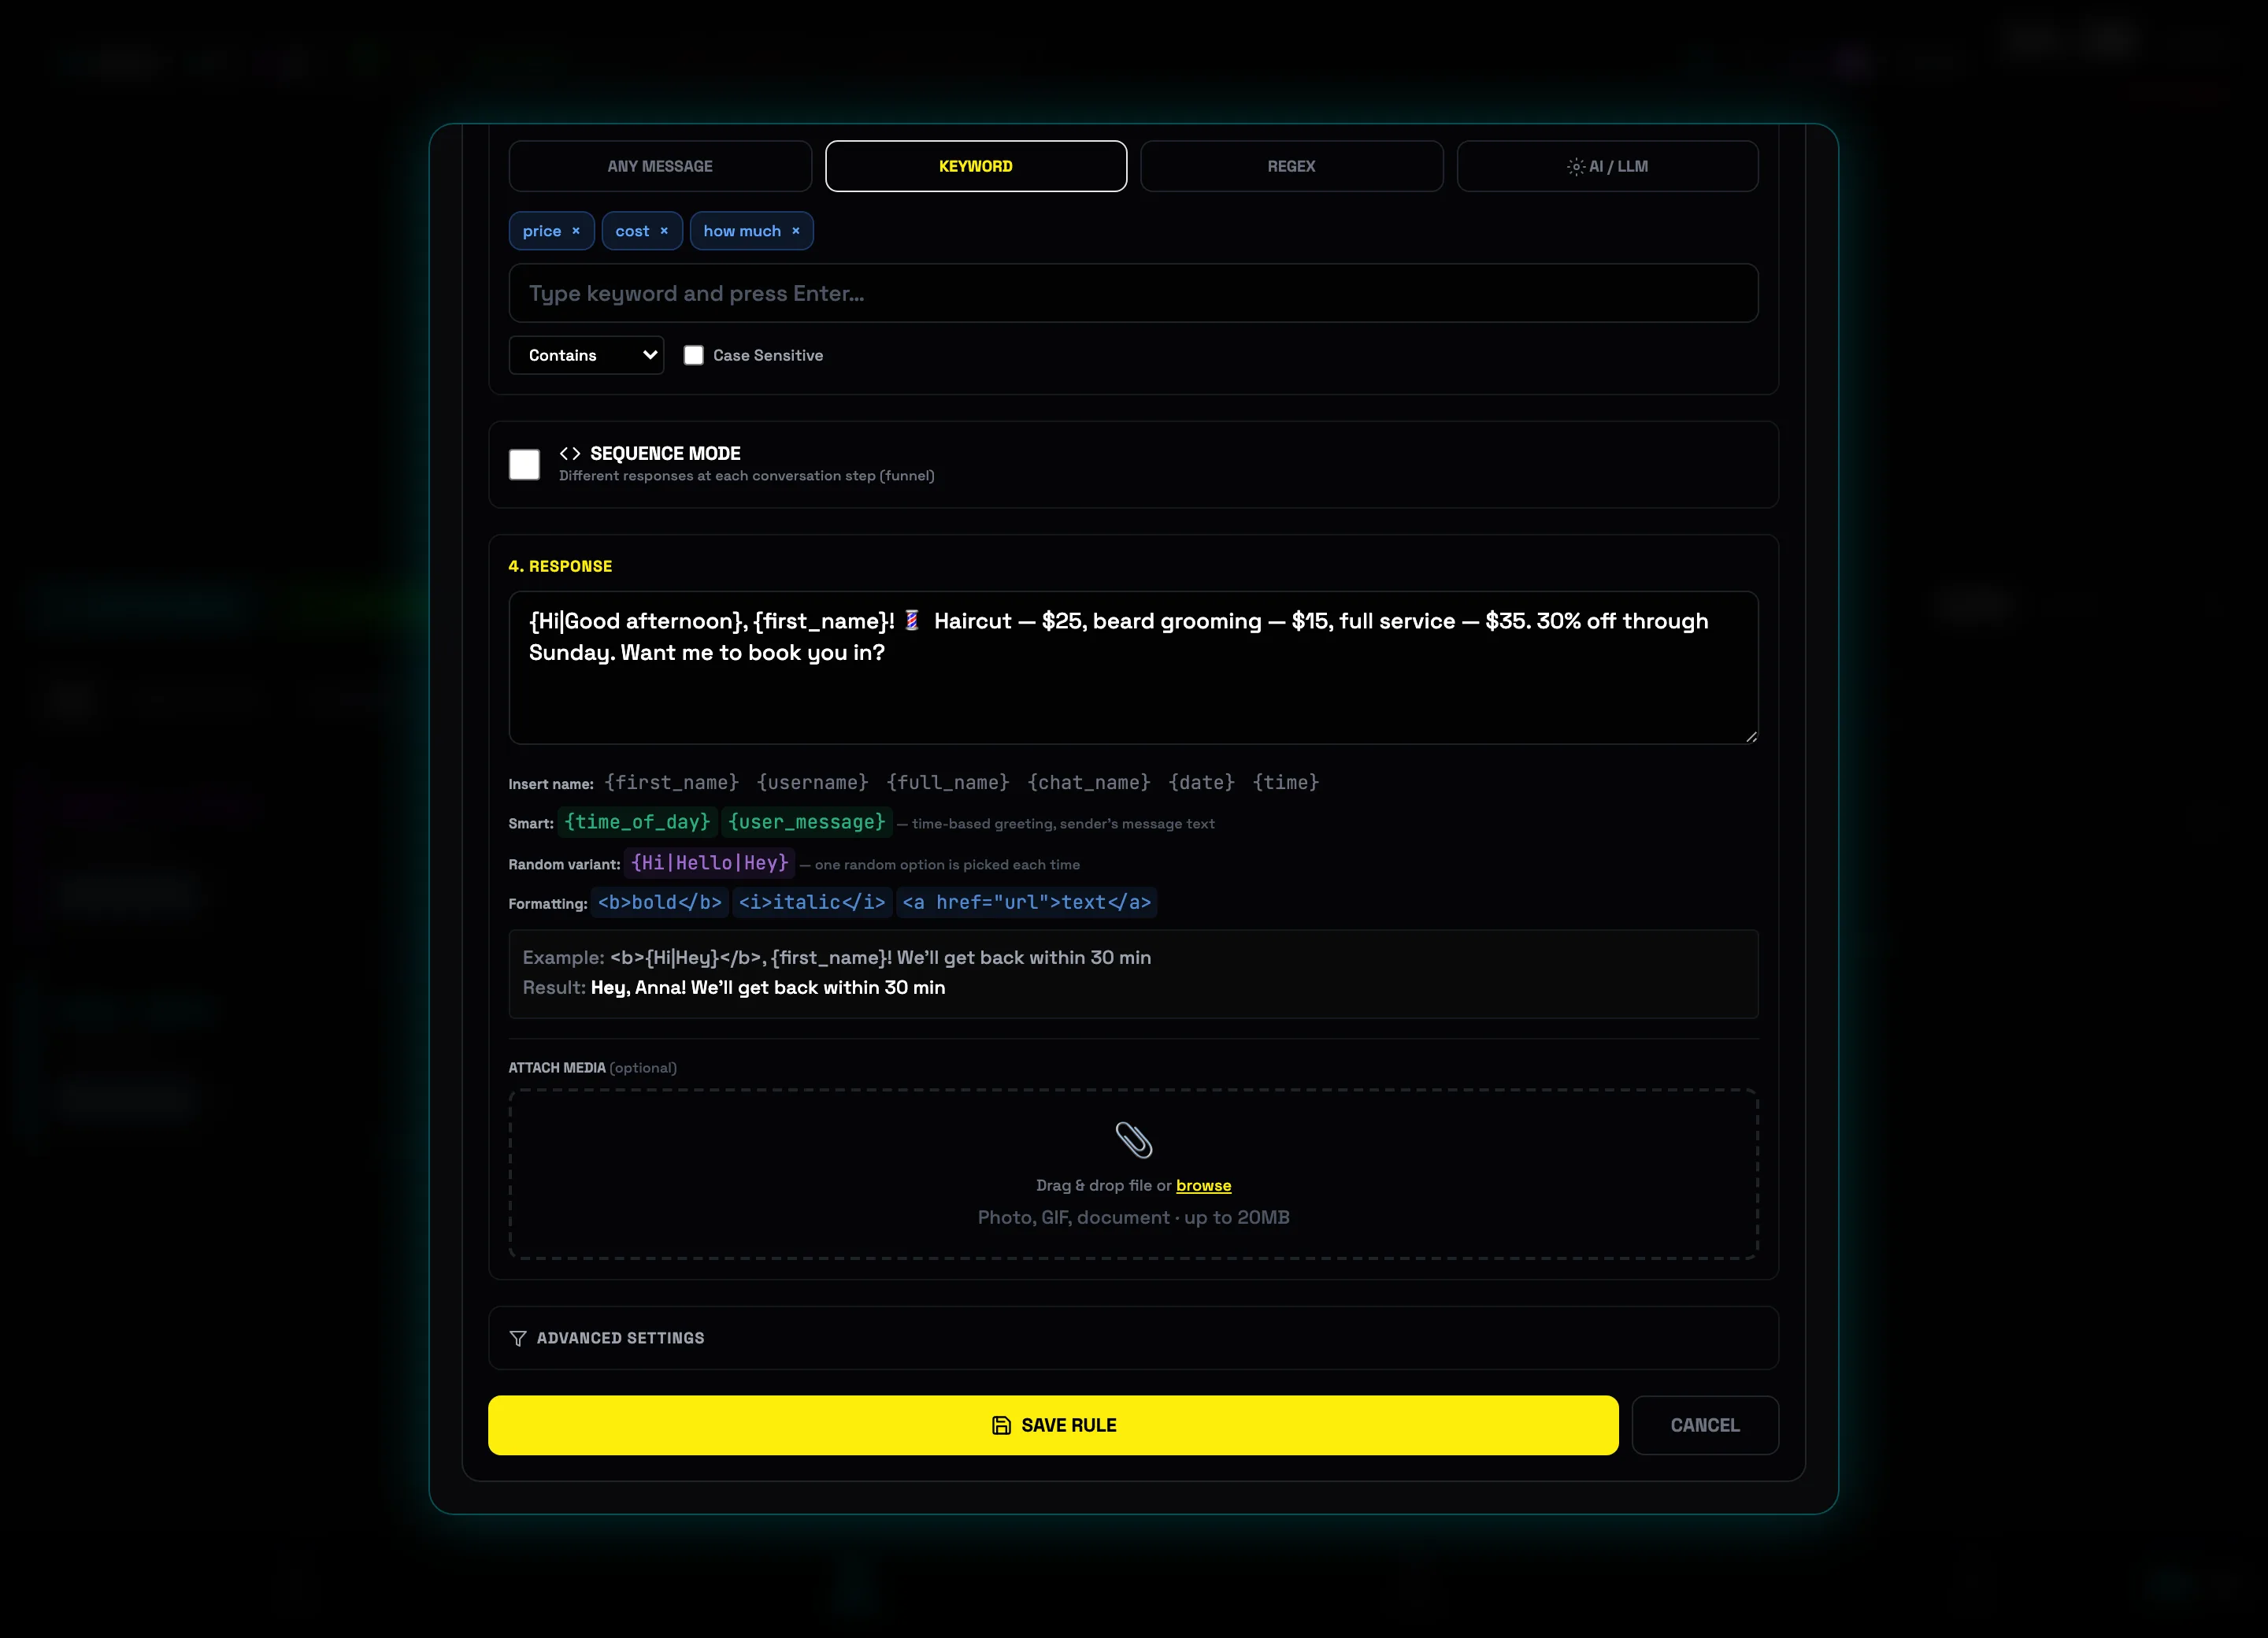
In the 3. WHEN TO REPLY block, choose KEYWORD (there are also ANY MESSAGE and REGEX). Type words and press Enter: "price", "cost", "how much". The match mode is Contains, Exact match, or Starts with, optionally Case-sensitive.
 "Keyword" triggerKeywords
 -
5
Write the reply and click "SAVE RULE"
In the 4. REPLY block, type the text. It supports the variables {first_name}, {username}, {time_of_day}, spintax {Hi|Good afternoon}, and HTML formatting. Below is ATTACH MEDIA (photo, GIF, document · up to 20 MB). When you're done, click SAVE RULE.
 Reply textSave rule💡Tip: spintax {Hi|Hello|Good afternoon} makes every reply unique — it looks more natural and is safer for the account.
 -
6
Enable rules with the toggle and watch the triggers
Each rule card has its own toggle — a disabled rule greys out and doesn't reply. The card shows an activity log: a reply counter and the time of the last trigger (for example, "18 replies · last: 6/10/2026"), while the Engine ONLINE status at the top sums up all the account's replies.
 Rule toggleReply counter⚠️Important: the engine replies only while the account's bot is running — if the bot is stopped, the status switches to OFF (bot stopped).
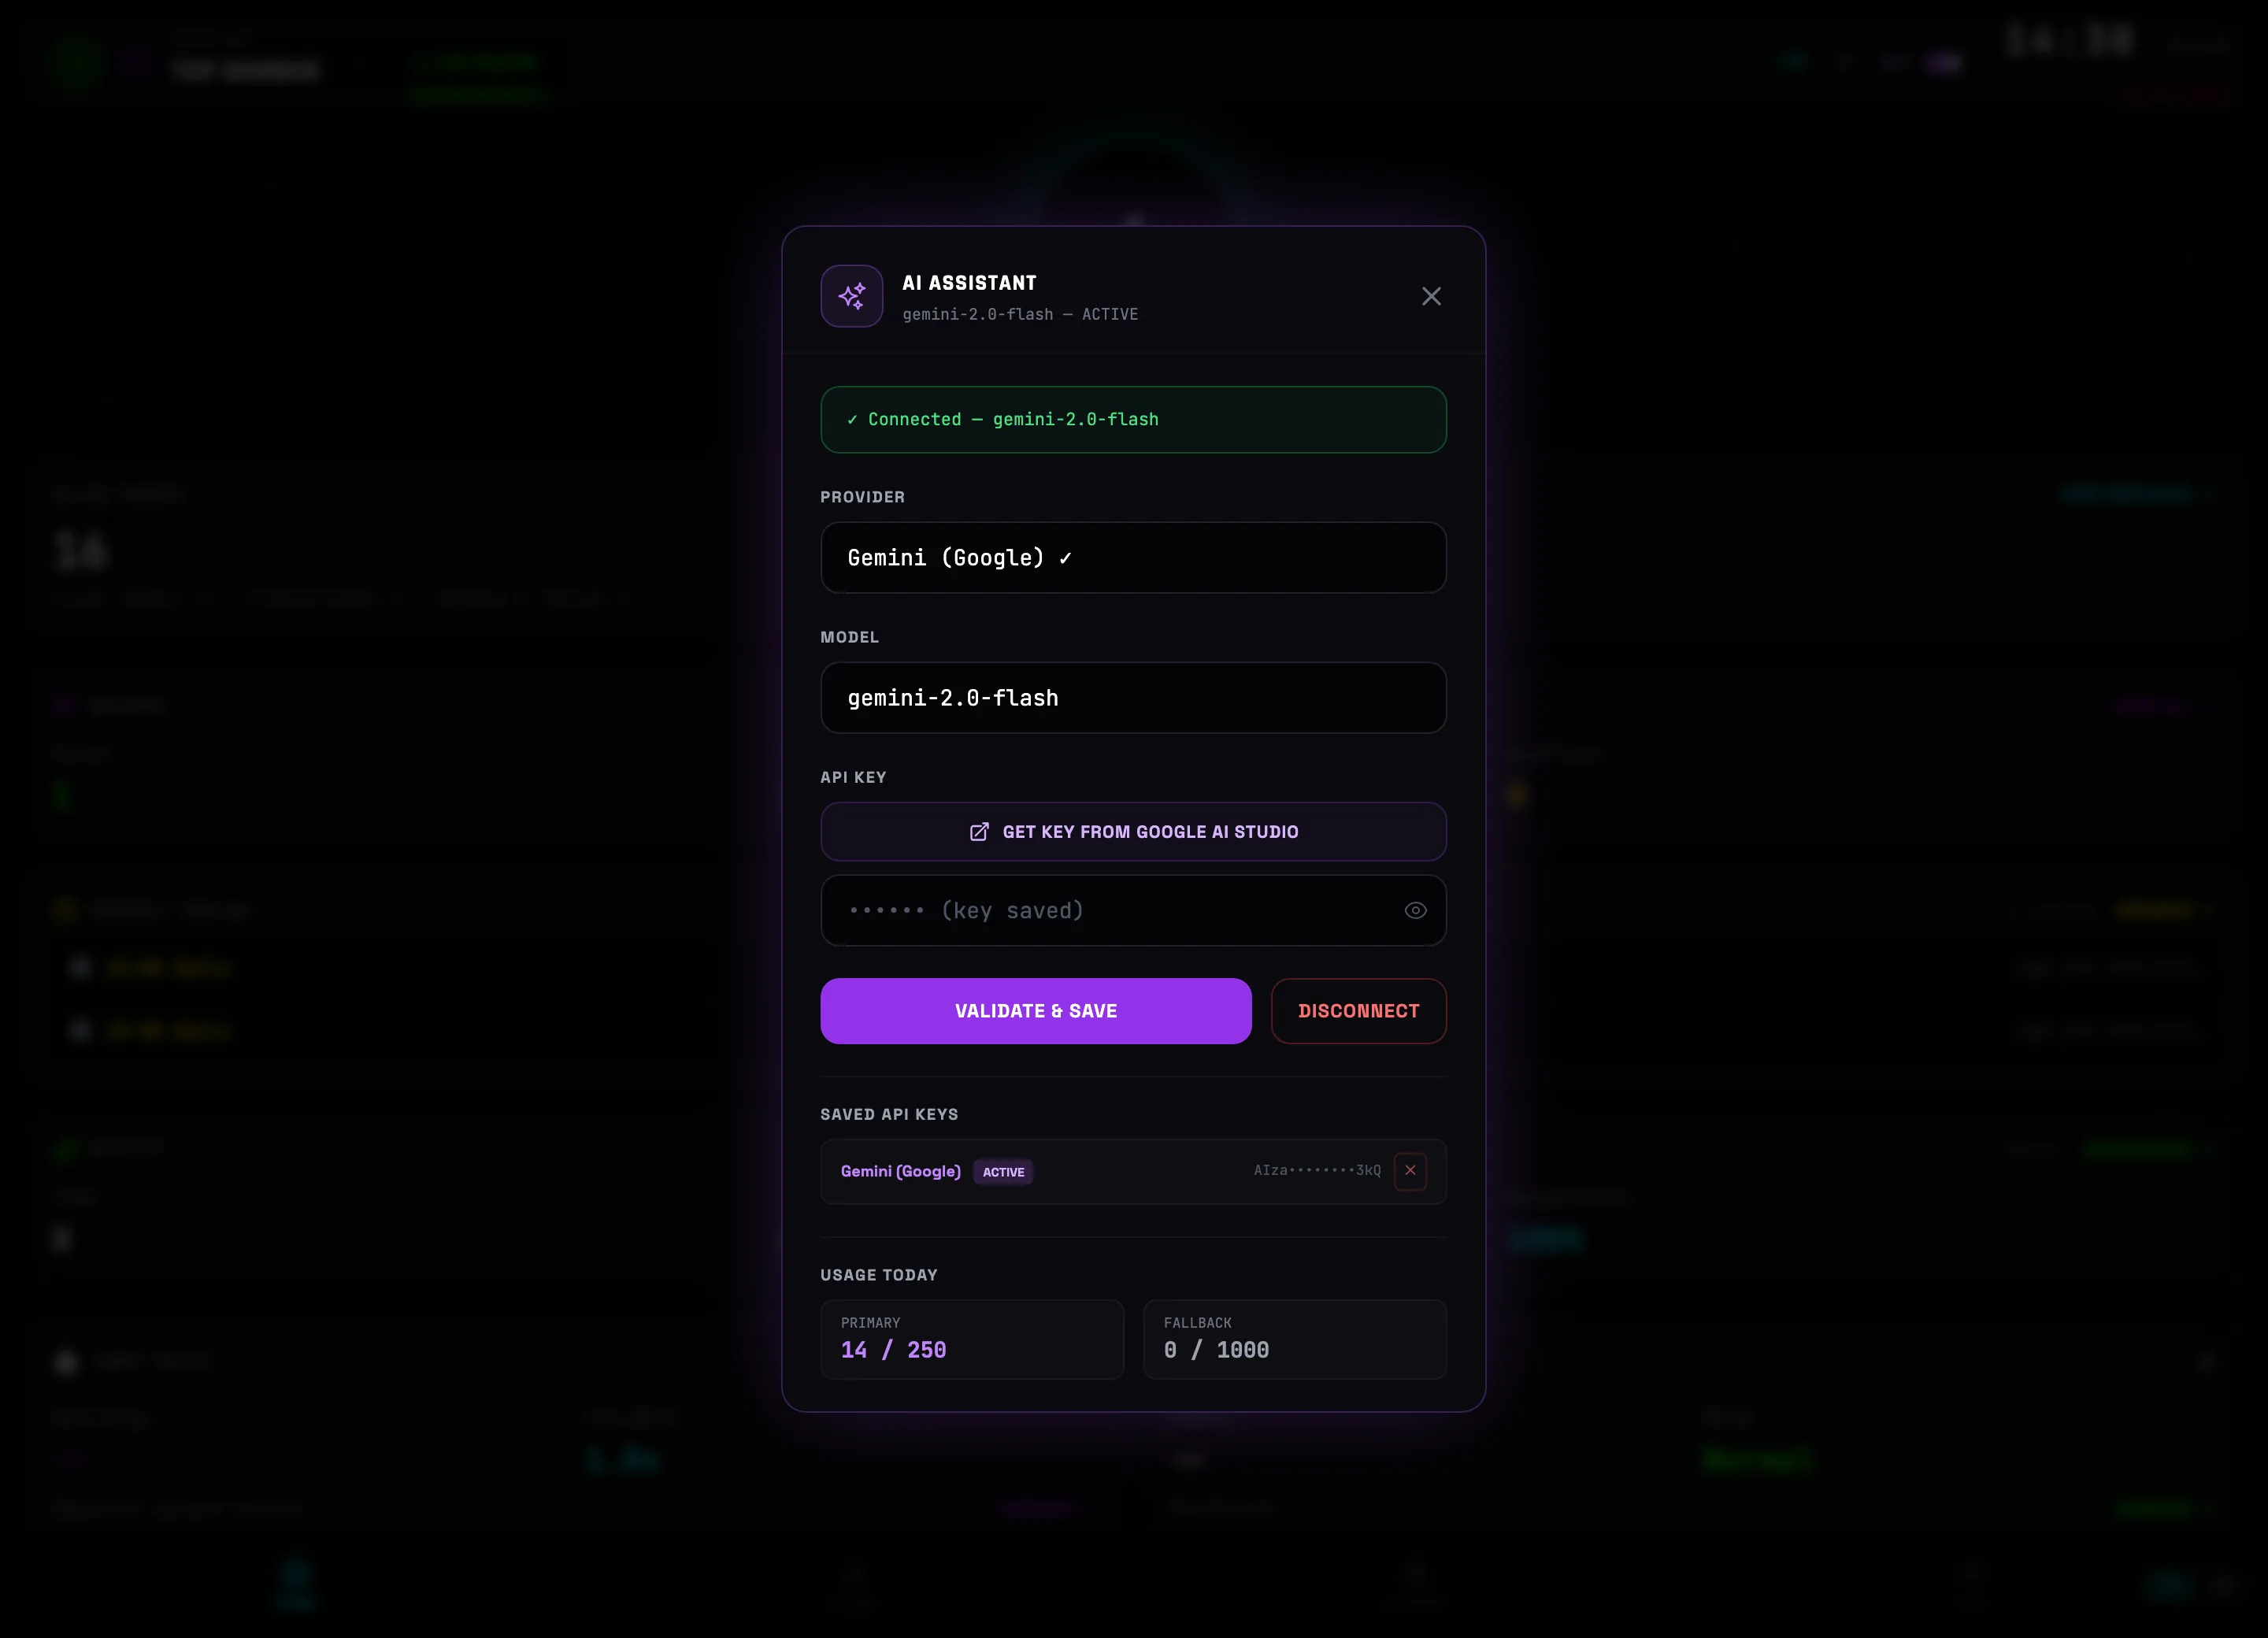
AI ASSISTANT — connecting a provider
The AI assistant enables smart features: text generation, target scoring and auto-selection. It connects in a minute with your own API key — choose from Gemini, OpenAI, Anthropic, DeepSeek or Groq.
-
1
Open the settings via the AI widget in the header
In the top bar, next to your plan, there is an AI indicator with a status dot: gray — no provider connected, purple — active. Clicking the indicator opens the AI ASSISTANT window.
 AI widget in the header
 -
2
Pick a provider and model
The PROVIDER list offers Gemini (Google), OpenAI (GPT), Anthropic (Claude), DeepSeek and Groq (Llama). Below it the MODEL list shows a specific version of the chosen provider (for example gemini-2.5-flash). A green Connected banner means the key has already been accepted.
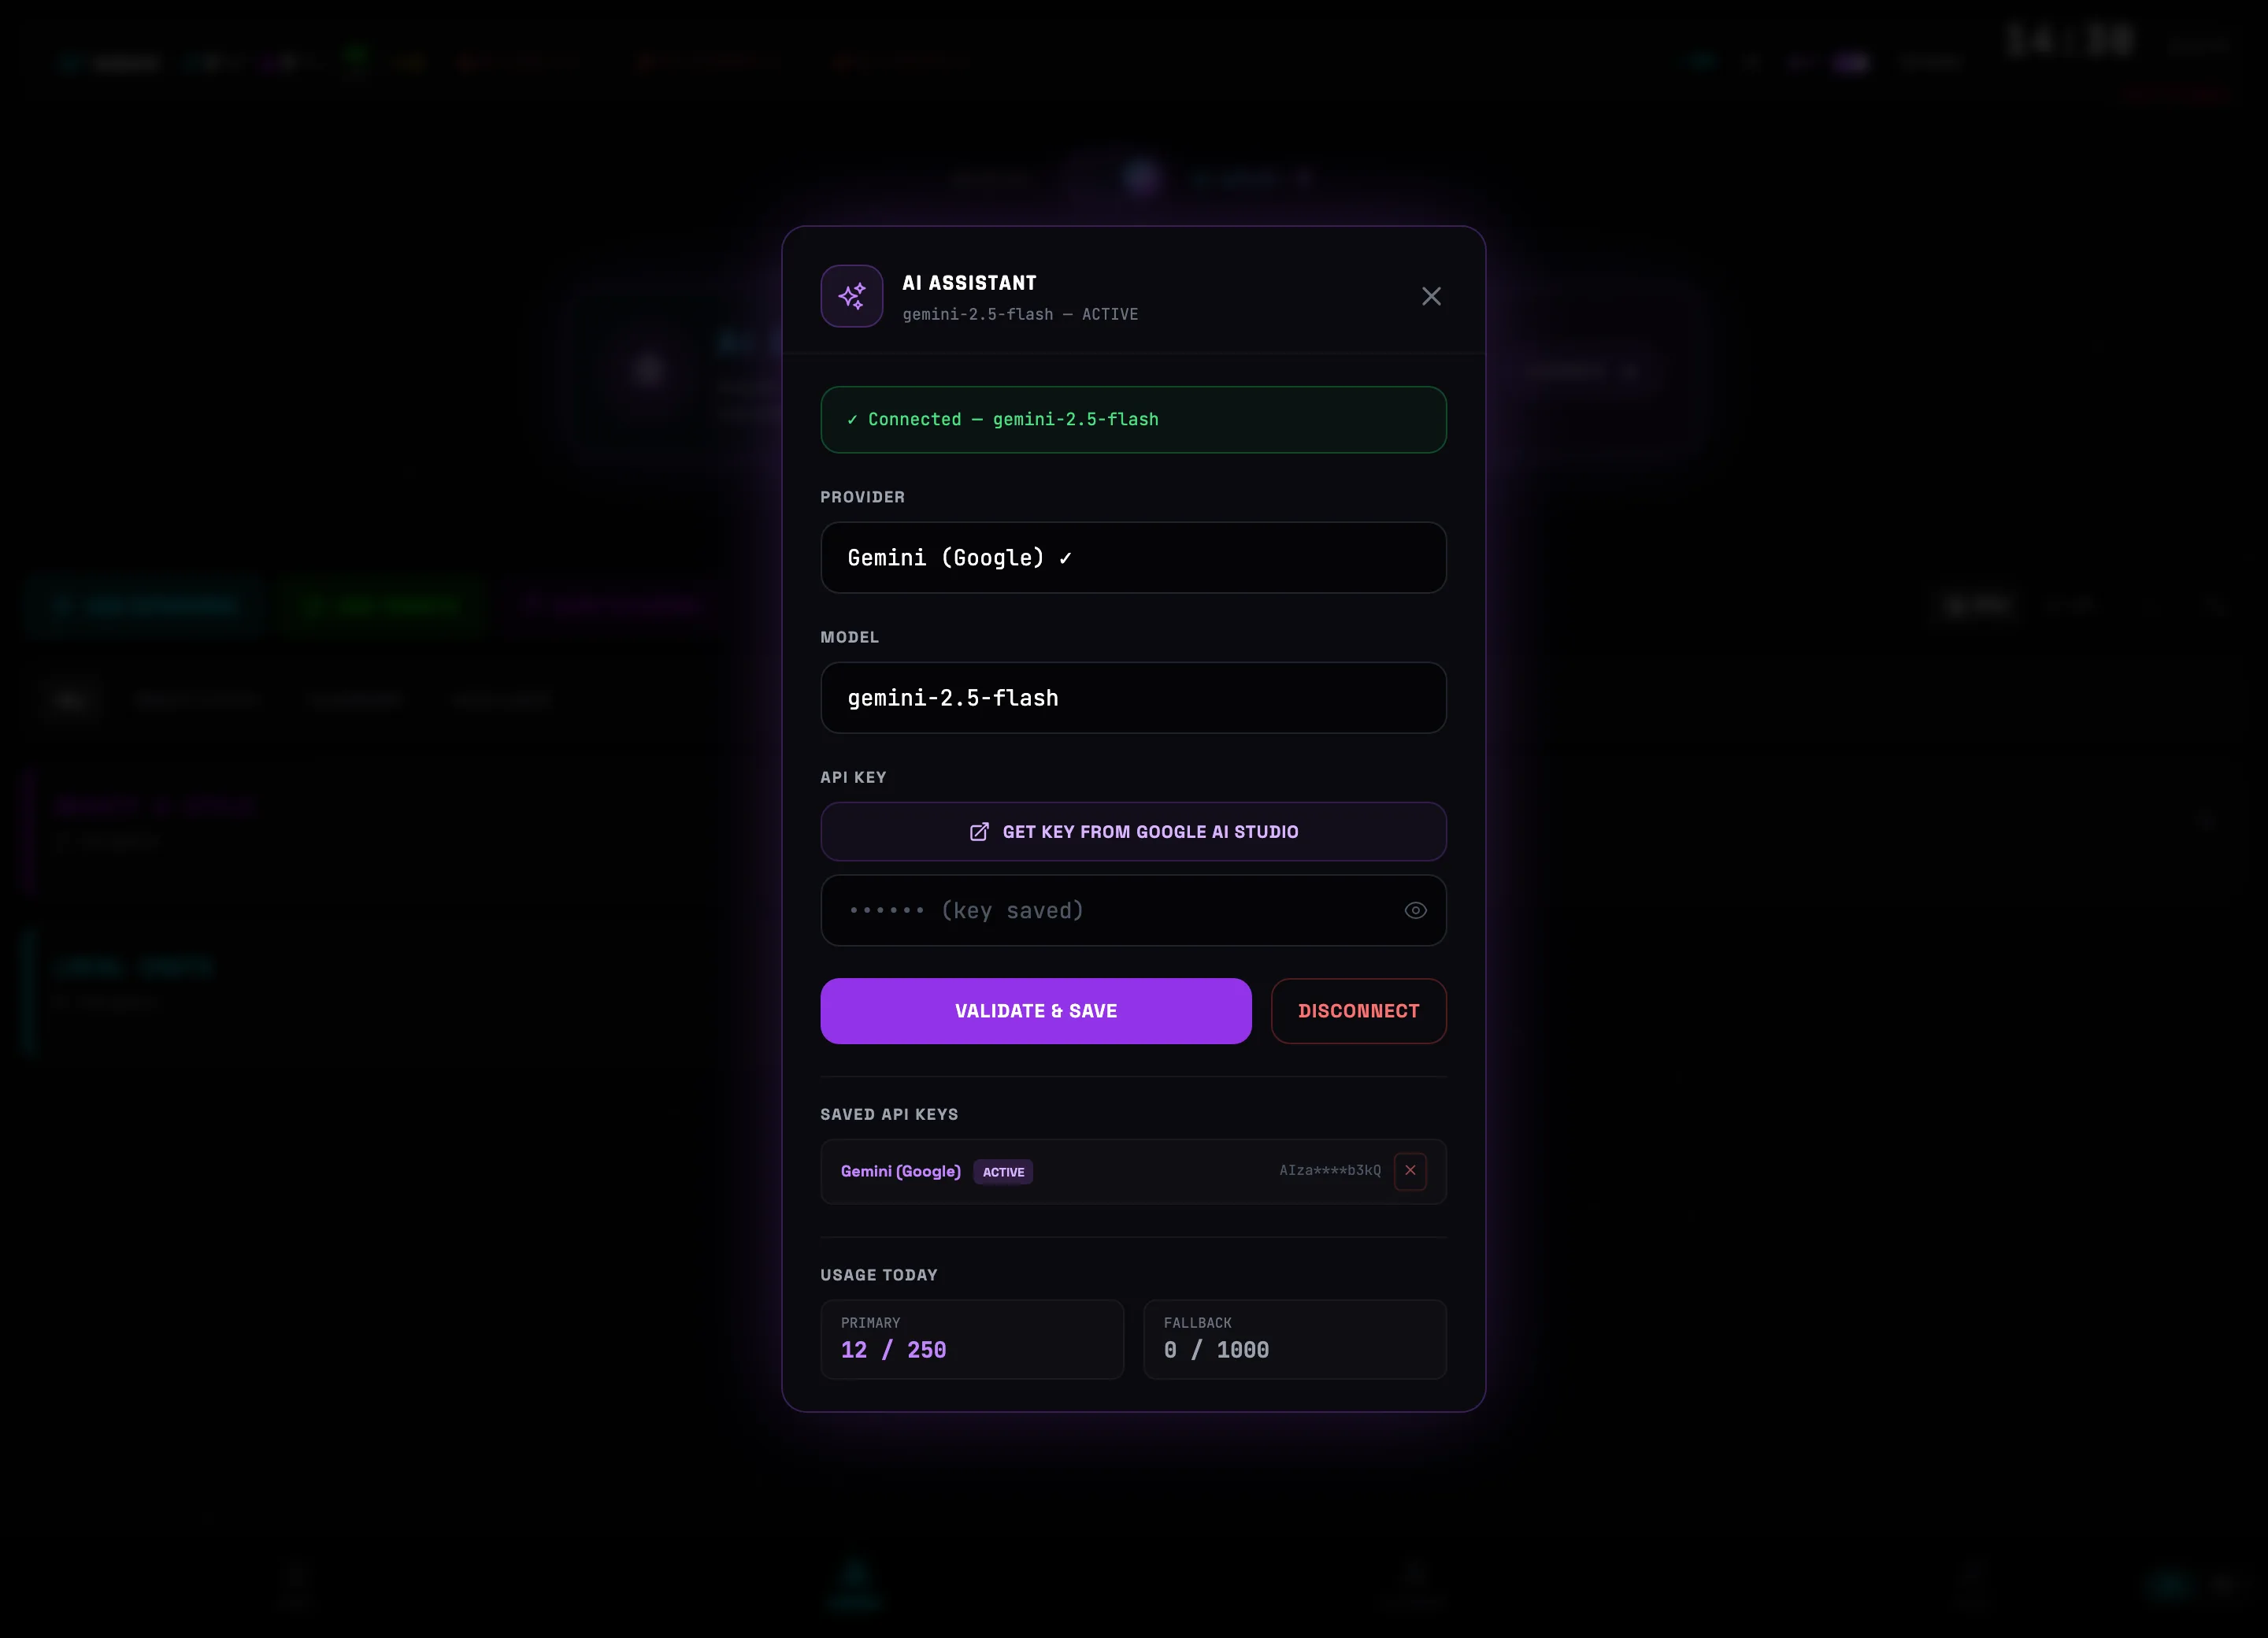 Provider listModel selection💡Tip: for most tasks the fast and cheap gemini-2.5-flash is enough — it is the default option.
 -
3
Paste the API key and click VERIFY & SAVE
The GET KEY button leads to the provider's page where the key is issued for free. Copy the key into the API KEY field and click VERIFY & SAVE — TG:ON checks the key with a request and connects the provider. The DISCONNECT button removes the active key.
 Get keyAPI key fieldVerify & Save💡Tip: saved keys for several providers are stored in the SAVED API KEYS block — you can switch between them with the Select button without re-entering. The USED TODAY block shows the remaining daily quota.
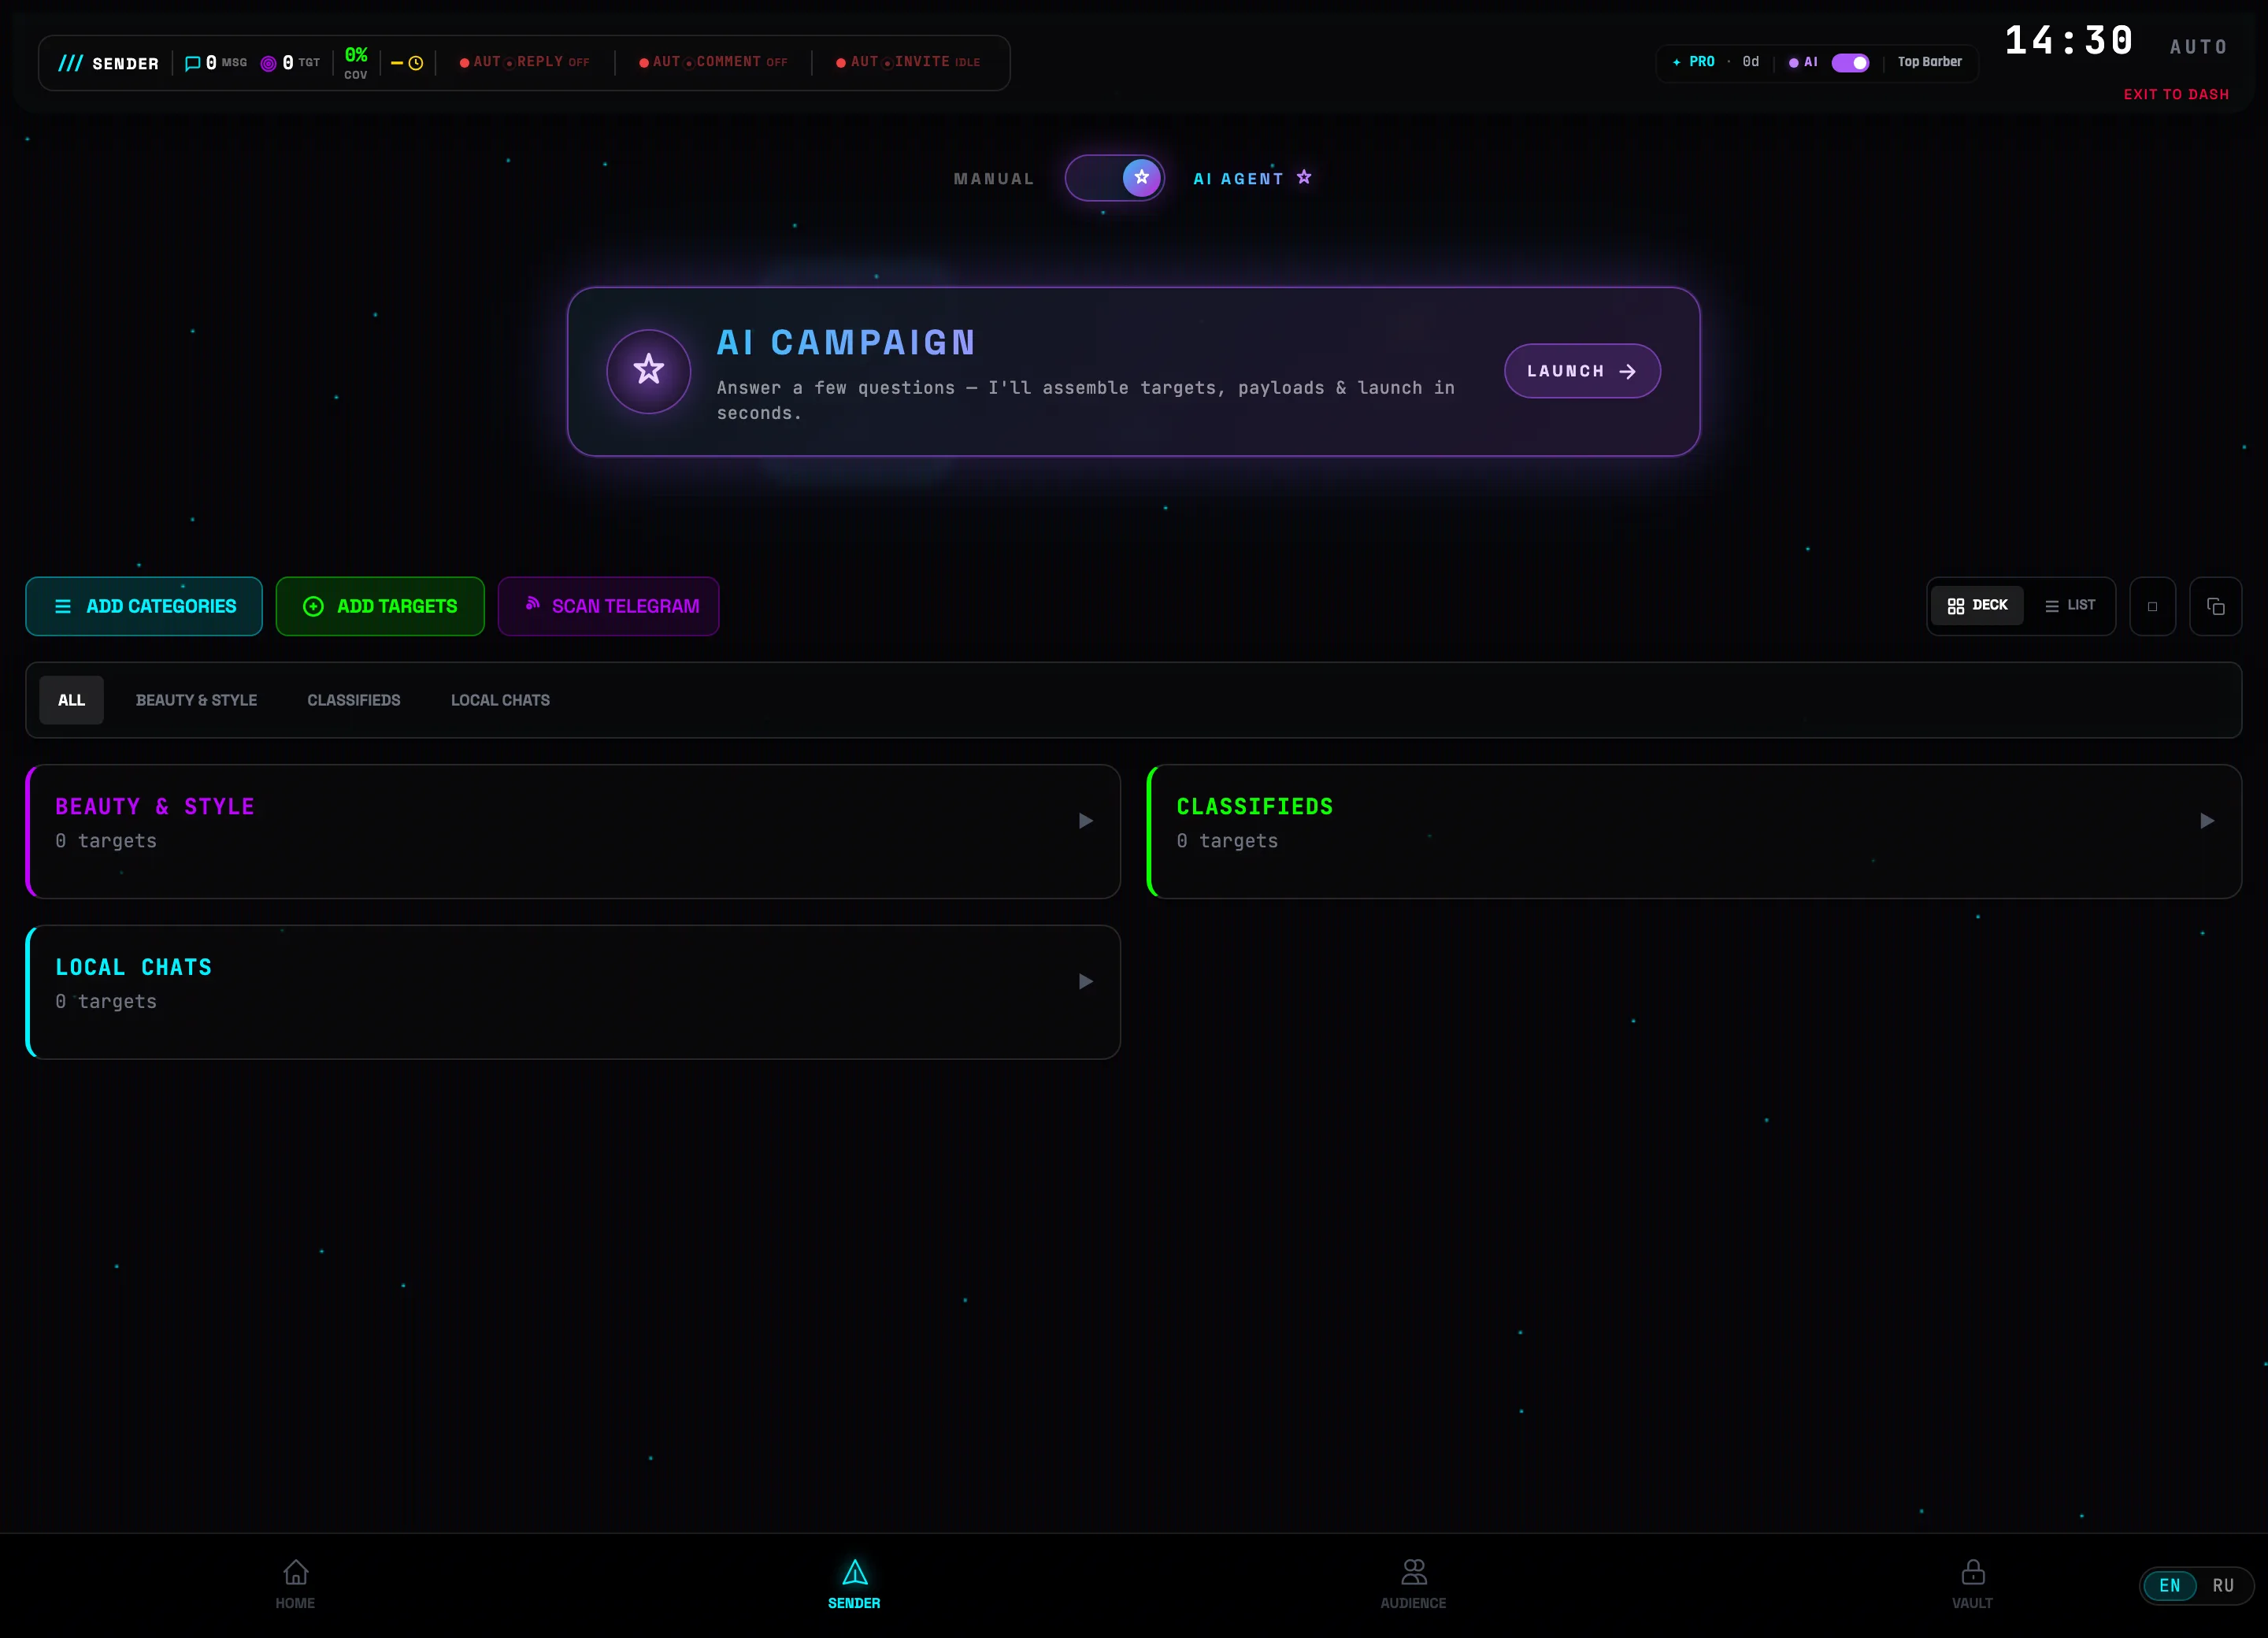
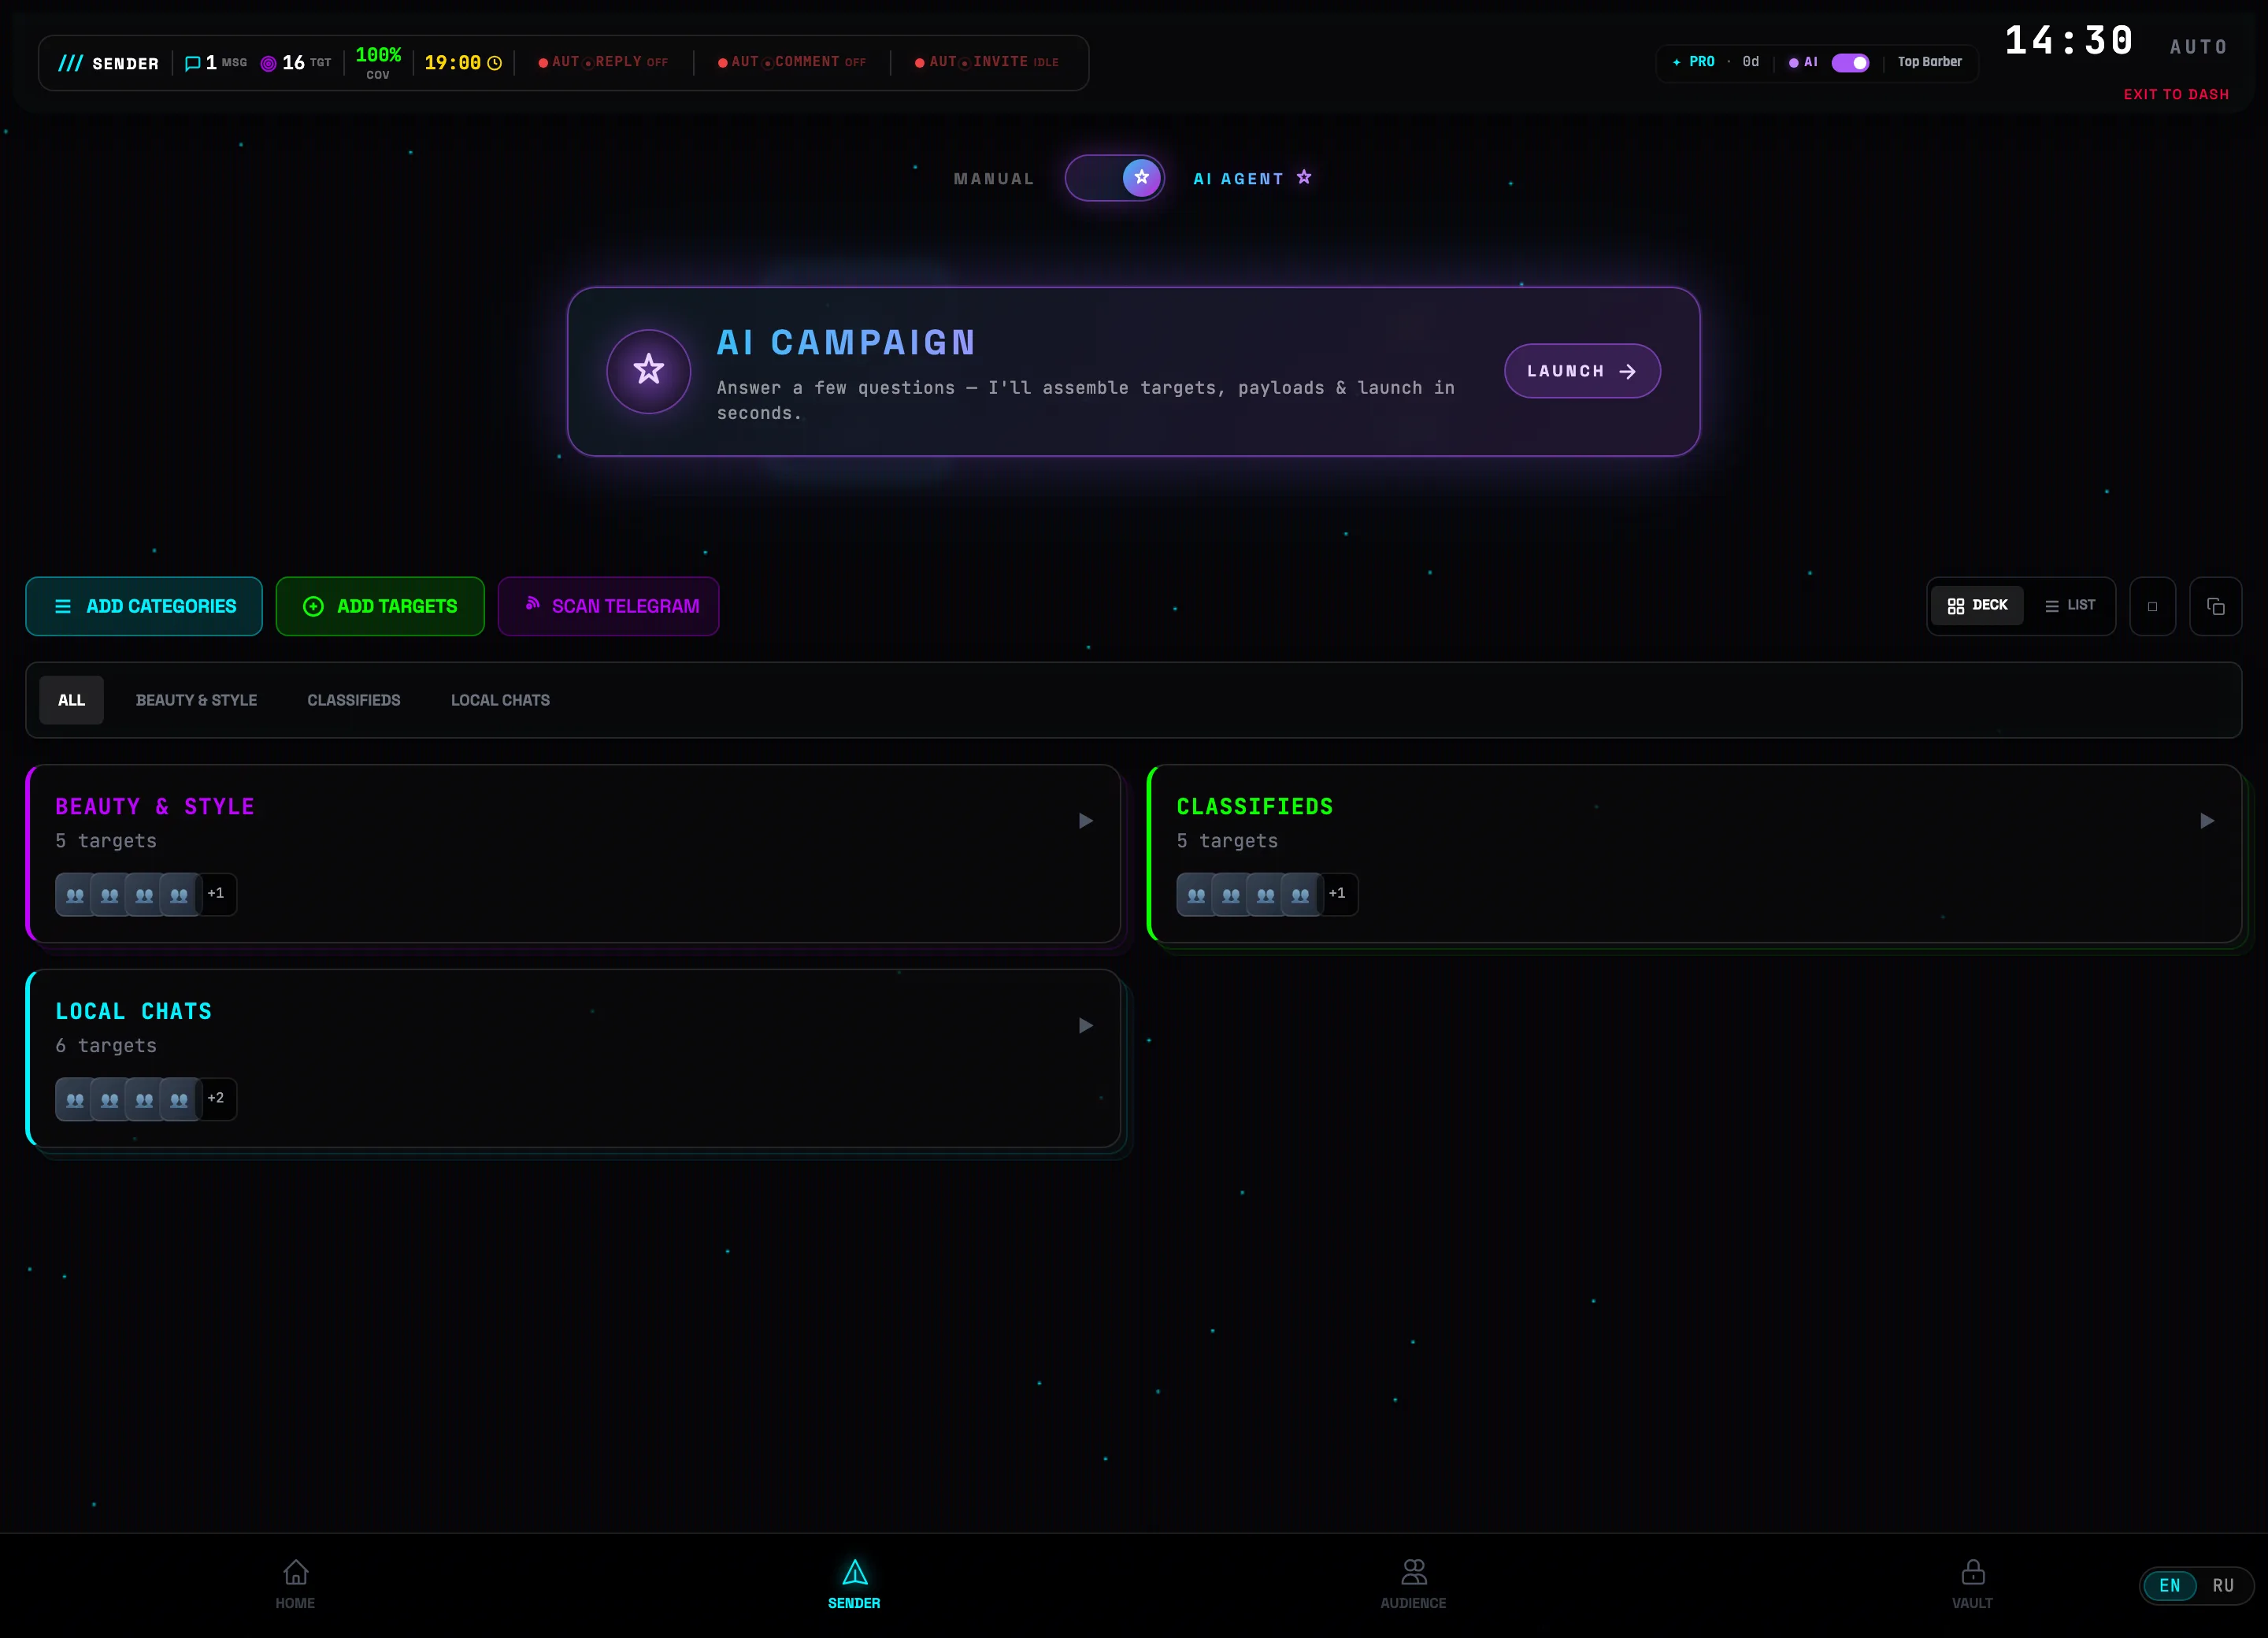
AI CAMPAIGN BUILDER — a campaign in a minute
Once AI is connected, the AI AGENT mode appears in the Sender. Describe your niche and goal — the builder will find relevant chats in the Vault database, score them, write copy with spintax and suggest a schedule. All that's left is to review and launch.
-
1
Switch on AI AGENT mode and click START
Above the Sender pipeline there is a MANUAL / AI AGENT toggle. In AI AGENT mode an AI CAMPAIGN card appears — click START on it to open the builder.
 AI AGENT toggleAI CAMPAIGN card
 -
2
Describe your niche
The AI CAMPAIGN BUILDER window guides you step by step (the NICHE → GOAL → GEO → VOICE → REVIEW → LAUNCH bar). On the first question, pick a ready-made preset (Services, E-commerce, Crypto…) or Other… and describe your niche in your own words.
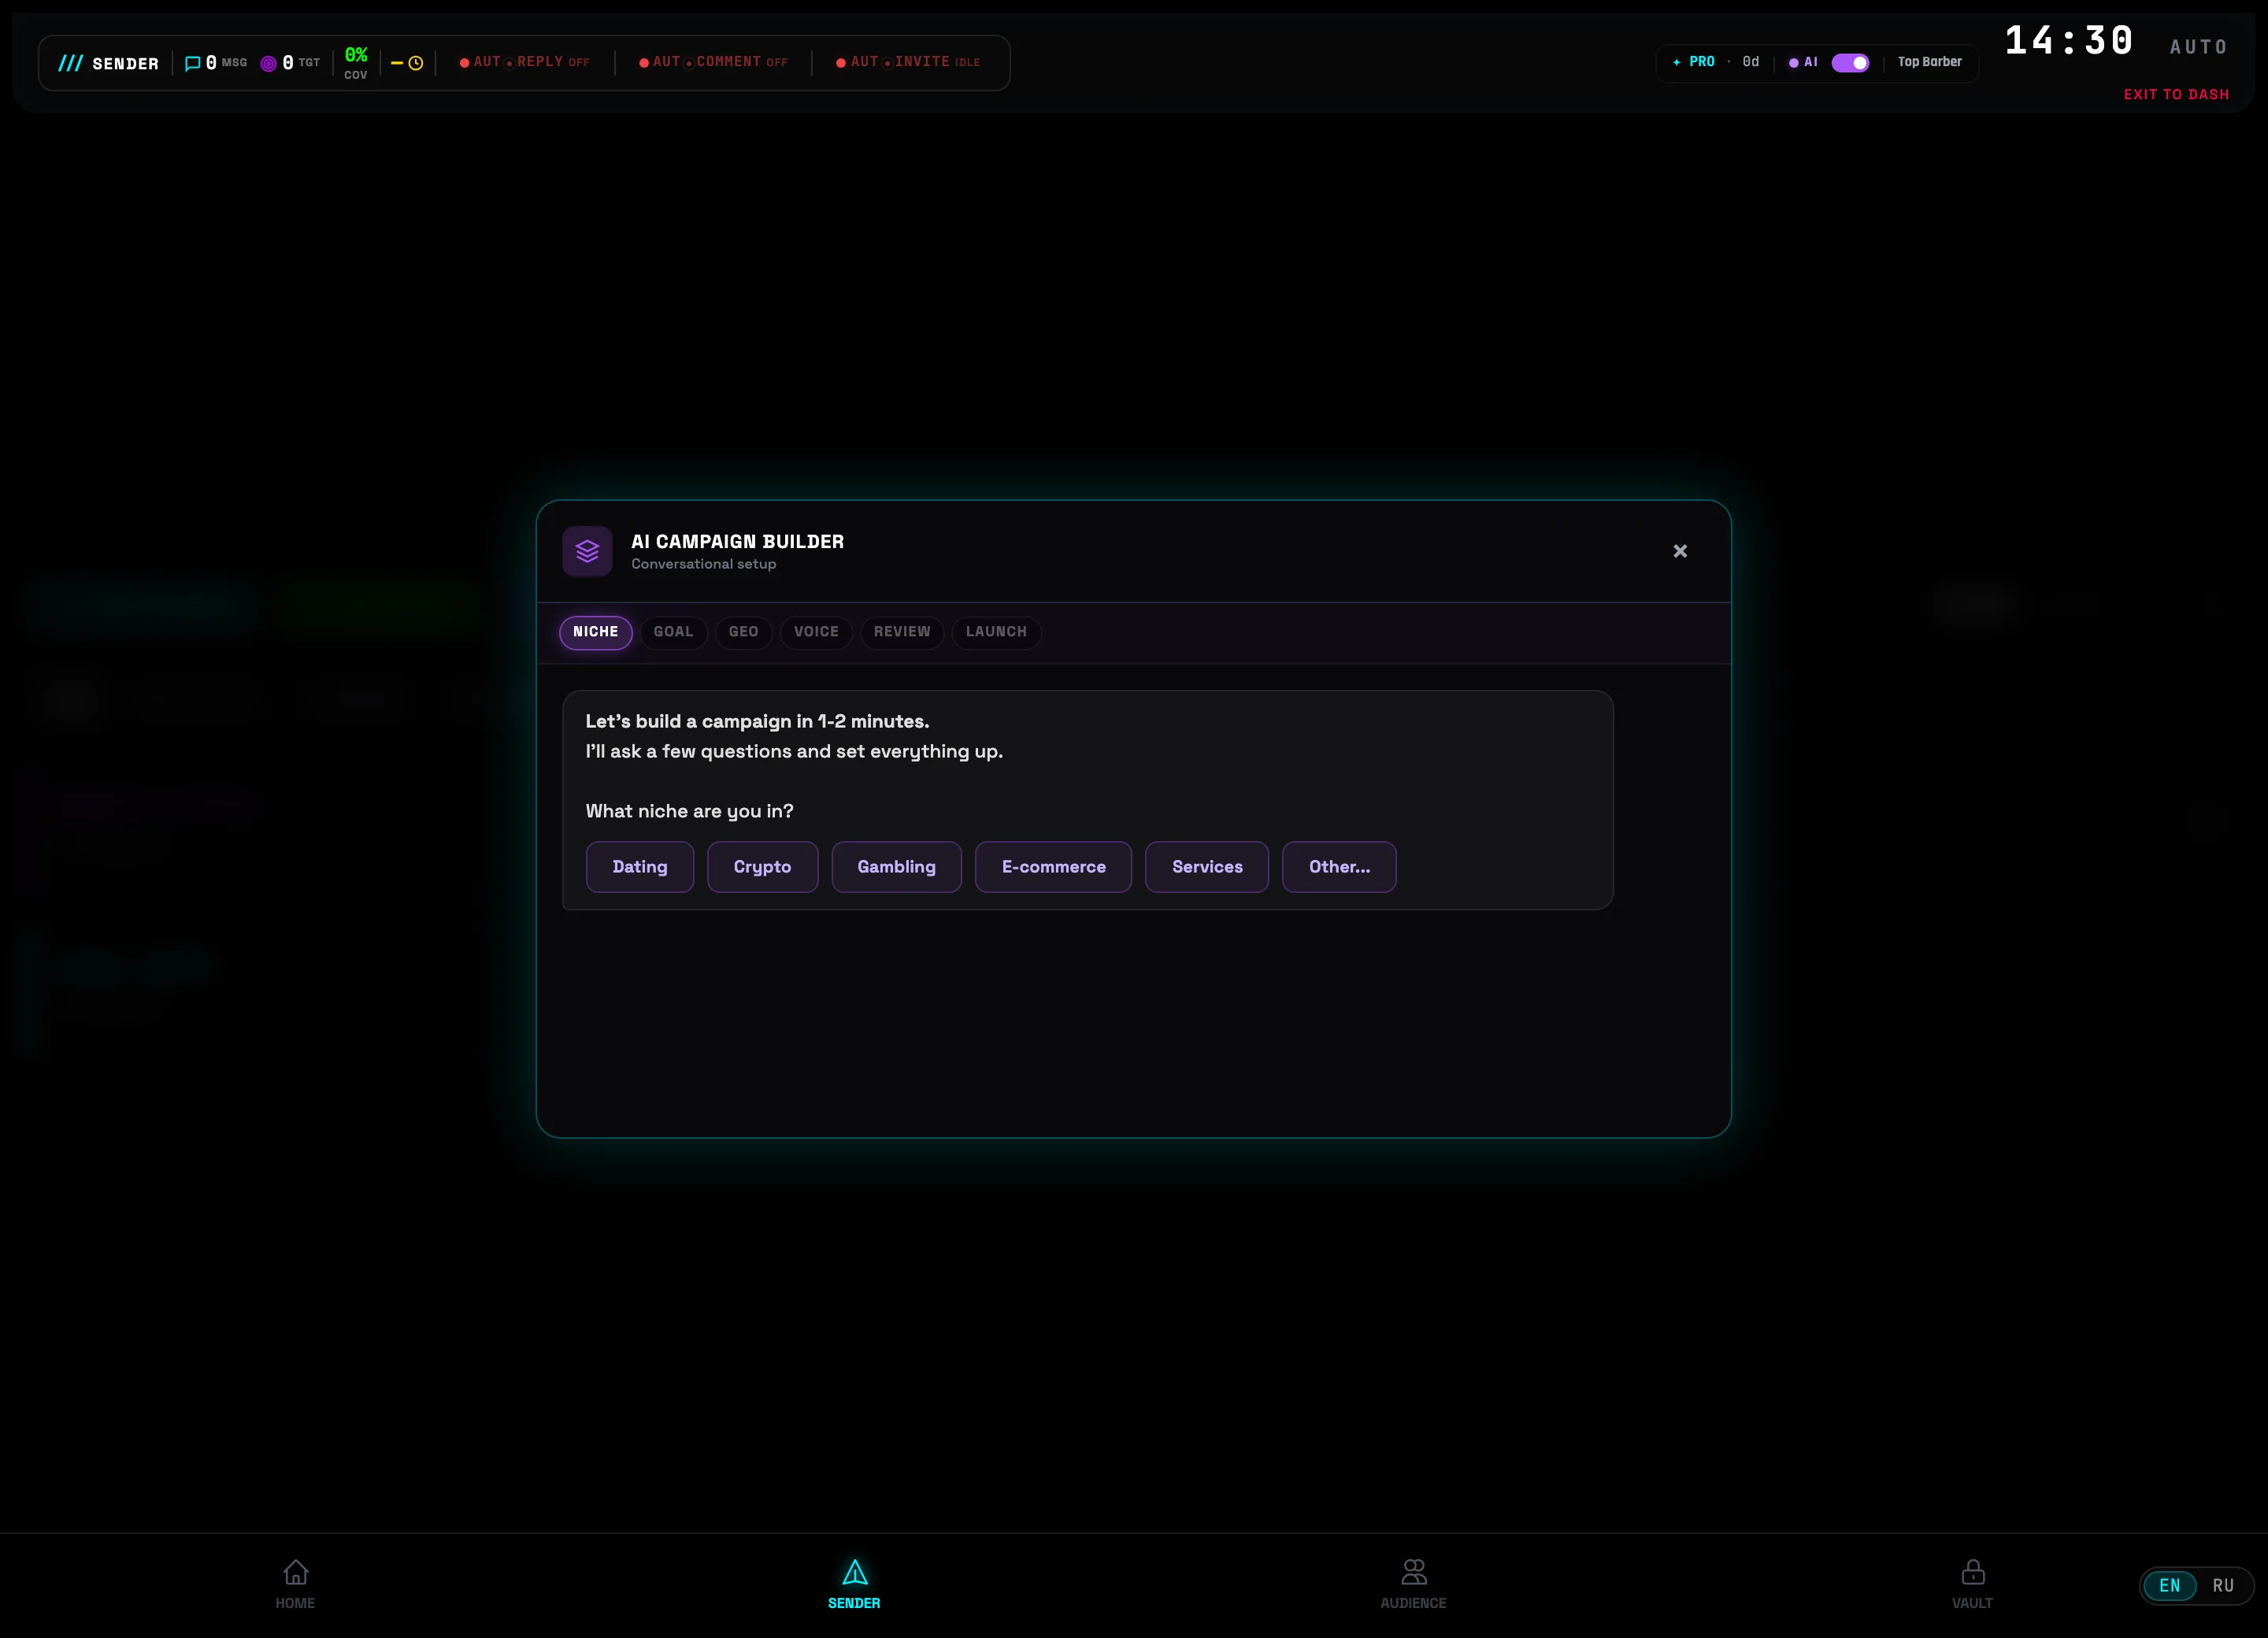 Step progressNiche presets💡Tip: after the niche, the builder asks for the goal (Leads, Traffic, Sales, Warm-up), the geo (language and country) and the message tone — answer briefly, the AI takes everything into account at once.
 -
3
Review the summary and click Build campaign →
On the REVIEW step the builder shows all your answers — niche, goal, geo, voice — and the expected reach. If everything is correct, click Build campaign →; the Edit answers button takes you back to the needed step without losing the rest.
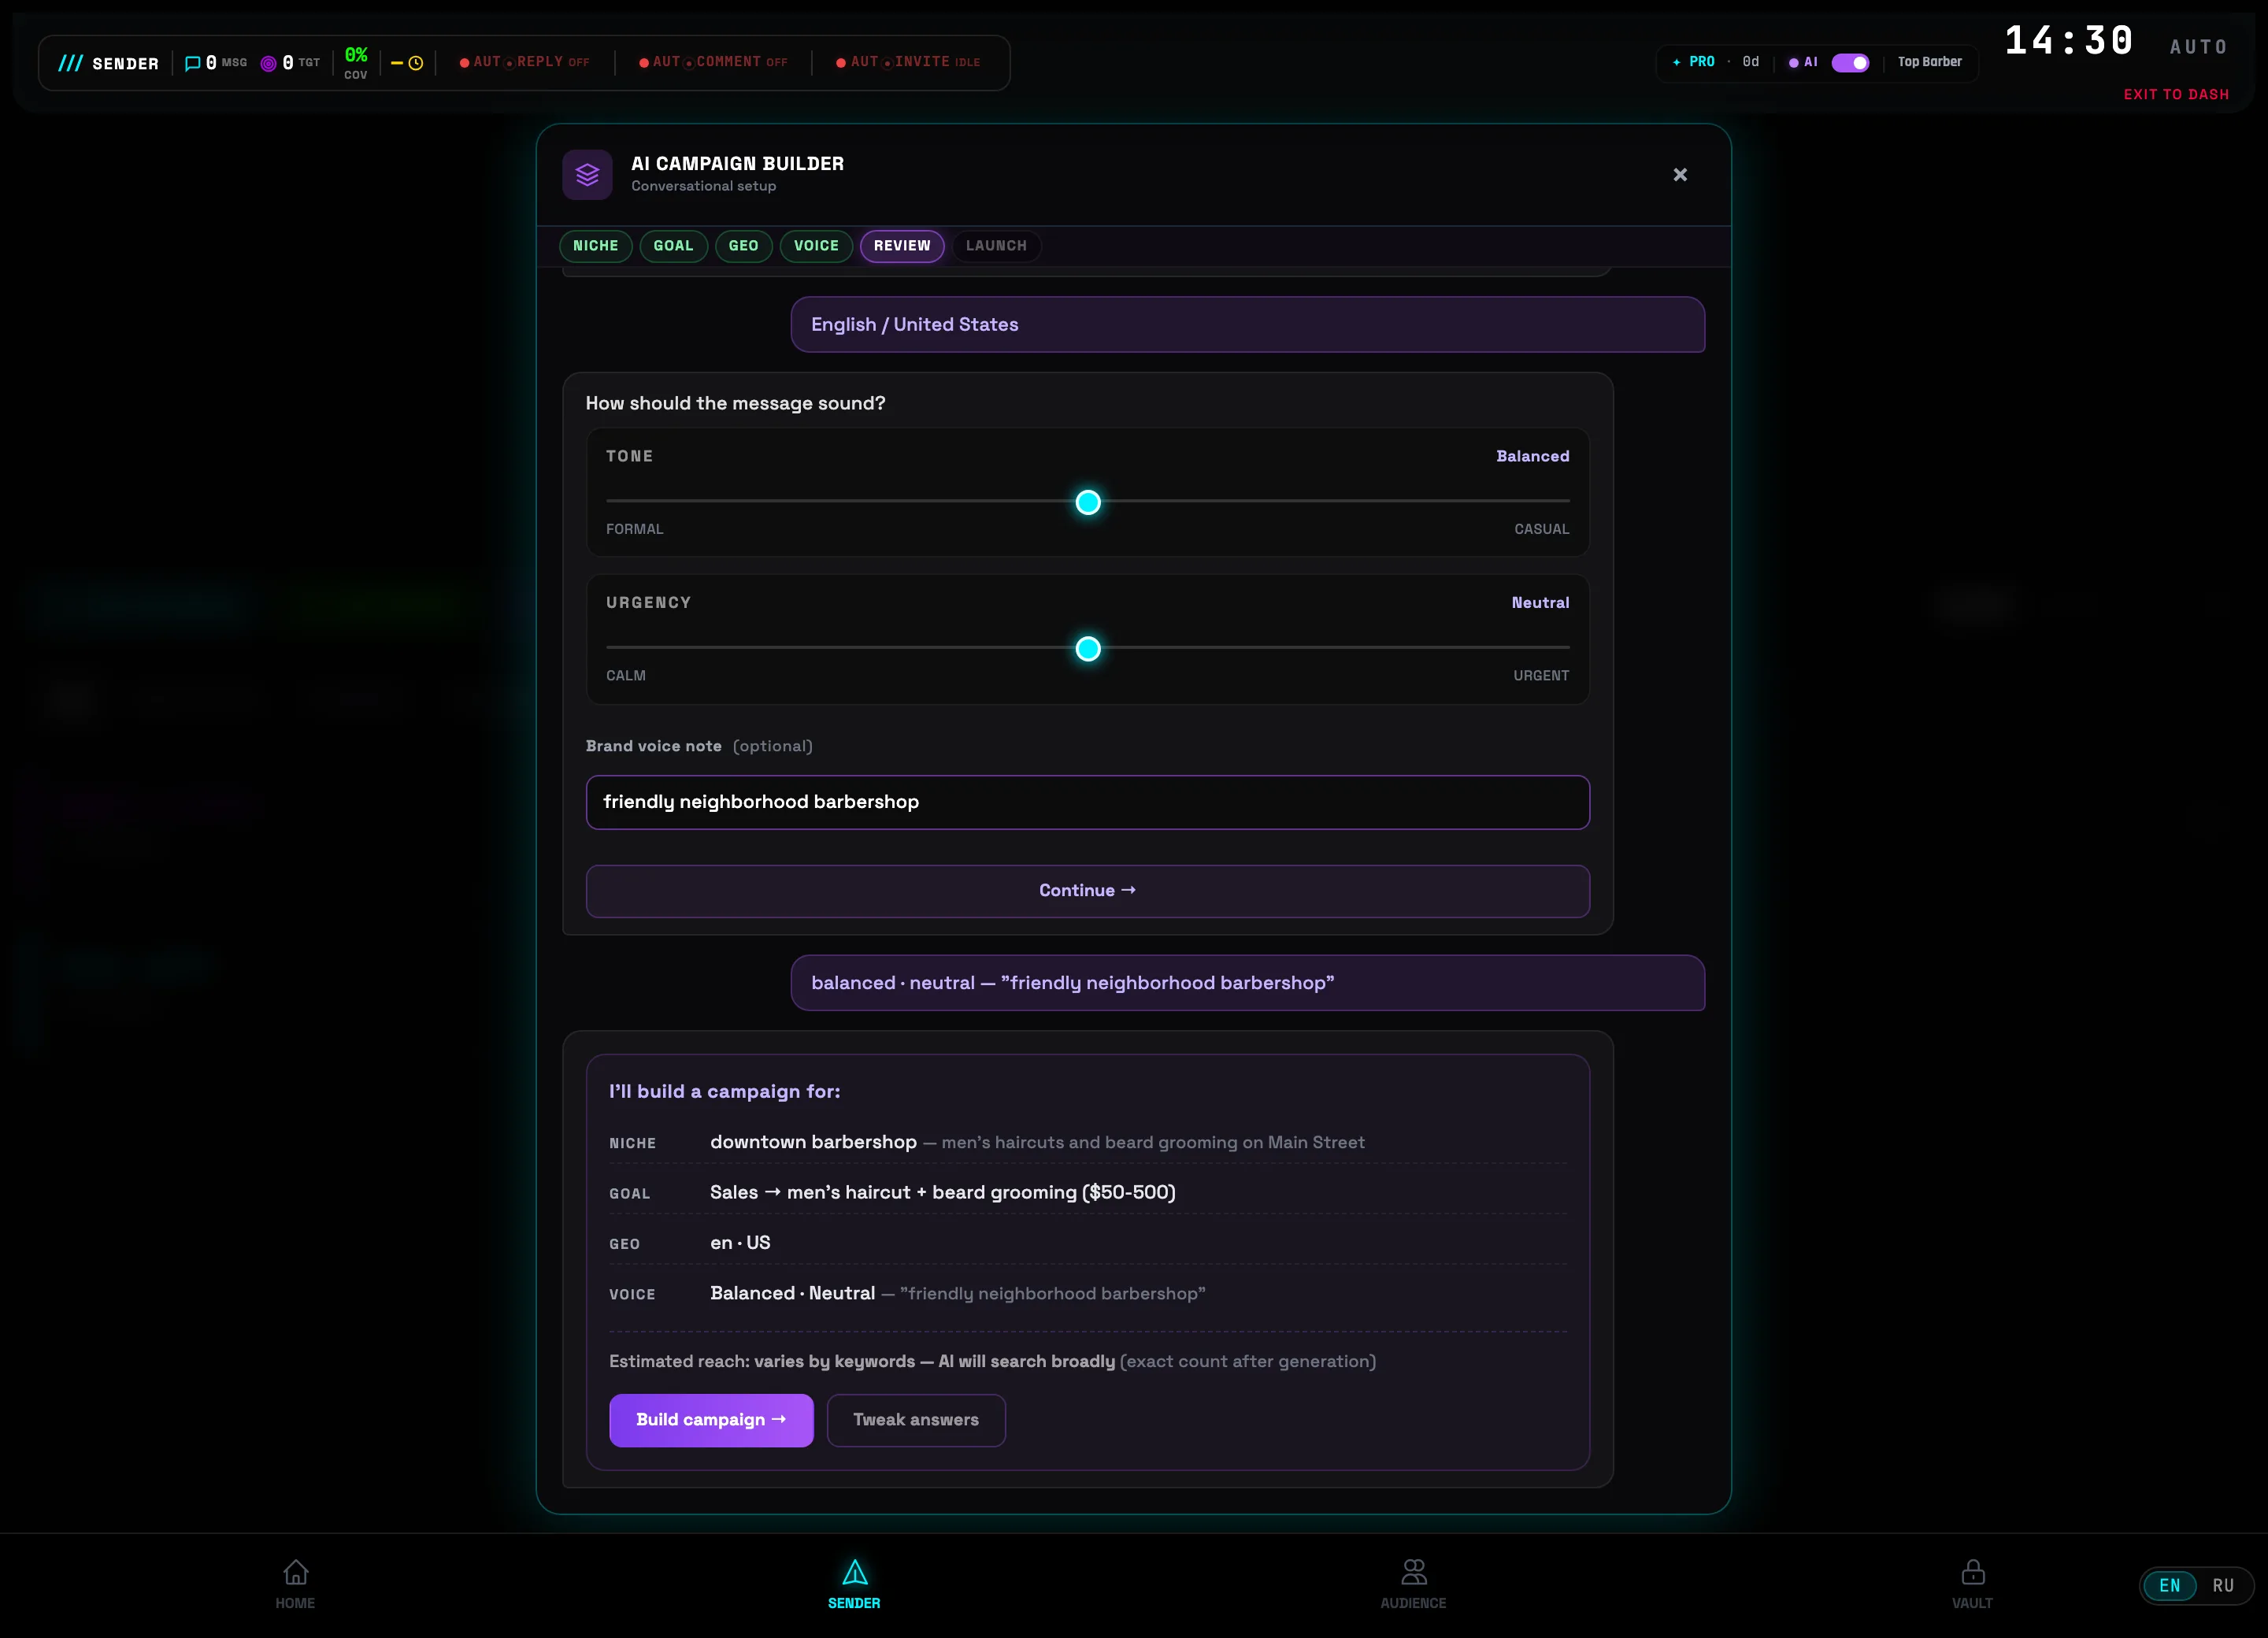 Parameter summaryBuild campaign
 -
4
Edit the generated message
The AI writes copy for your niche — with spintax (variants in curly braces) for uniqueness. Below the field you can see the number of spintax variants, the length and the tone. You can edit the text right here, and the Regenerate and + A/B buttons create a new variant.
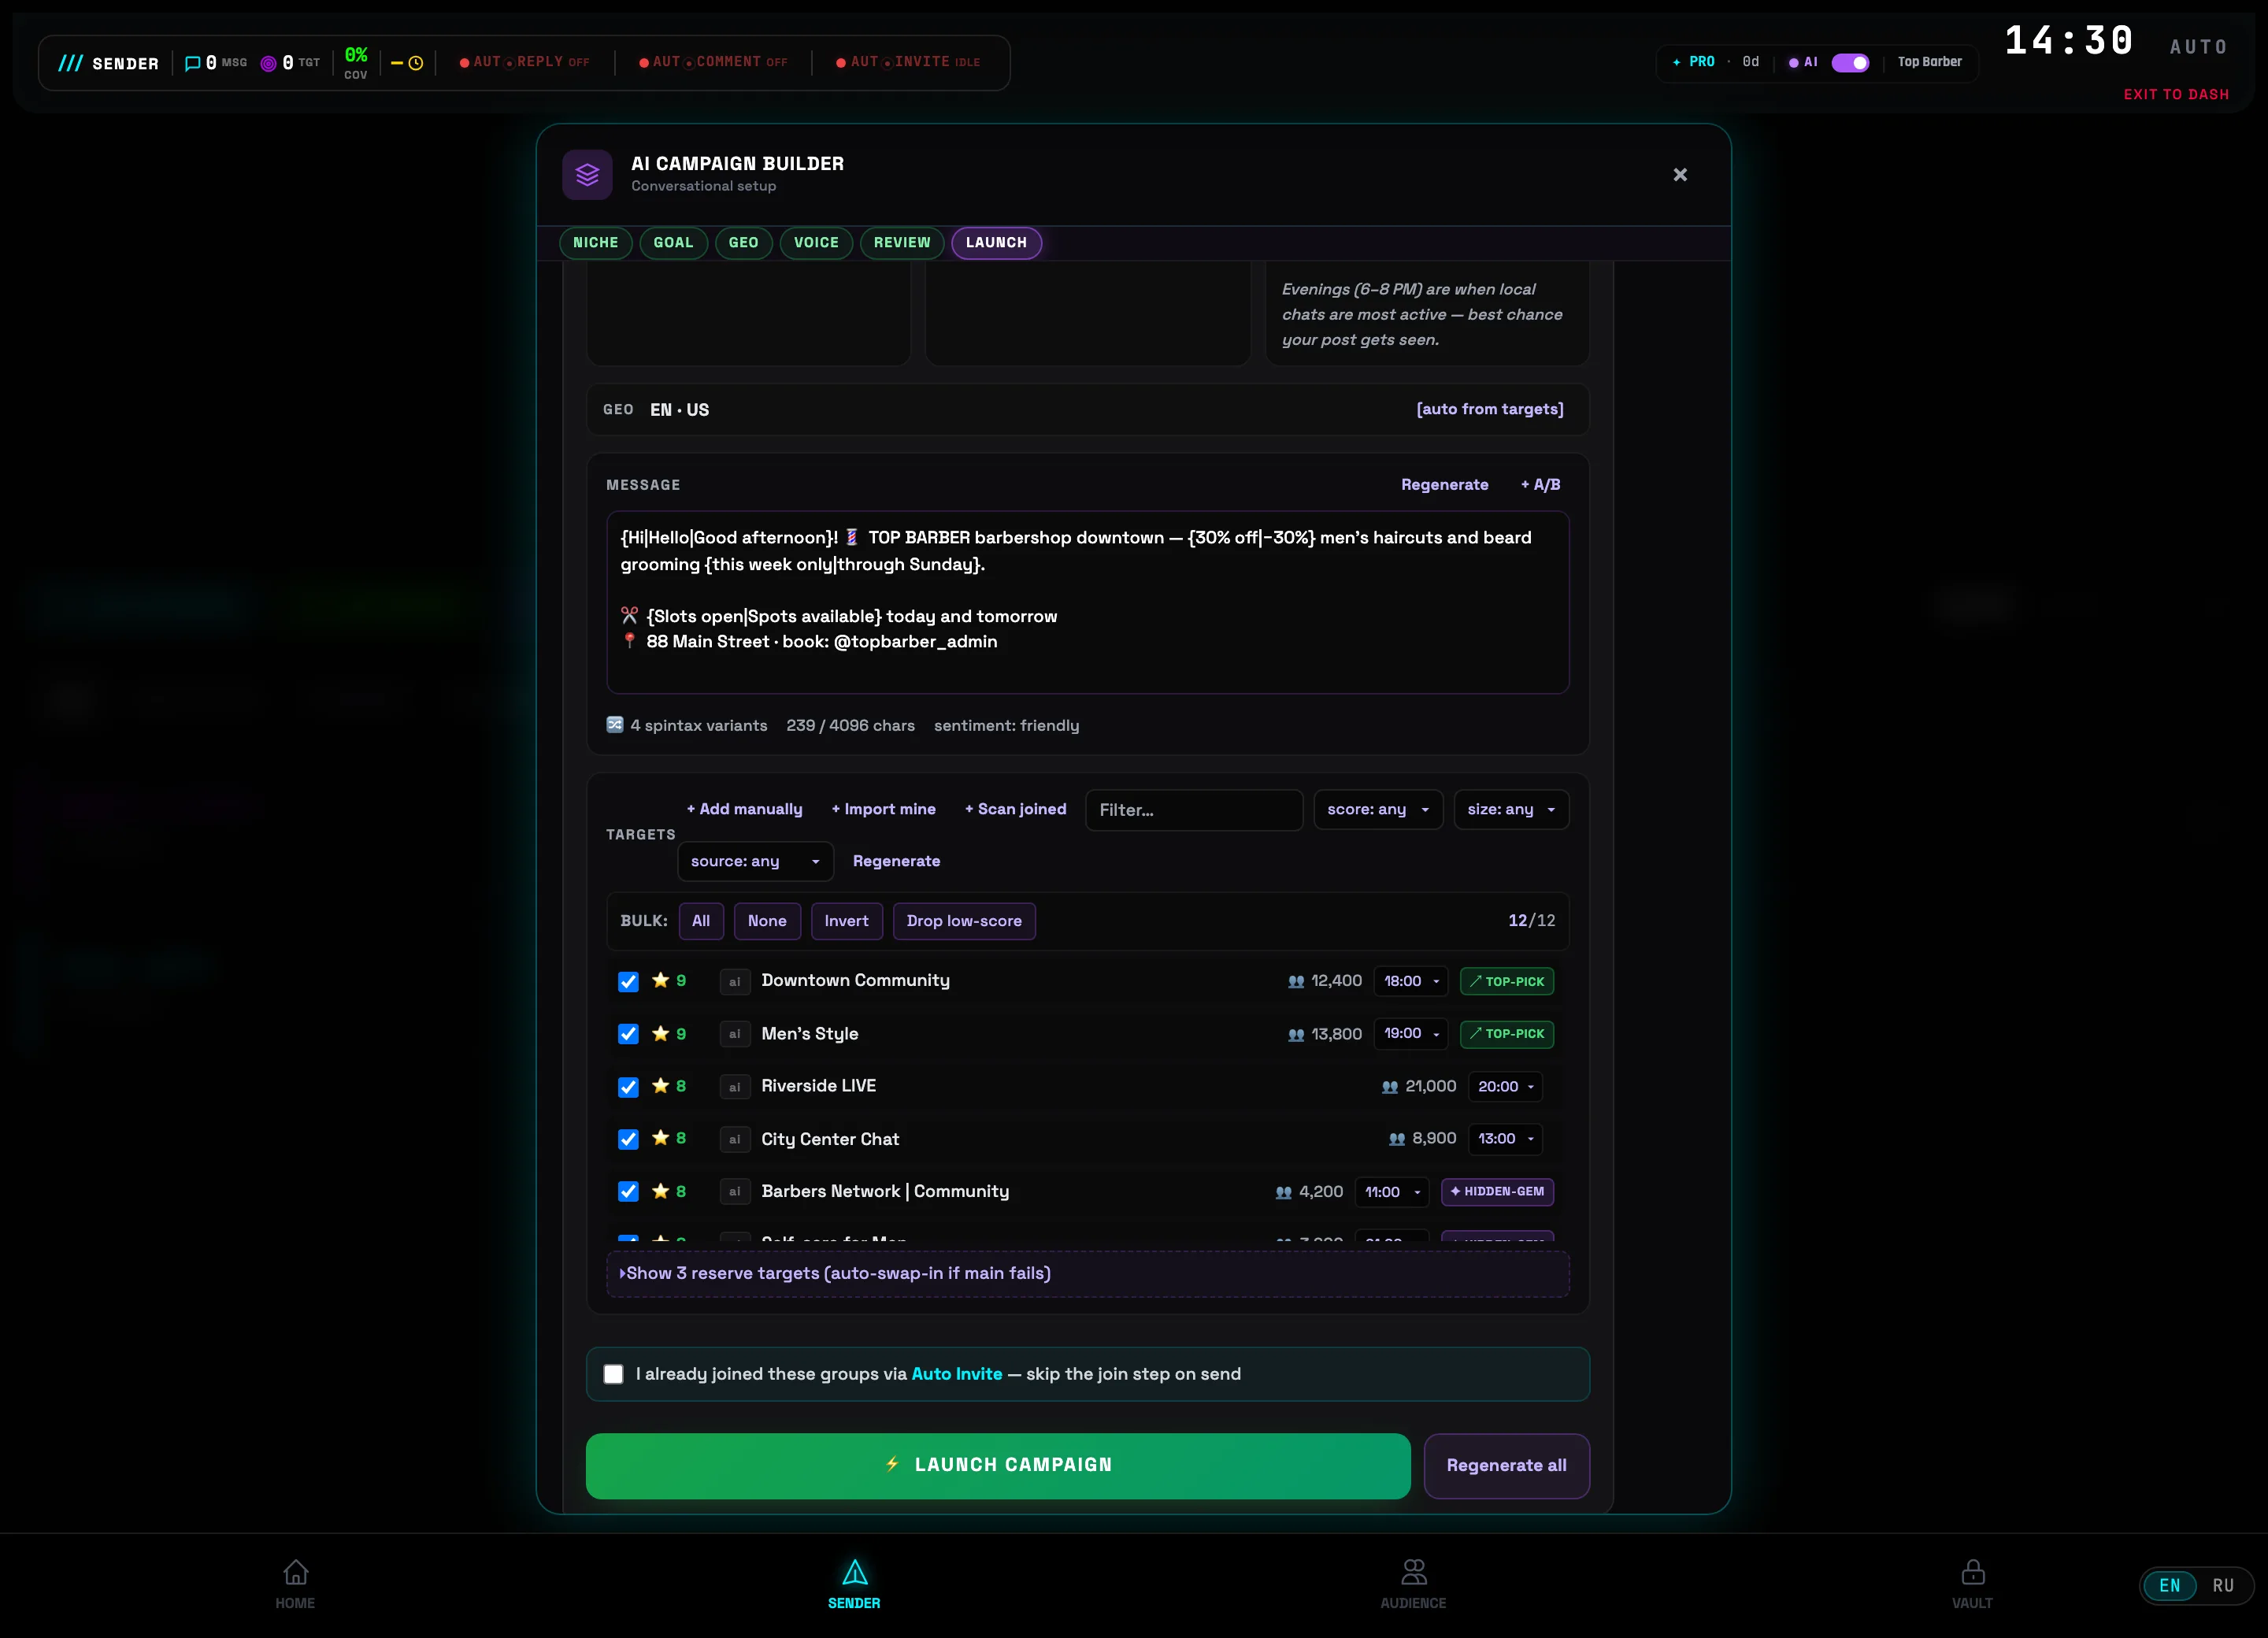 Generated text (spintax)Spintax variant counter💡Tip: the AI also suggests a schedule itself — in the SCHEDULE block, with an explanation of why this exact time was chosen. You can switch it to Interval, Once or Slots.
 -
5
Check the scored targets and click ⚡ LAUNCH CAMPAIGN
Each found target comes with an AI score (a star from 1 to 10) and top pick / hidden gem / risk flags. Uncheck the ones you don't need, filter by score and size, add your own chats. When the list looks right — click ⚡ LAUNCH CAMPAIGN: the targets, message and schedule will move into the regular Sender pipeline.
 Targets with AI scoresLaunch campaign⚠️Important: before launch the builder asks for confirmation and shows how many real Telegram groups the broadcast will go to. Check the number — sending goes to live chats.
AUTO INVITE — bulk joining of groups
Before a broadcast, the account must be a member of the chats it will post to. AUTO INVITE joins dozens of groups in the background at a safe pace, slows down by itself on FloodWait, and immediately drops the joined groups into your Targets.
-
1
Open AUTO INVITE from the SENDER header
In the SENDER section, on the right of the header next to AUTOREPLY and AUTOCOMMENT, there is the AUTOINVITE widget. The IDLE label means there are no runs right now. Clicking the widget opens the bulk-join window; while it works the label switches to a joined counter (for example 6/10).
 AUTOINVITE widget💡Tip: joining is a preparation step before SEND ALL. Run it in advance so that by the time of the broadcast the account is already sitting in the right chats.
 -
2
Paste the list of groups
In the AUTO INVITE window, on the JOIN tab, the Bulk paste mode is selected. In the GROUPS TO JOIN field, paste links in any form — @username, t.me/link, an +invite invite, or a numeric -100… id. The parser breaks them down on the fly and shows counters below the field: valid, duplicates, invalid.
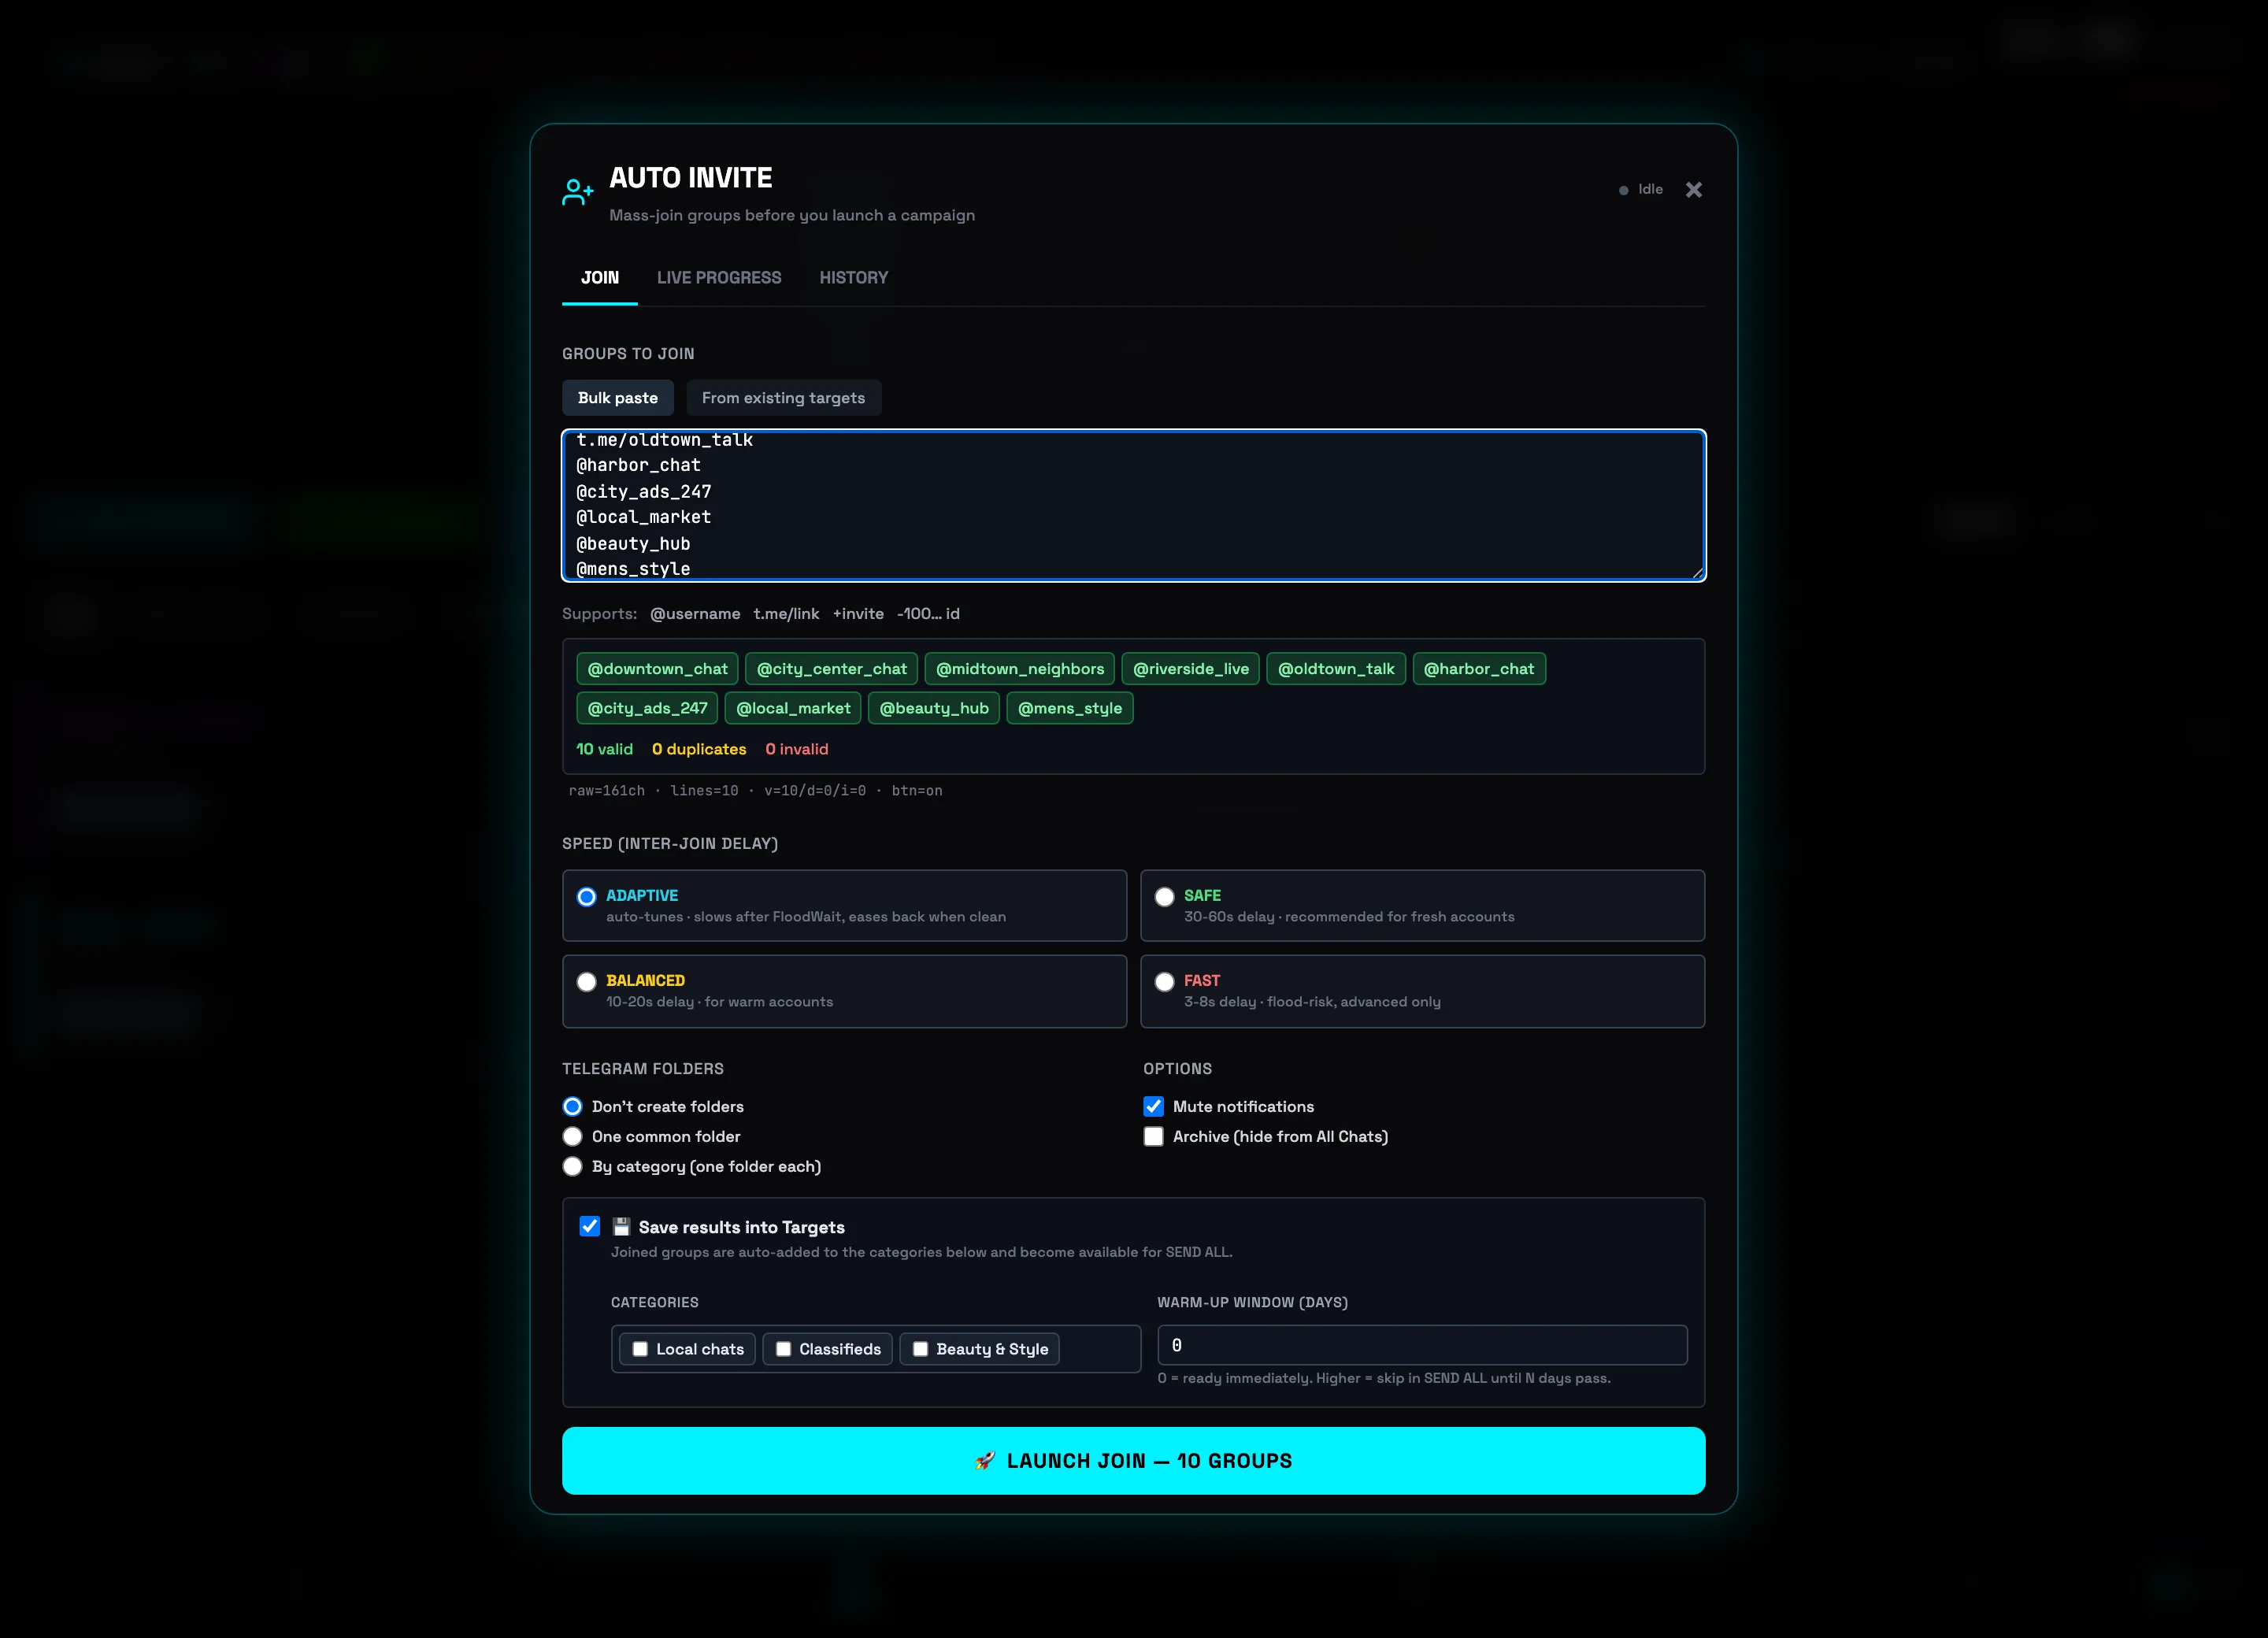 Field for pasting groupsParsing: valid / duplicates💡Tip: the From existing targets tab joins Targets that are already added — there the Not joined / Joined filters will show which chats you still need to join.
 -
3
Choose the pace and join options
The SPEED (DELAY BETWEEN JOINS) block sets the pause between joins: ADAPTIVE (adjusts itself — slows down after FloodWait, speeds up when it's clean), SAFE (30–60s, for fresh accounts), BALANCED (10–20s), and FAST (3–8s, flood risk). In the OPTIONS block you can enable Mute notifications and Archive (hide from “All chats”) so that new groups don't flood the account.
 Speed modesJoin options⚠️Important: for a fresh or recently unblocked account use SAFE or ADAPTIVE. The FAST mode catches FloodWait and spam-block more often — it's only for warmed-up accounts.
 -
4
Enable “Save to Targets” and launch
The Save result to Targets checkbox immediately adds the joined groups to the selected CATEGORIES — and they become available for SEND ALL without re-importing. The WARM-UP WINDOW (DAYS) field lets you hold back new chats: 0 — ready right away, more — skip them in the broadcast for N days. The big button at the bottom shows the total: 🚀 START JOINING — 10 GROUPS.
 Save to TargetsLaunch joining
 -
5
Track progress on the PROGRESS tab
The PROGRESS tab with the RUNNING status shows a bar and counters: 6 joined, 4 left, 0 failed out of / 10, plus the current Mode. Below is the queue by status: 🟢 Joined and ⚪ In queue. You can change the pace on the fly with the Auto / Safe / Balanced / Fast buttons, and put the run on ⏸ Pause or Cancel task.
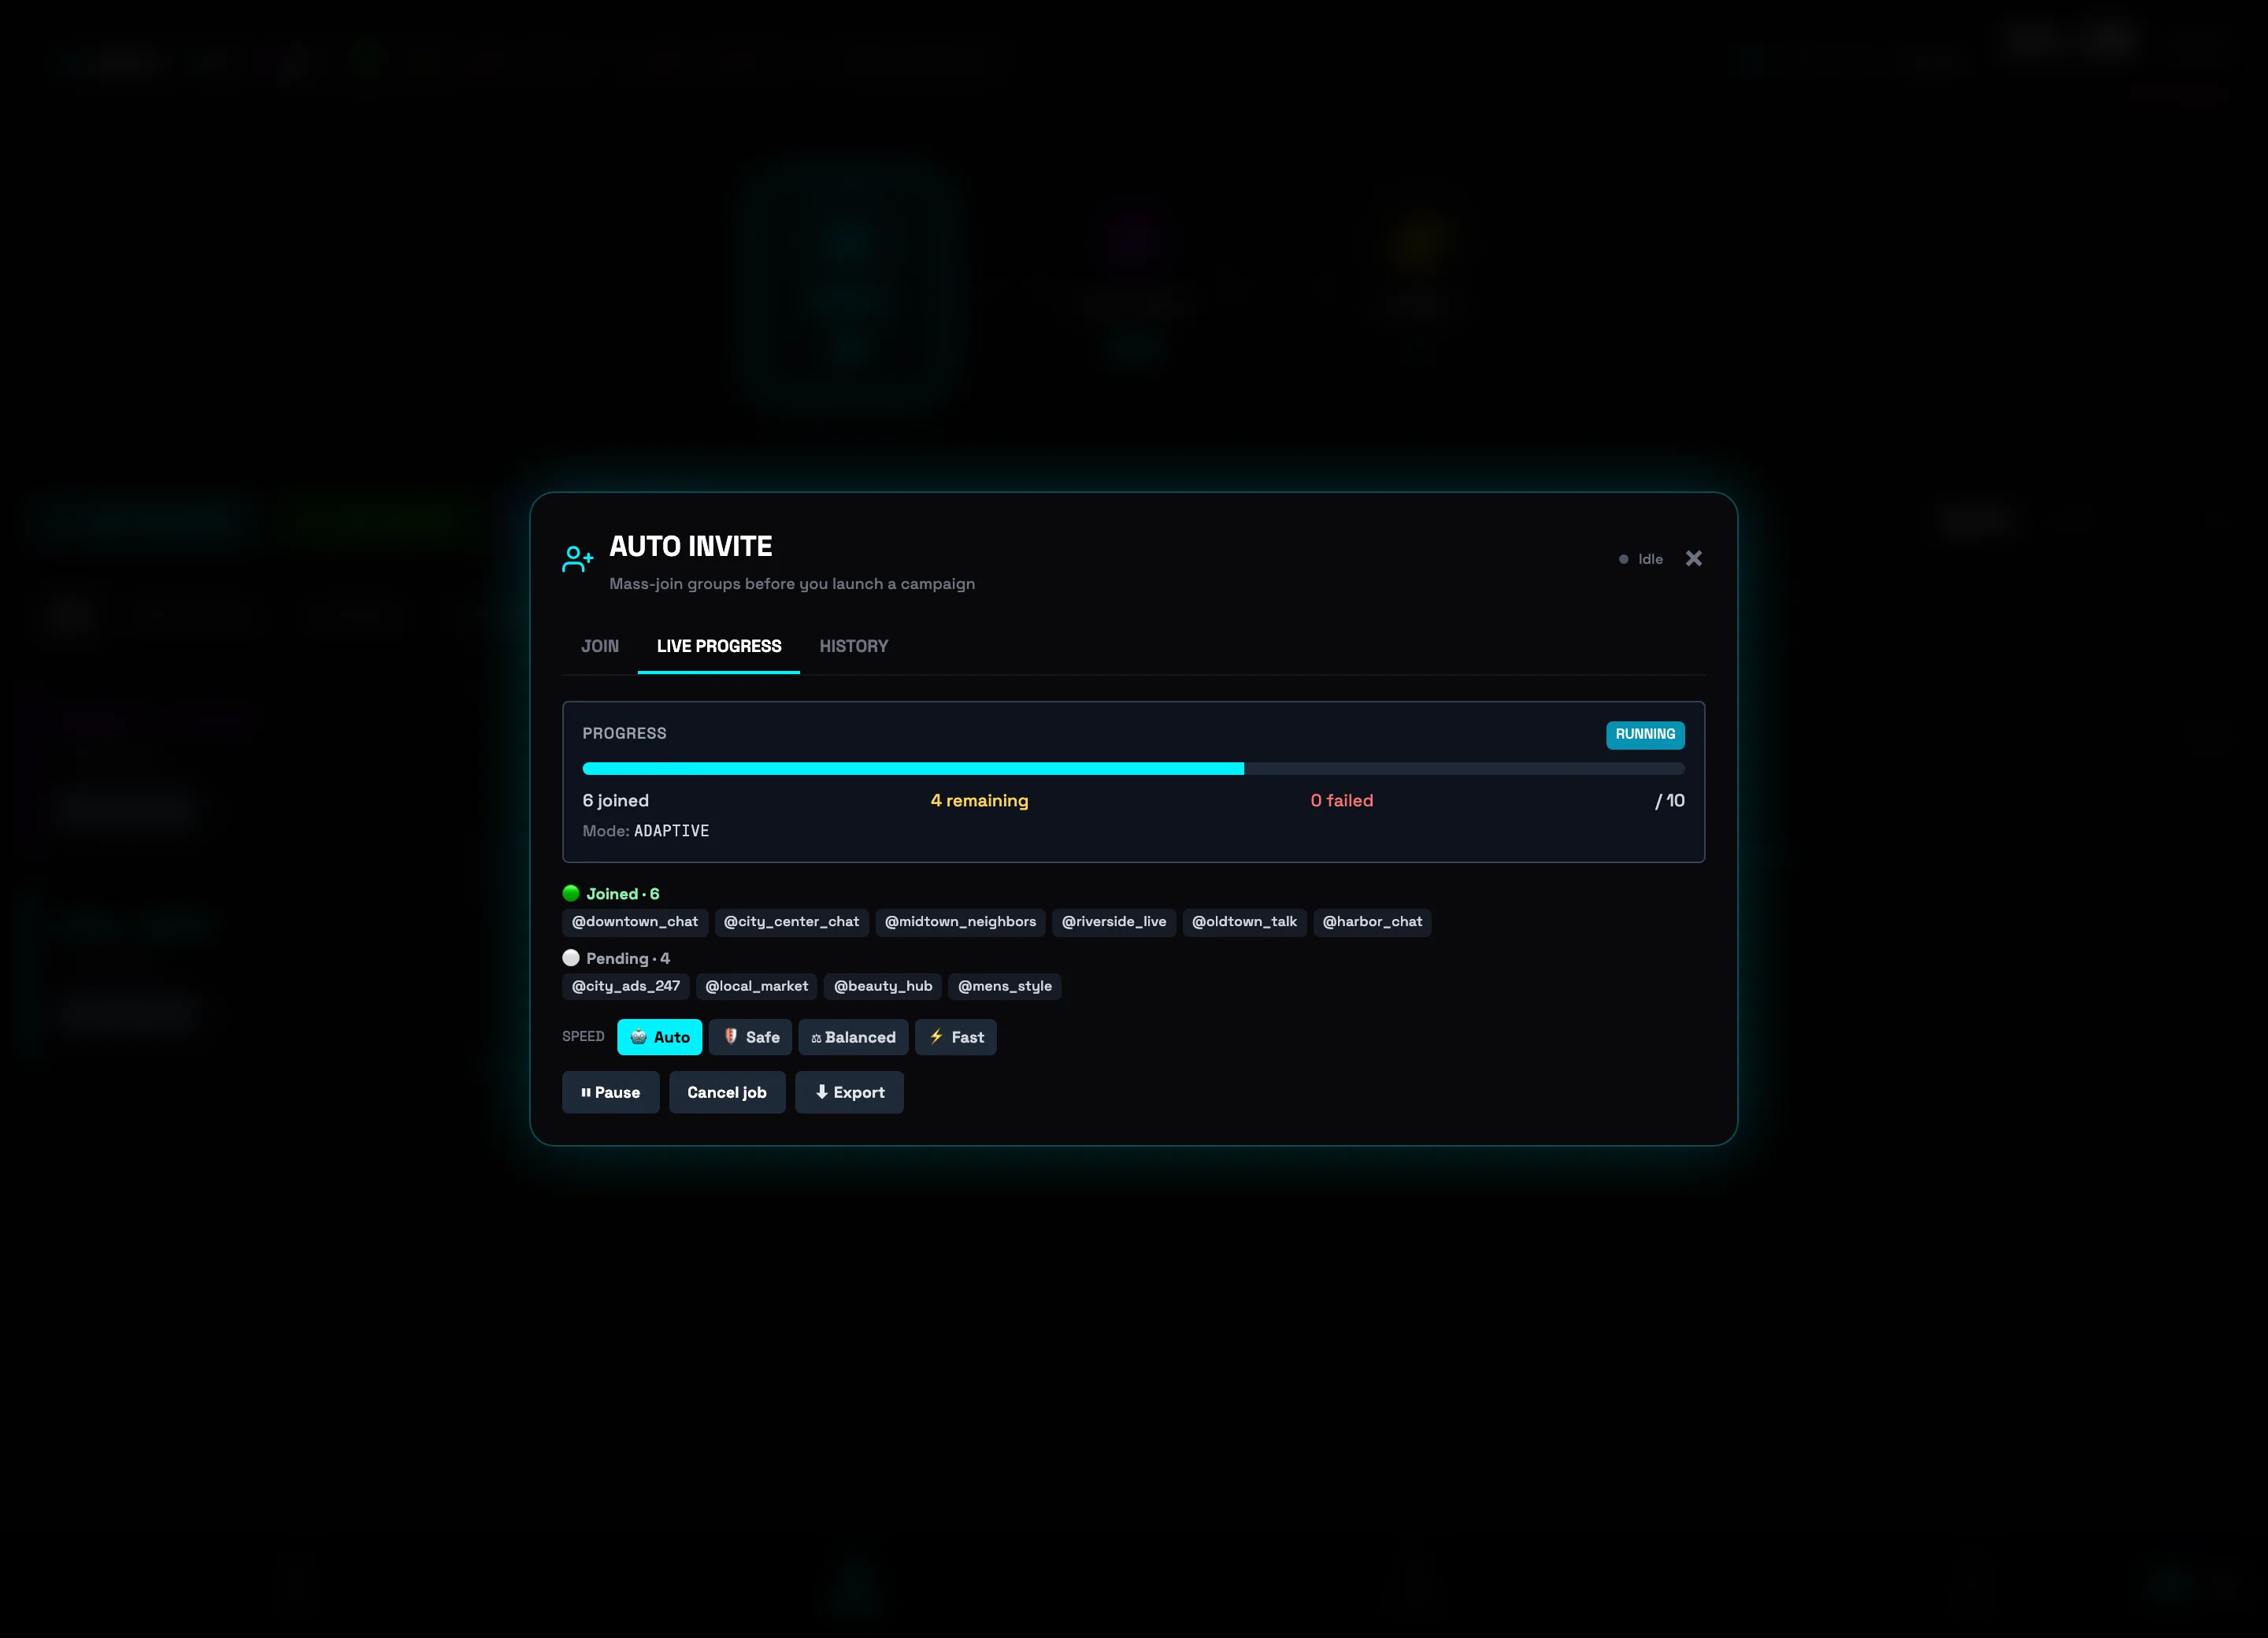 Progress 6/10 = 60%Queue by status💡Tip: ramp the mode up to Fast only when a couple of groups are left — that way you don't push toward the Telegram limit while the queue is still large.
 -
6
What to do on FloodWait
If Telegram temporarily limits joins, the status switches to PAUSED (FLOOD), and in the ⏸️ Paused — Telegram FloodWait banner a countdown to resuming runs (here — 3:42). The caption says it plainly: it resumes by itself, nothing to press — the run continues automatically. There's no point pressing ▶ Resume manually ahead of time: it will almost certainly catch FloodWait again.
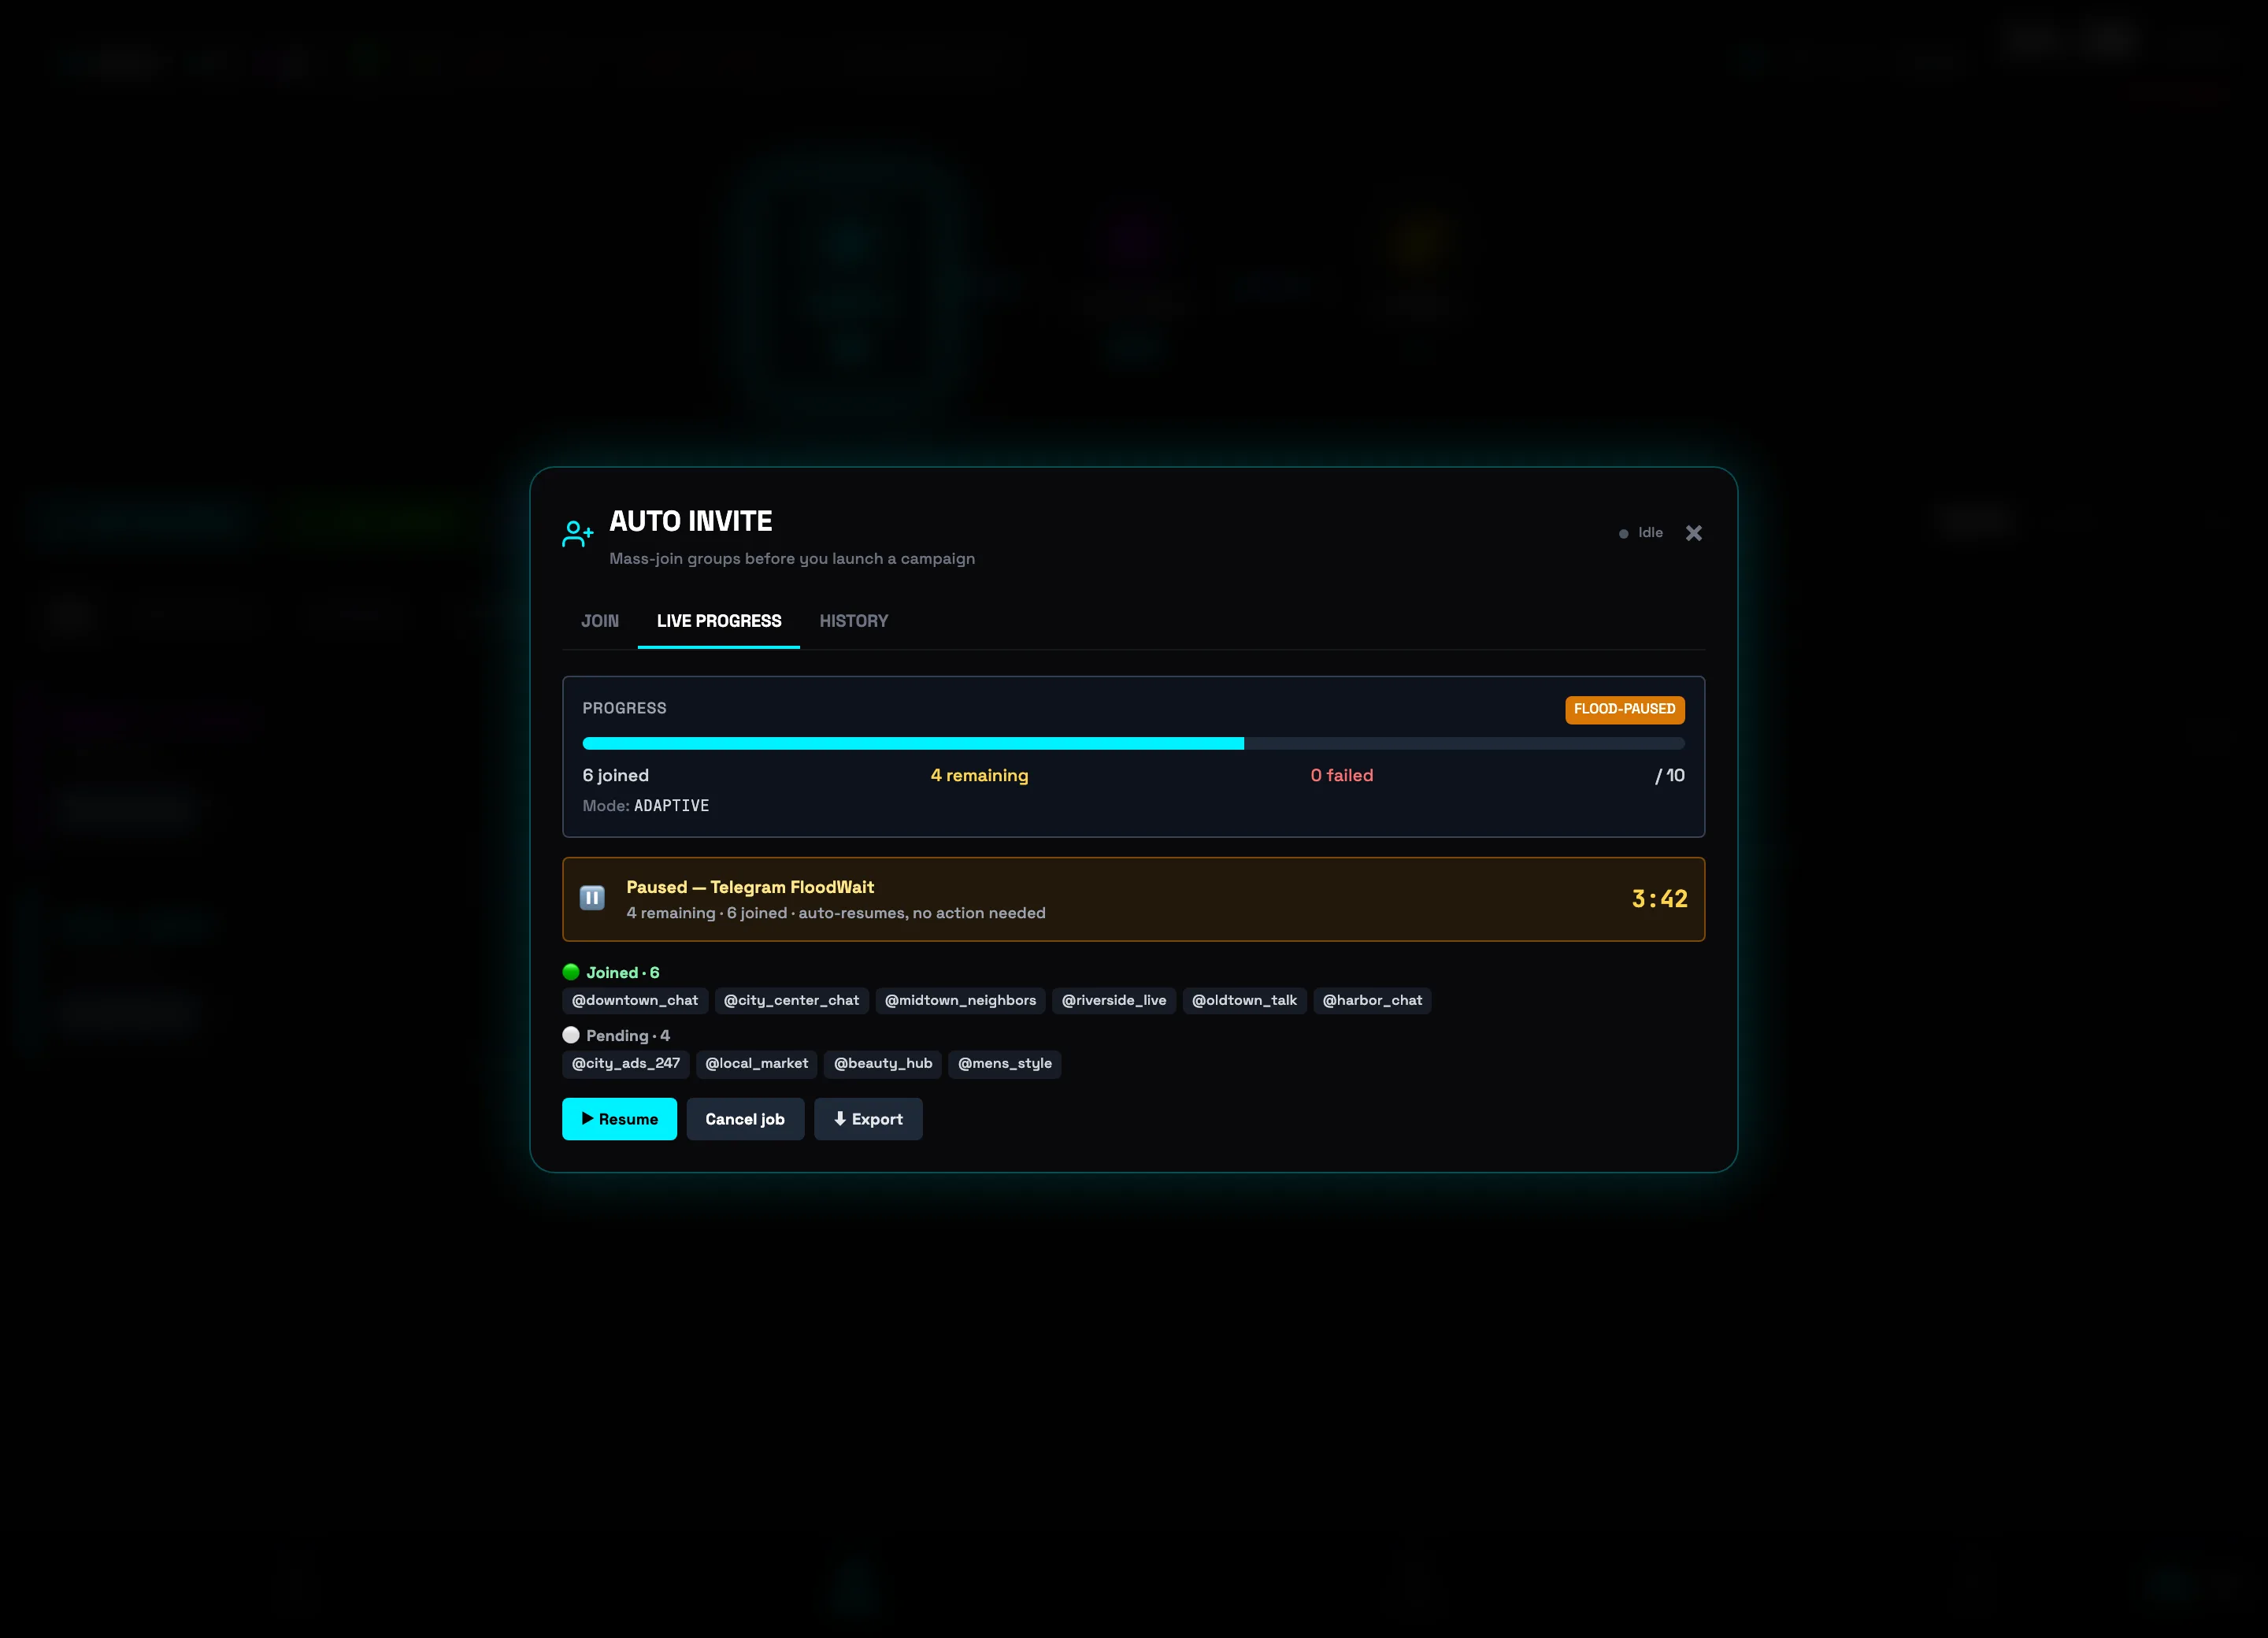 FloodWait banner + countdownControl buttons⚠️Important: frequent pauses in a row are a sign the account needs a rest. Give it ~24 hours and start the run again instead of force-resuming.
AUTOCOMMENT — the first comment under a post
A comment-sniping engine: it watches for new posts in the channels you choose and instantly leaves your comment first — using a spintax template or an AI persona. Perfect for capturing the attention of other channels' audiences.
-
1
Open the engine: the AUTOCOMMENT pill in the header
On the SENDER tab, the top bar hosts three automations; click the AUT⊙COMMENT pill — the AUTO-COMMENT window opens. The label on the pill shows the engine state: OFF — disabled, a green 1 on — one scenario is running.
 Open AUTOCOMMENT
 -
2
Click "Create auto-comment" and fill in the scenario
The Create auto-comment button opens the editor. In the SCENARIO NAME field, enter a clear name — for example "Beauty channels NYC". In the TARGET CHANNELS block, add channels to watch one by one: type @channel or t.me/channel and click Add. To add them in bulk there are three buttons: Telegram Search, Bulk Paste and Data Vault (import from your Data Vault database).
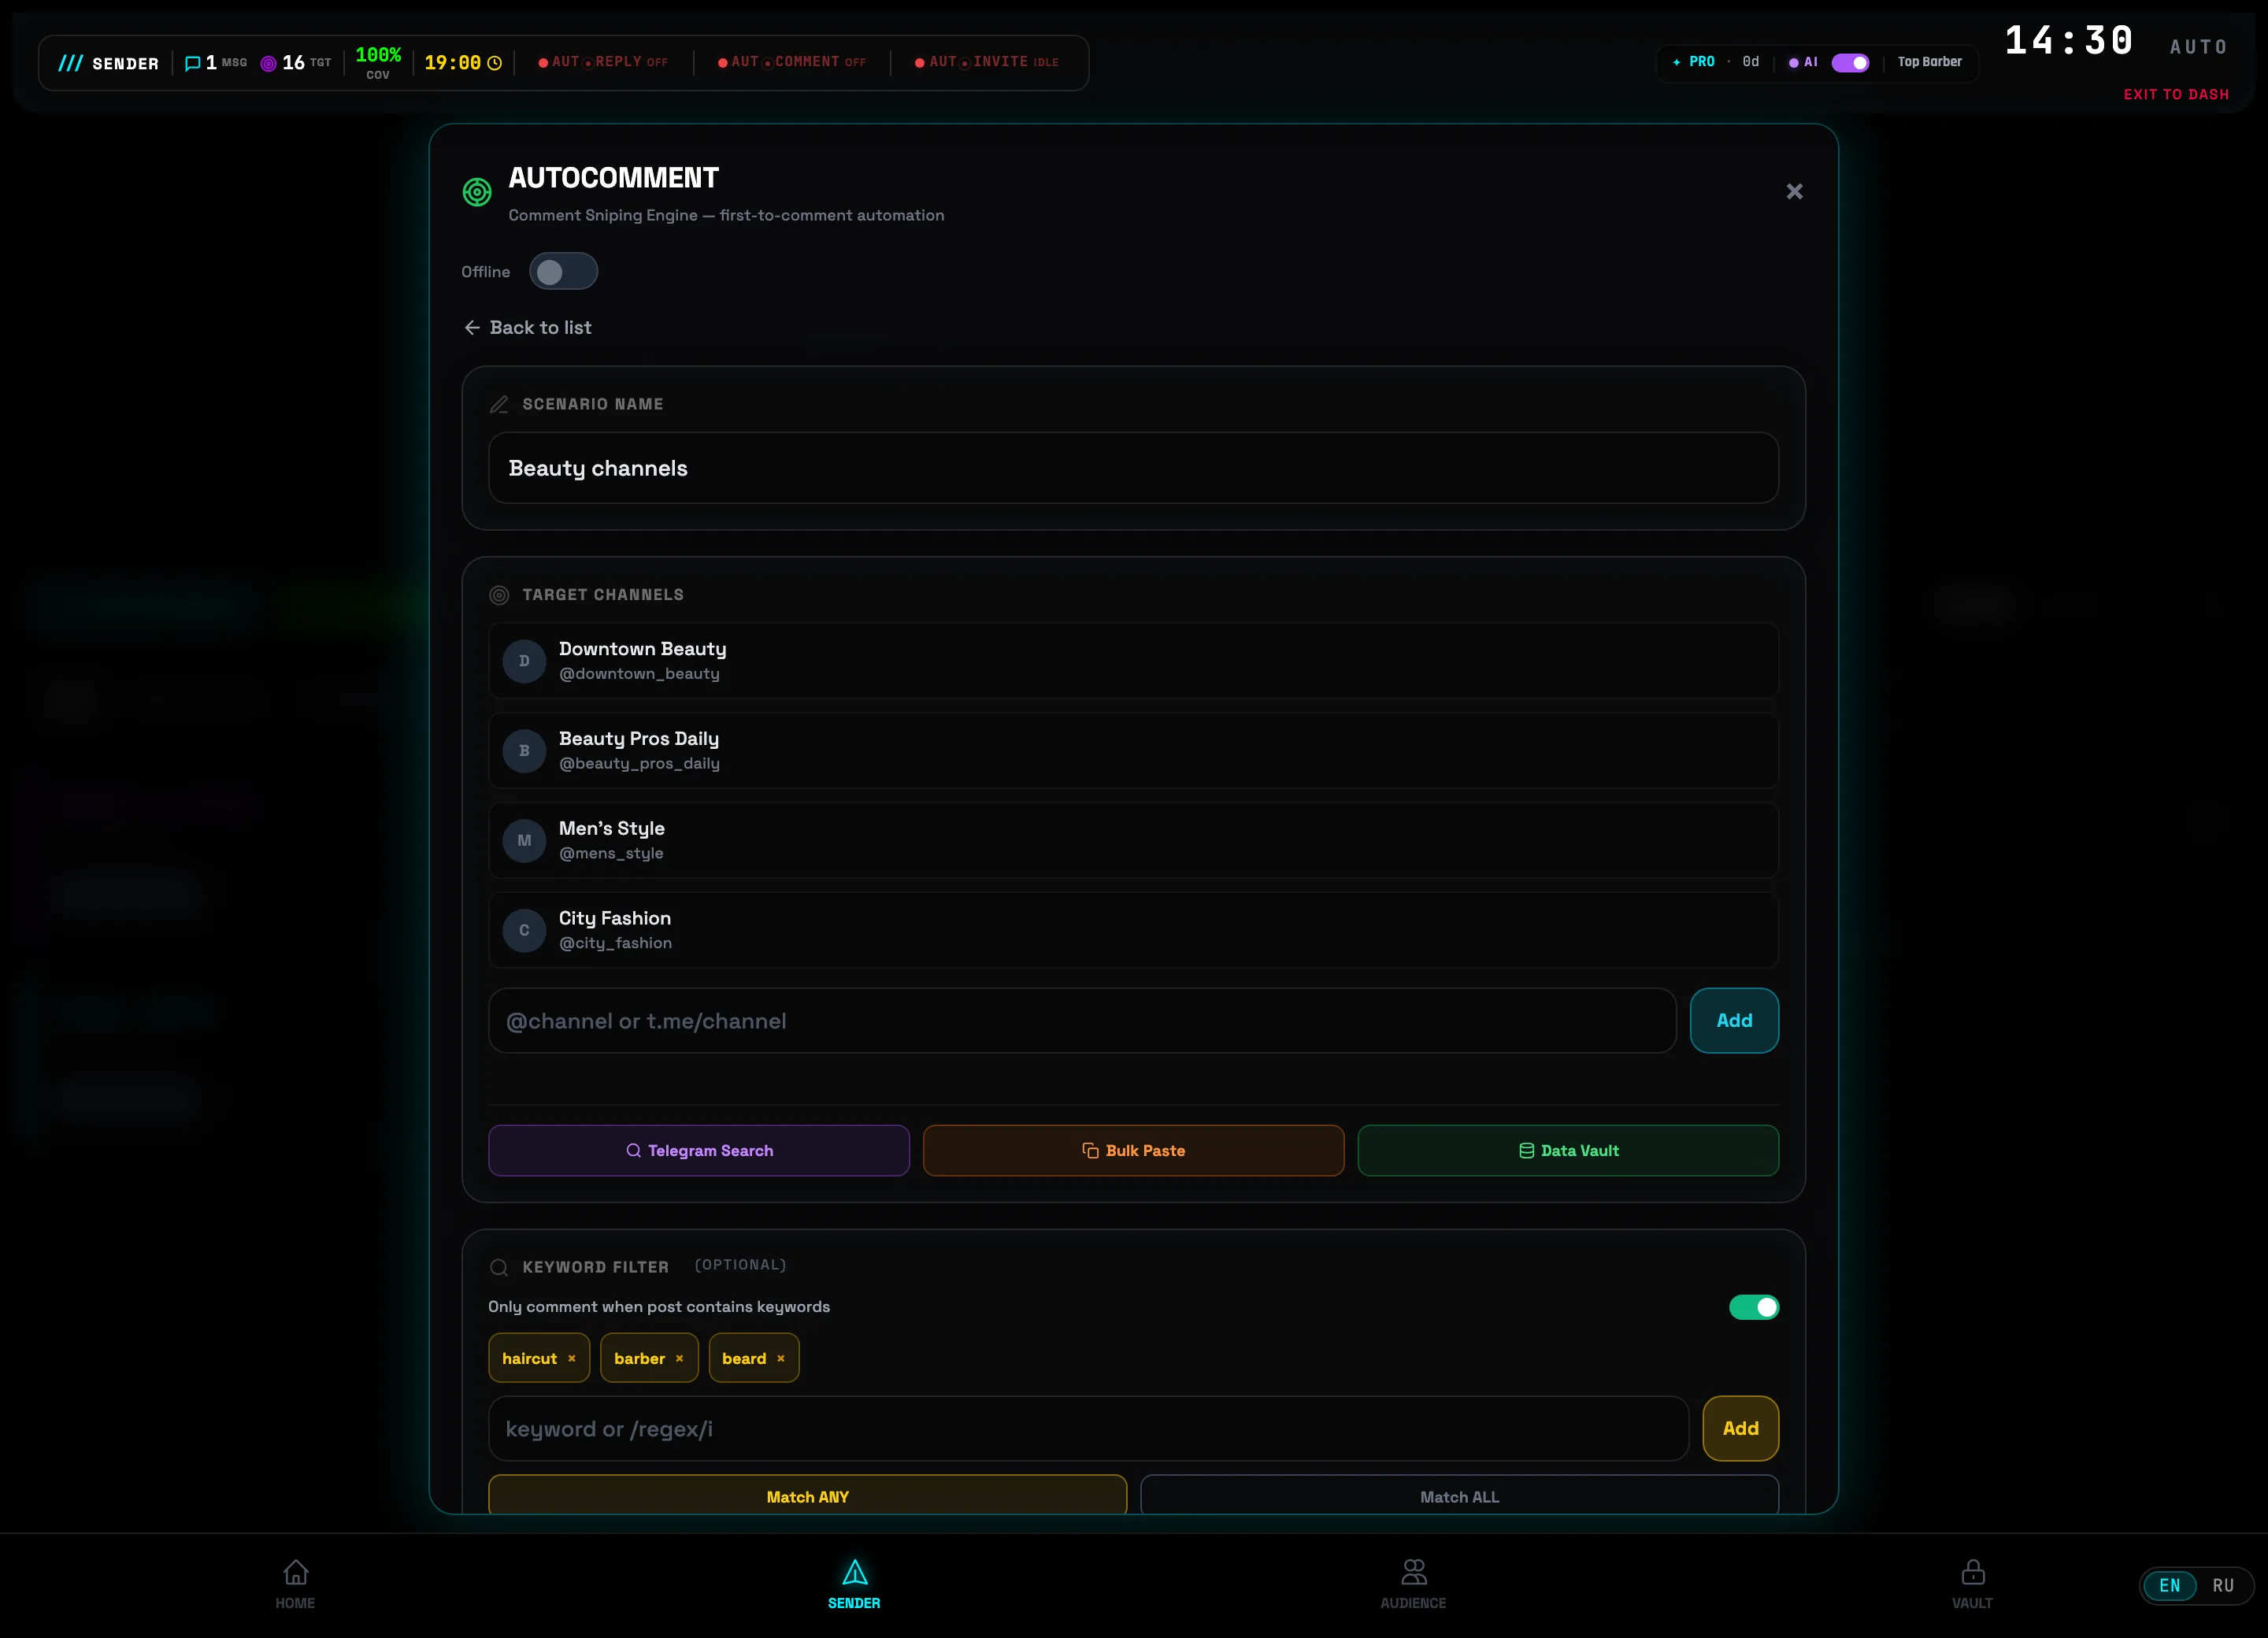 Scenario nameBulk channel import
 -
3
Paste a list of channels via "Bulk Paste"
The Bulk Paste button opens the TARGET INJECTION window. Paste the list in any form — @username, t.me/... links or numeric IDs, separated by spaces, commas or on new lines. The parser shows the breakdown right away: Valid / Duplicates / Invalid counters and colored chips in the preview. The INJECT 4 TARGETS button adds only the valid channels.
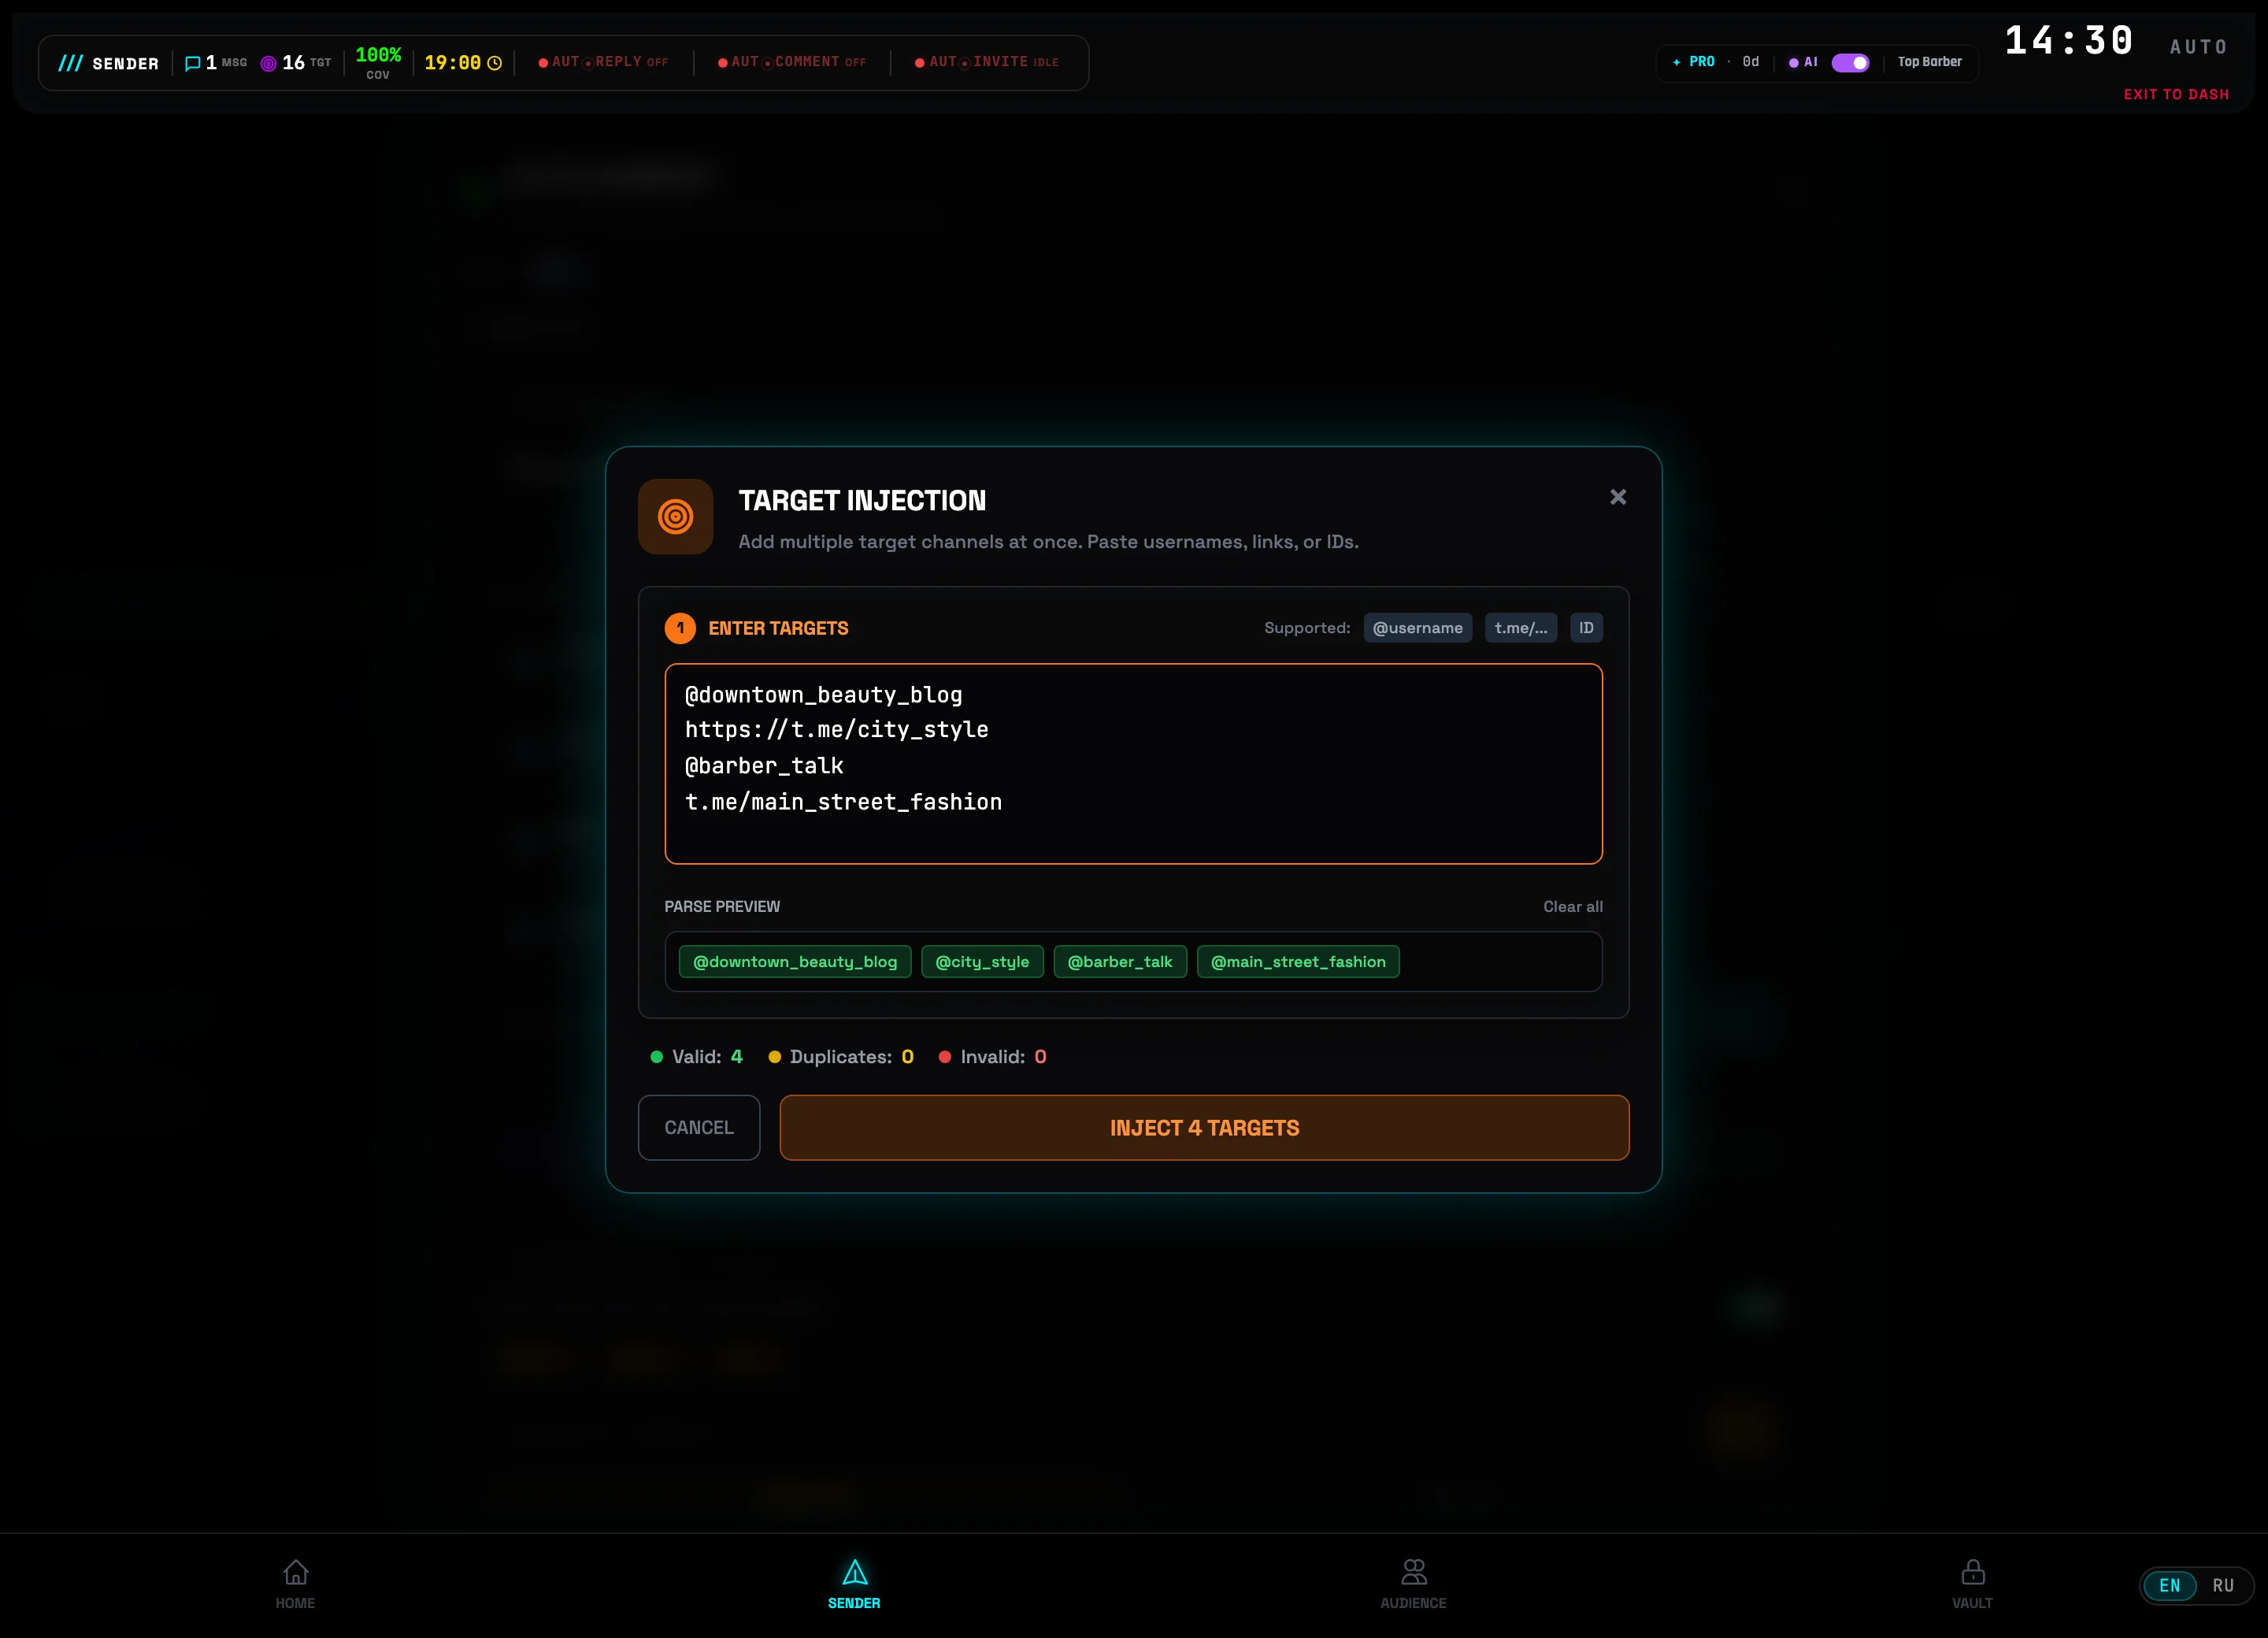 List paste fieldINJECT button💡Tip: duplicates and channels already added to the scenario are filtered out automatically — paste the whole list without cleaning it up by hand.
 -
4
MANUAL mode: spintax template + keyword filter
In the COMMENT MODE block, choose MANUAL and fill in the Comment template (spintax supported): the construct {Great post|Nice roundup|Helpful, thanks} inserts a random variant into each comment — the text won't repeat. Above it is the KEYWORD FILTER (optional): add words like "haircut", "barber", "beard", and the engine will only comment on posts about your topic; modes Match ANY / Match ALL, /regex/i supported.
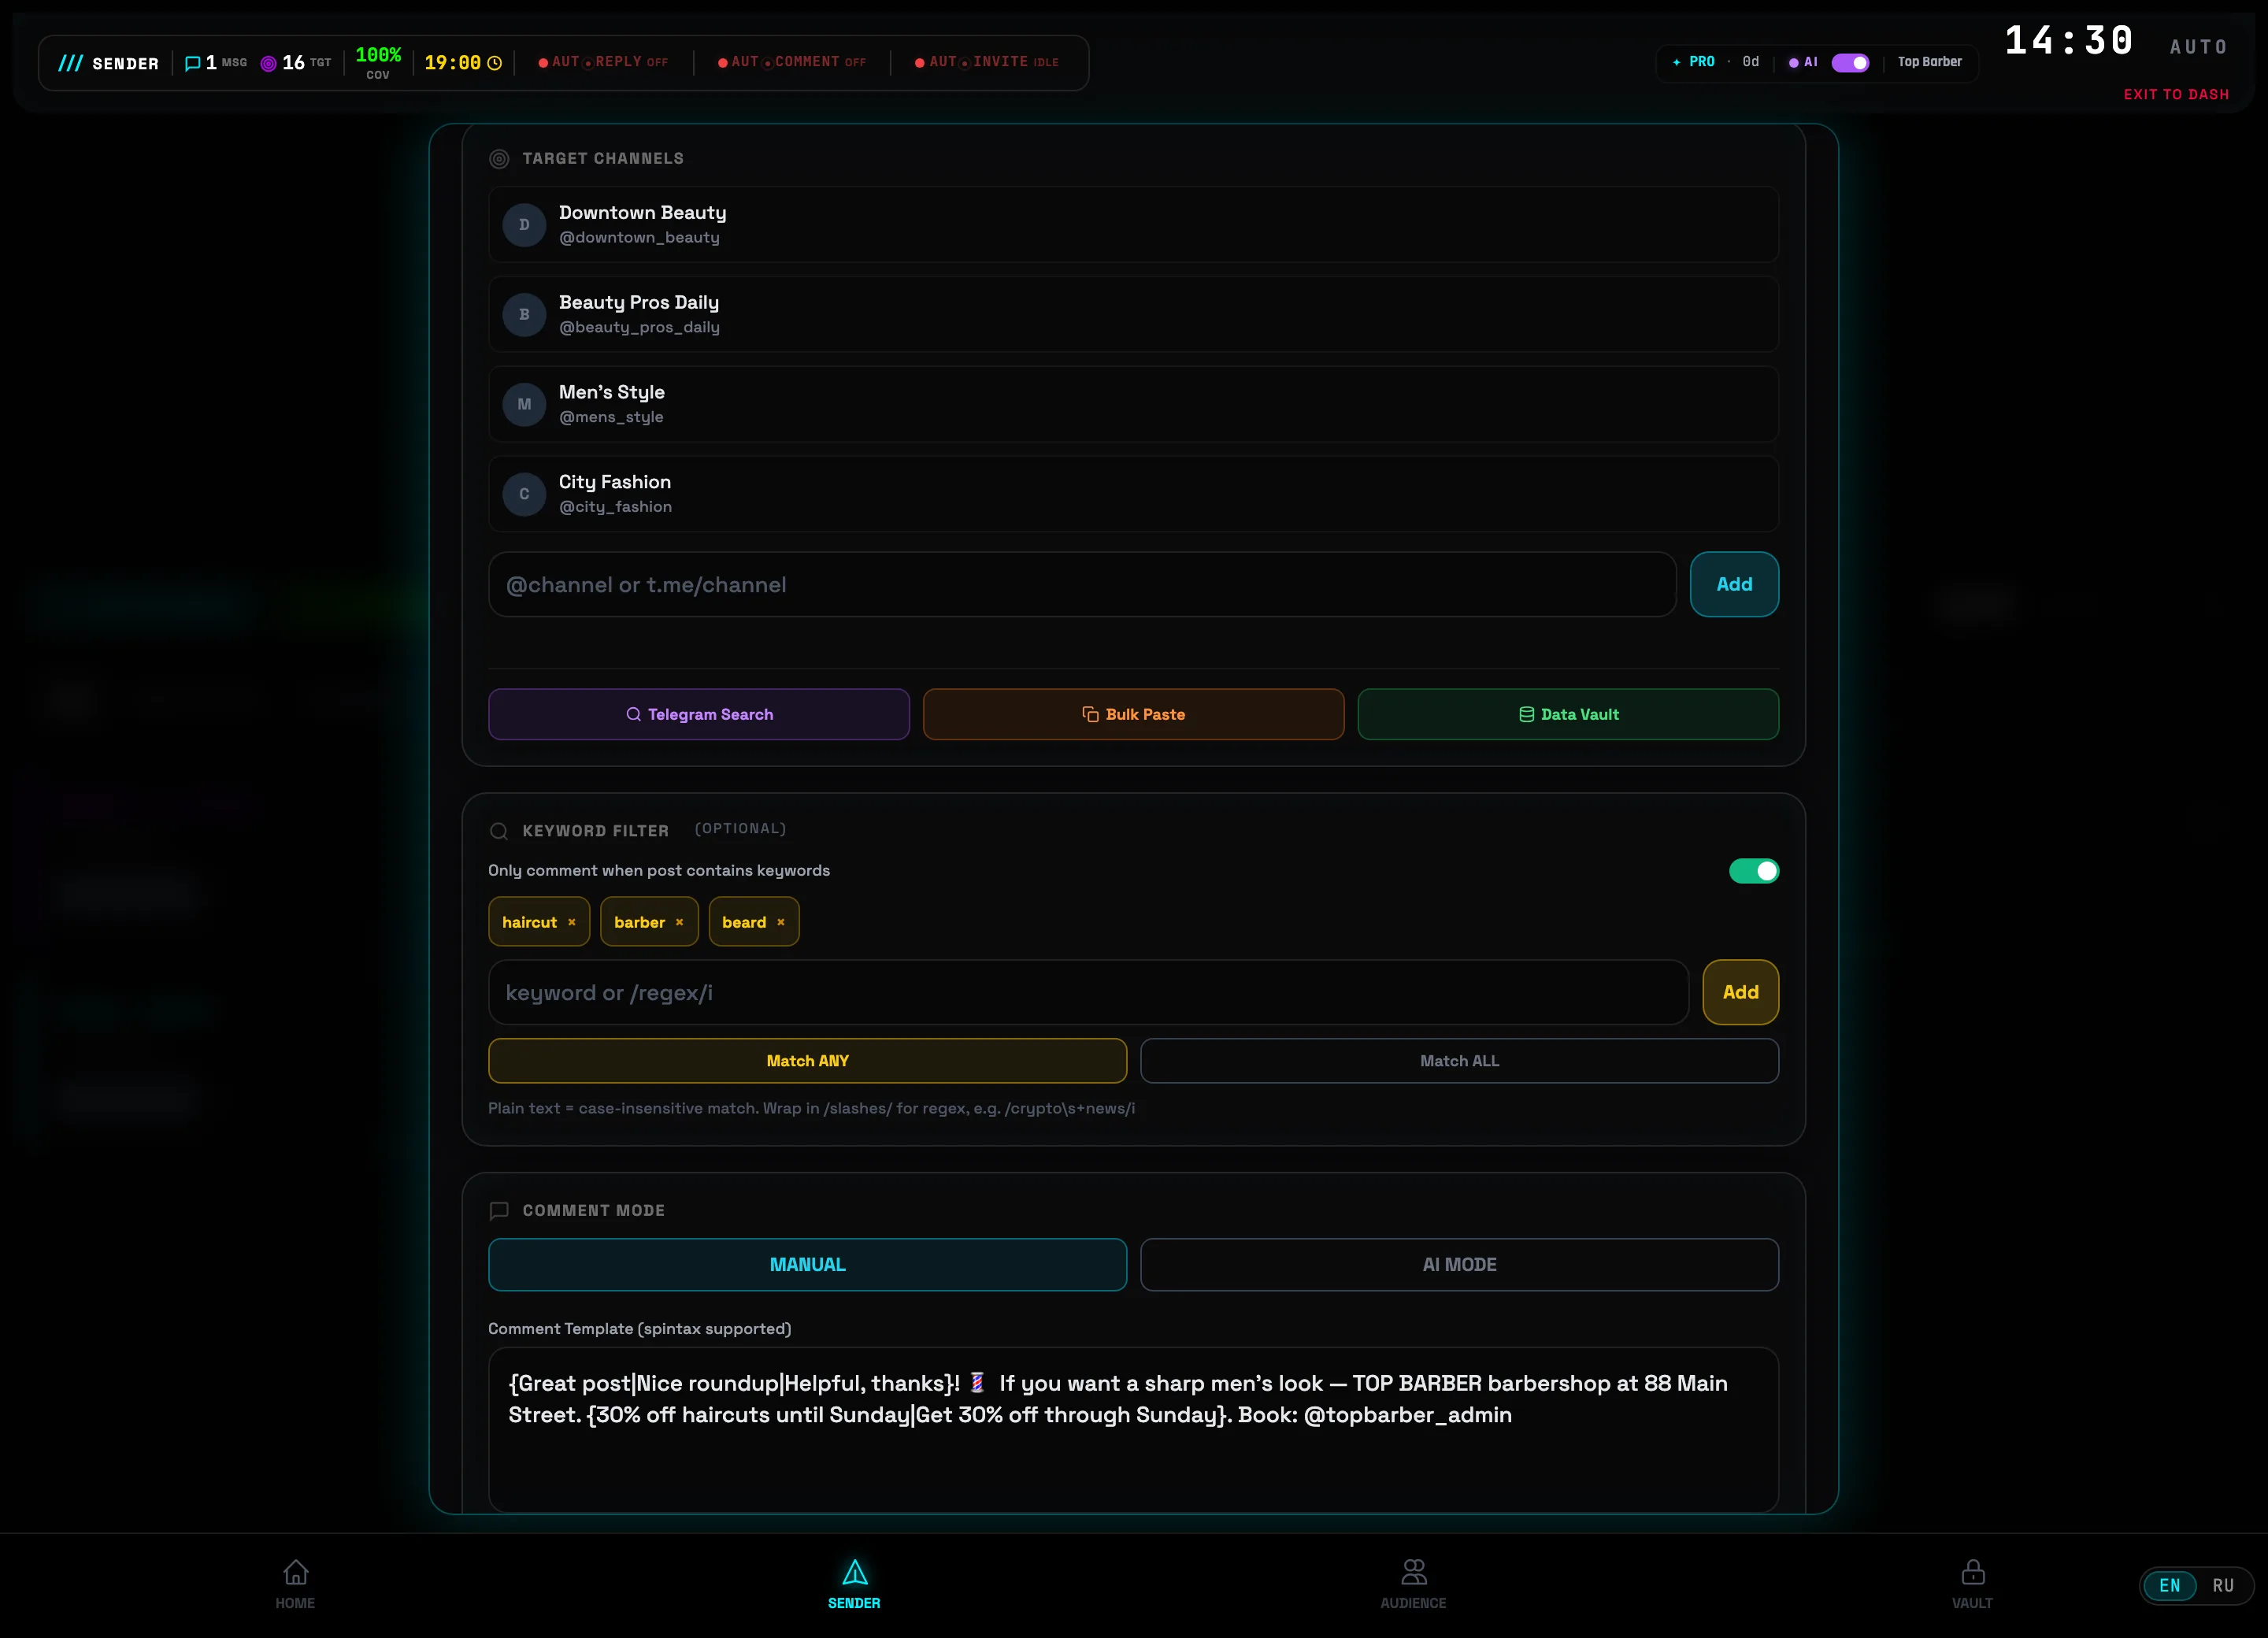 Mode: MANUAL / AISpintax template
 -
5
Or AI MODE: a persona writes the comment based on the post
Switch the mode to AI MODE — instead of a template, the comment is generated by a neural network. Pick a card from the AI persona list (or create your own via + New persona), and in the Context rule field describe the main prompt — how to react to a post. Below are Max reply length and Context sources (Add URL / Upload PDF) so the AI knows your services and prices. The Insert link toggle neatly adds a link to your channel into every comment. Done — click Save scenario.
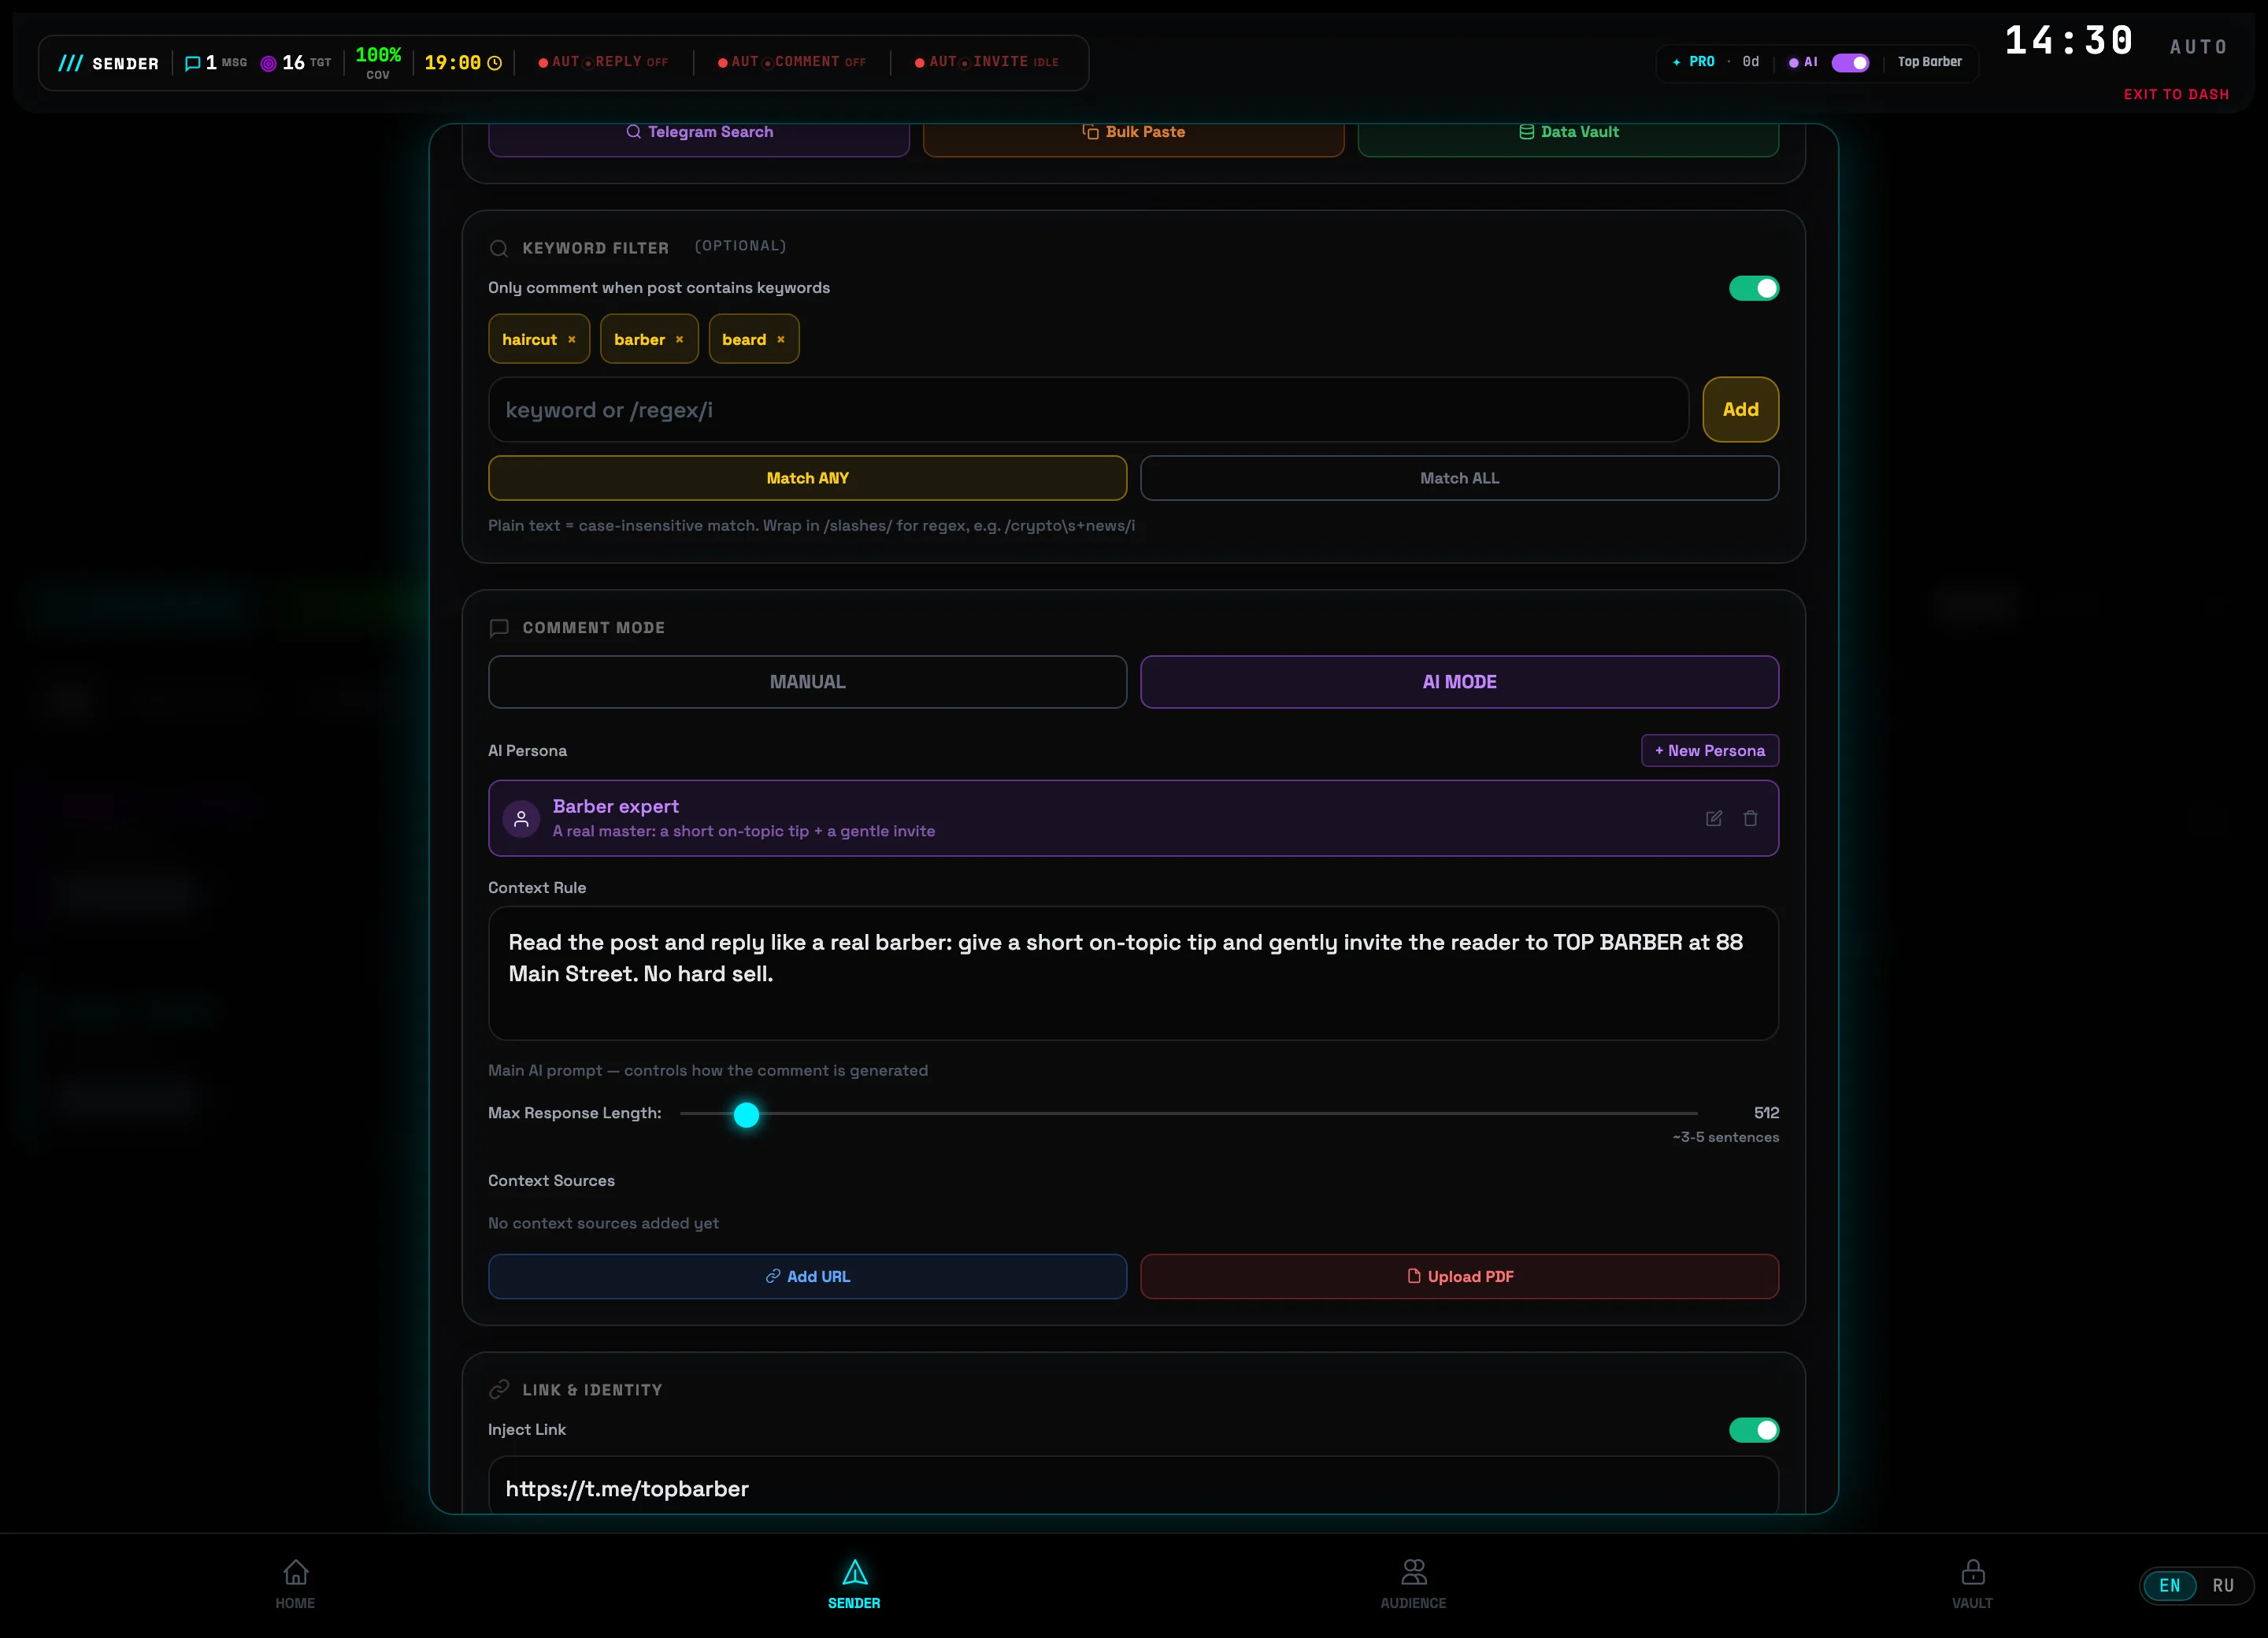 AI personaContext rule⚠️Important: AI MODE is available when an AI provider is connected in the header (the purple AI indicator). Don't push the RATE LIMITS too high: the recommendation in the editor is 3 comments per minute and 30 per hour, otherwise Telegram will respond with a flood ban.
 -
6
Turn on the engine and watch the SNIPING LOG
Go back to the scenario list: each card has its own toggle, and to the right of the Create auto-comment button is the master toggle for the whole engine. Turn it on: the status switches from Offline to a green Active, and the pill in the header lights up 1 on. Below, the SNIPING LOG grows in real time: each line is a fired comment with a timestamp, reaction speed ("Comment posted in 1.7s") and place in the feed ("Rank: First Comment! 🥇"). The summary above the log — "Successful: 14 | Avg rank: #2".
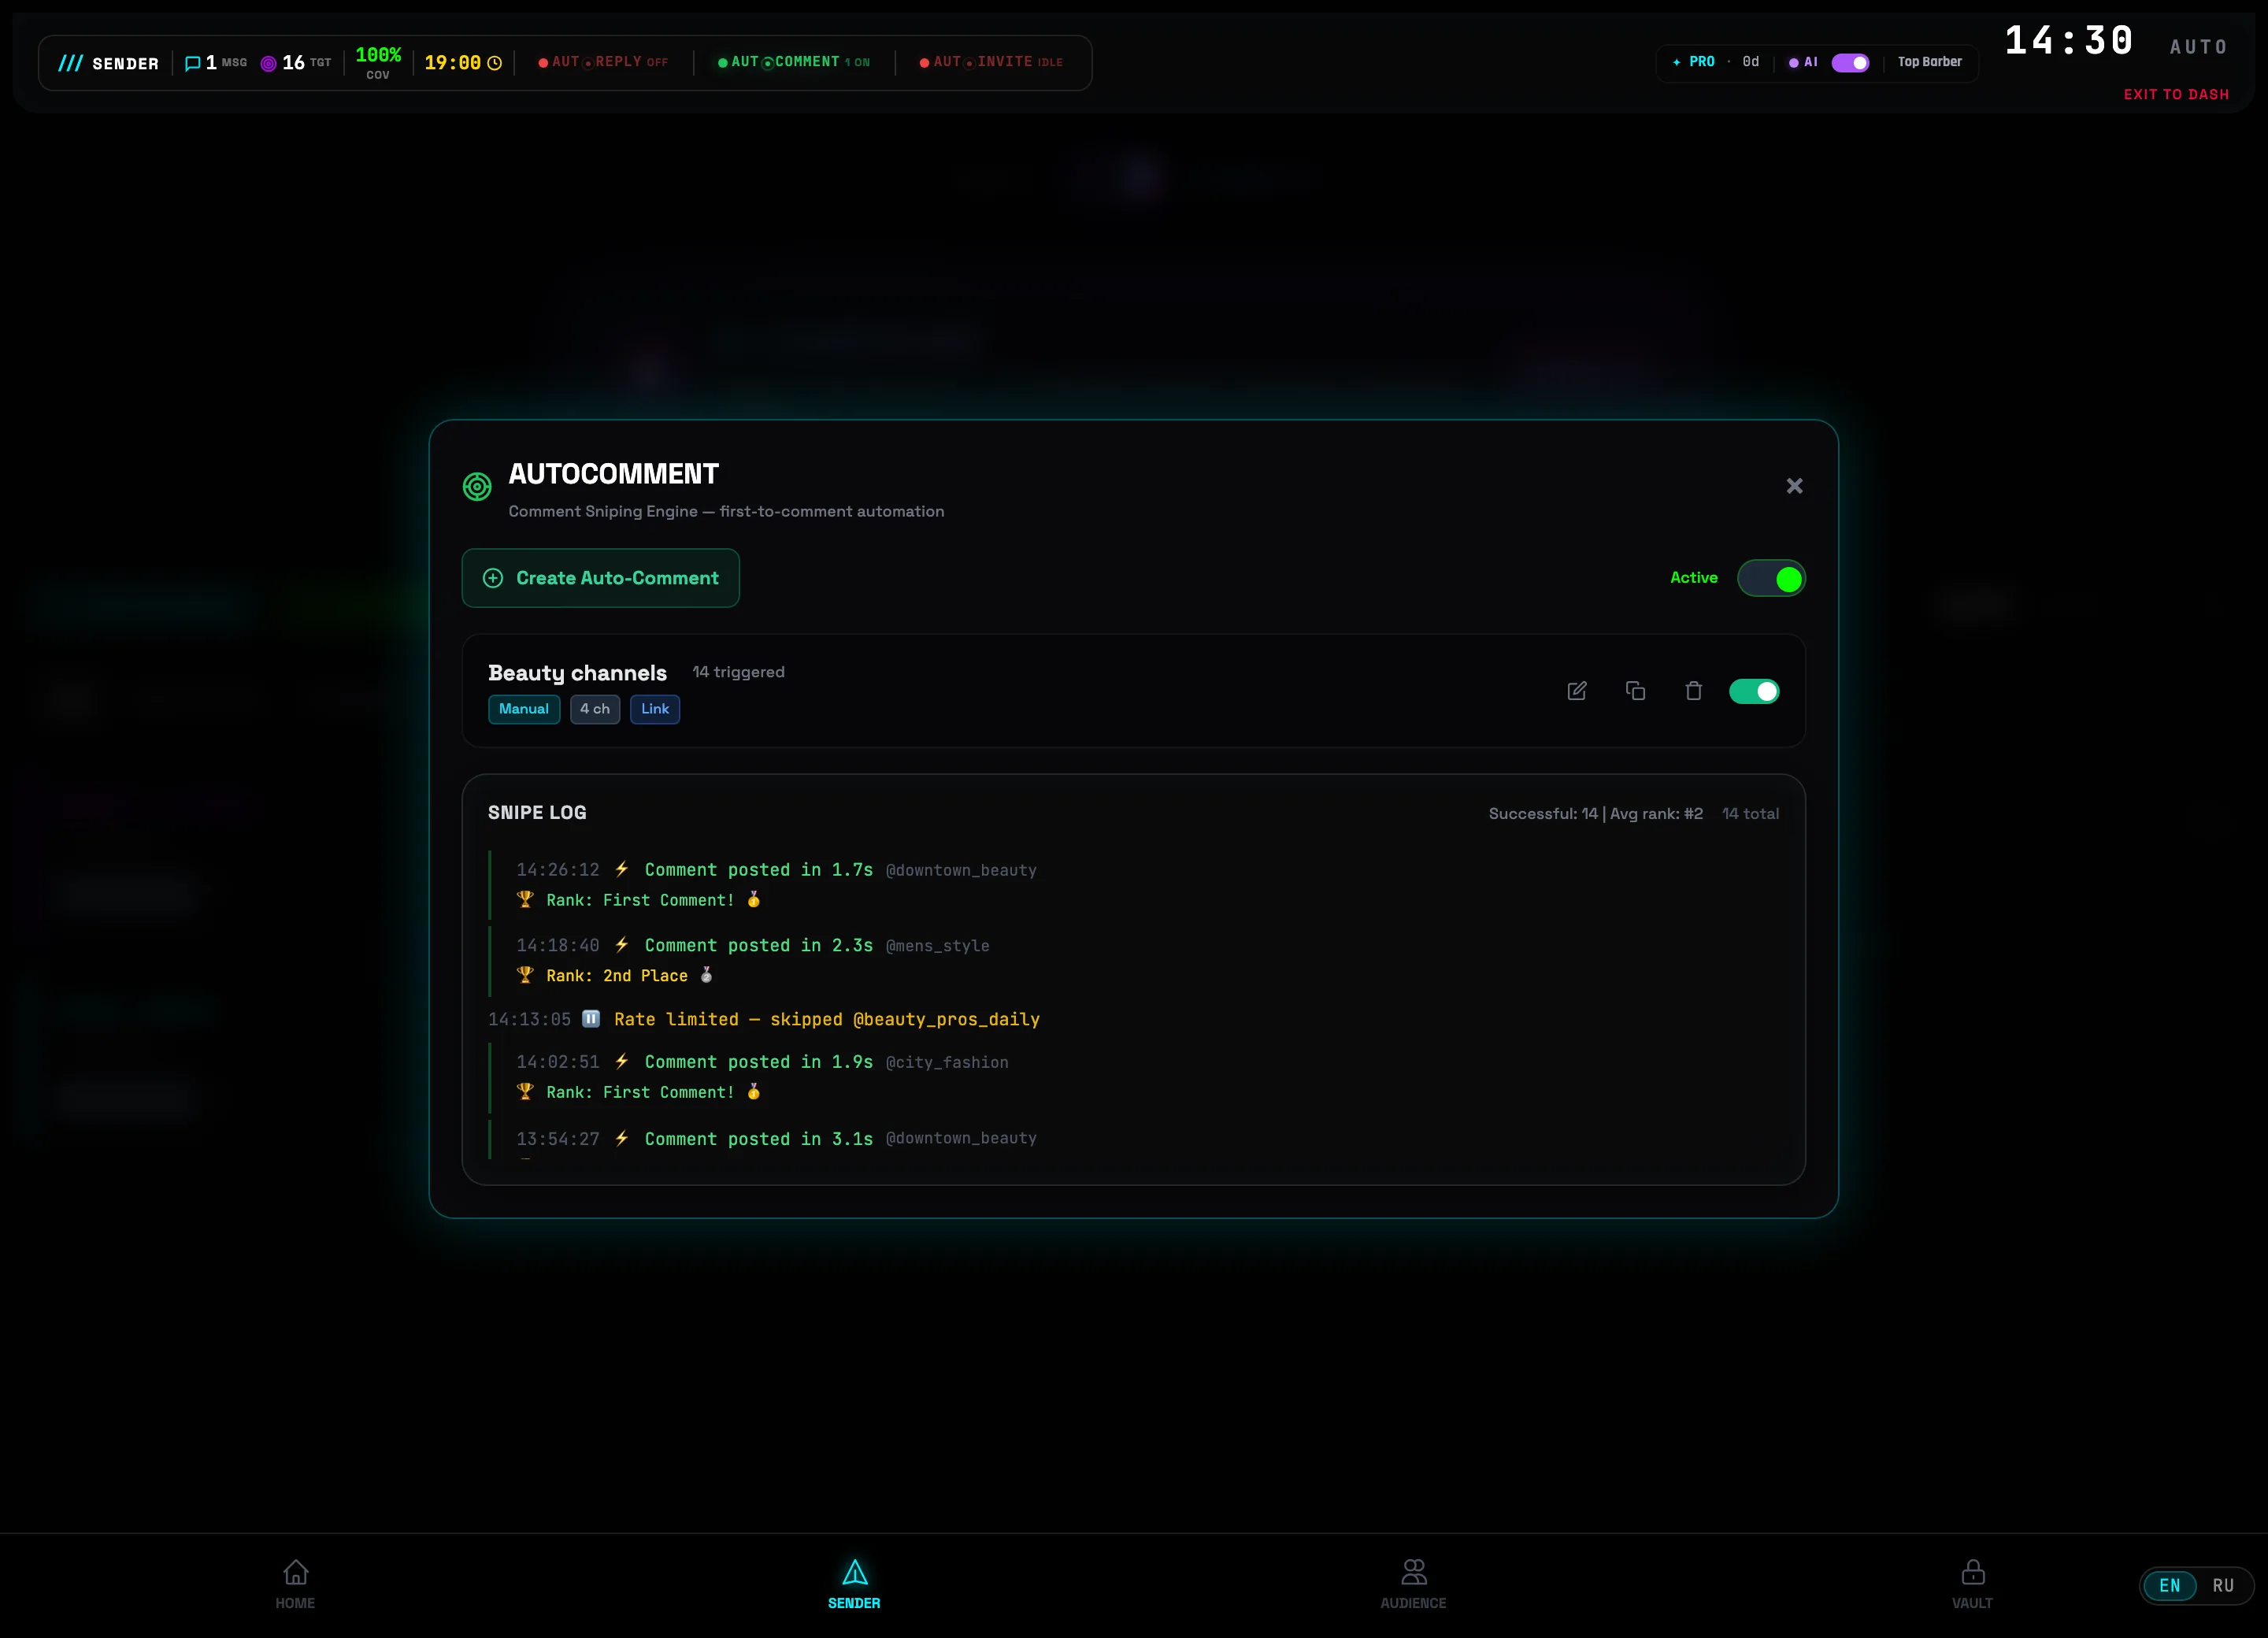 Master toggleFeed of fired comments💡Tip: "Rate limited — skipped" in the log is not an error: the engine skipped a post on its own to stay within the rate limits, and will continue with the next one.
AUTORESPONDER PRO — AI agents and funnels
The PRO level of the autoresponder: an AI agent with a persona and a knowledge base carries on the conversation by itself, while sequence mode turns a rule into a multi-step funnel with auto follow-ups and smart stopping.
-
1
Open the "AI AGENTS" tab and create an agent
When the AI Assistant is connected (the AI icon in the header), the AI AGENTS tab and the Create AI agent button appear in the autoresponder window. Instead of template text, the agent card shows "AI generates response dynamically" — the reply is generated for each message.
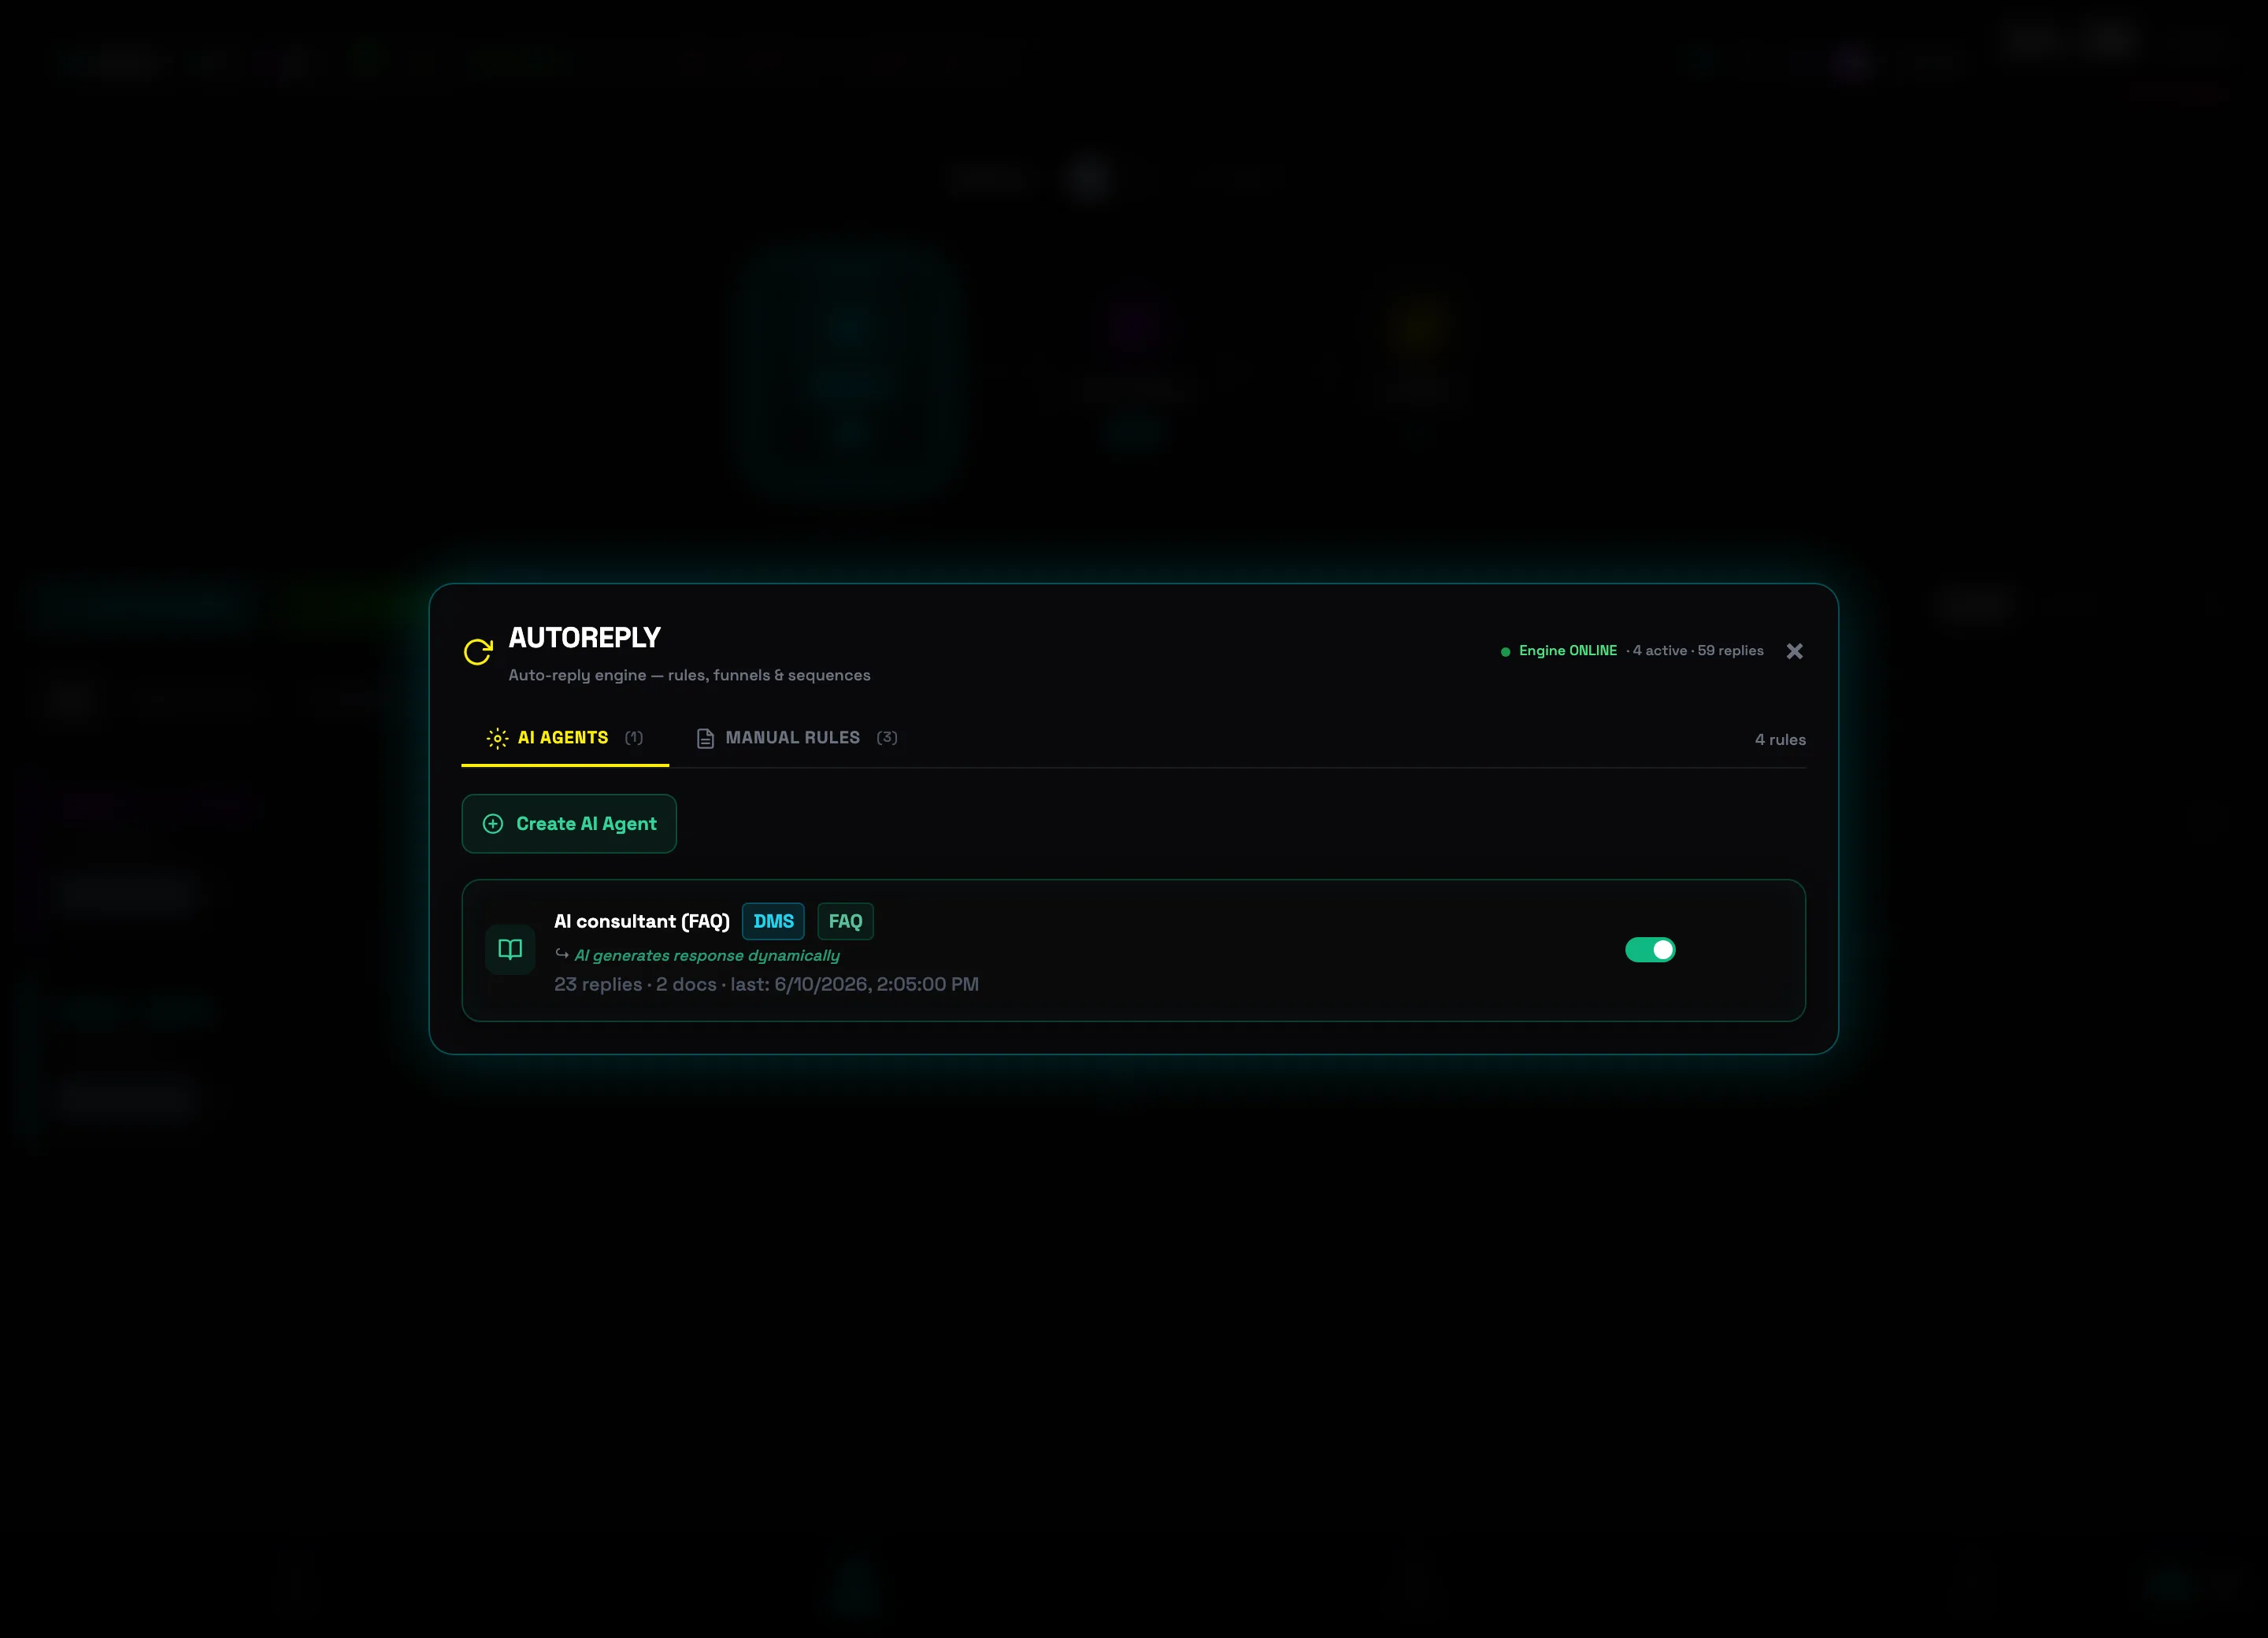 AI AGENTS tabCreate AI agent
 -
2
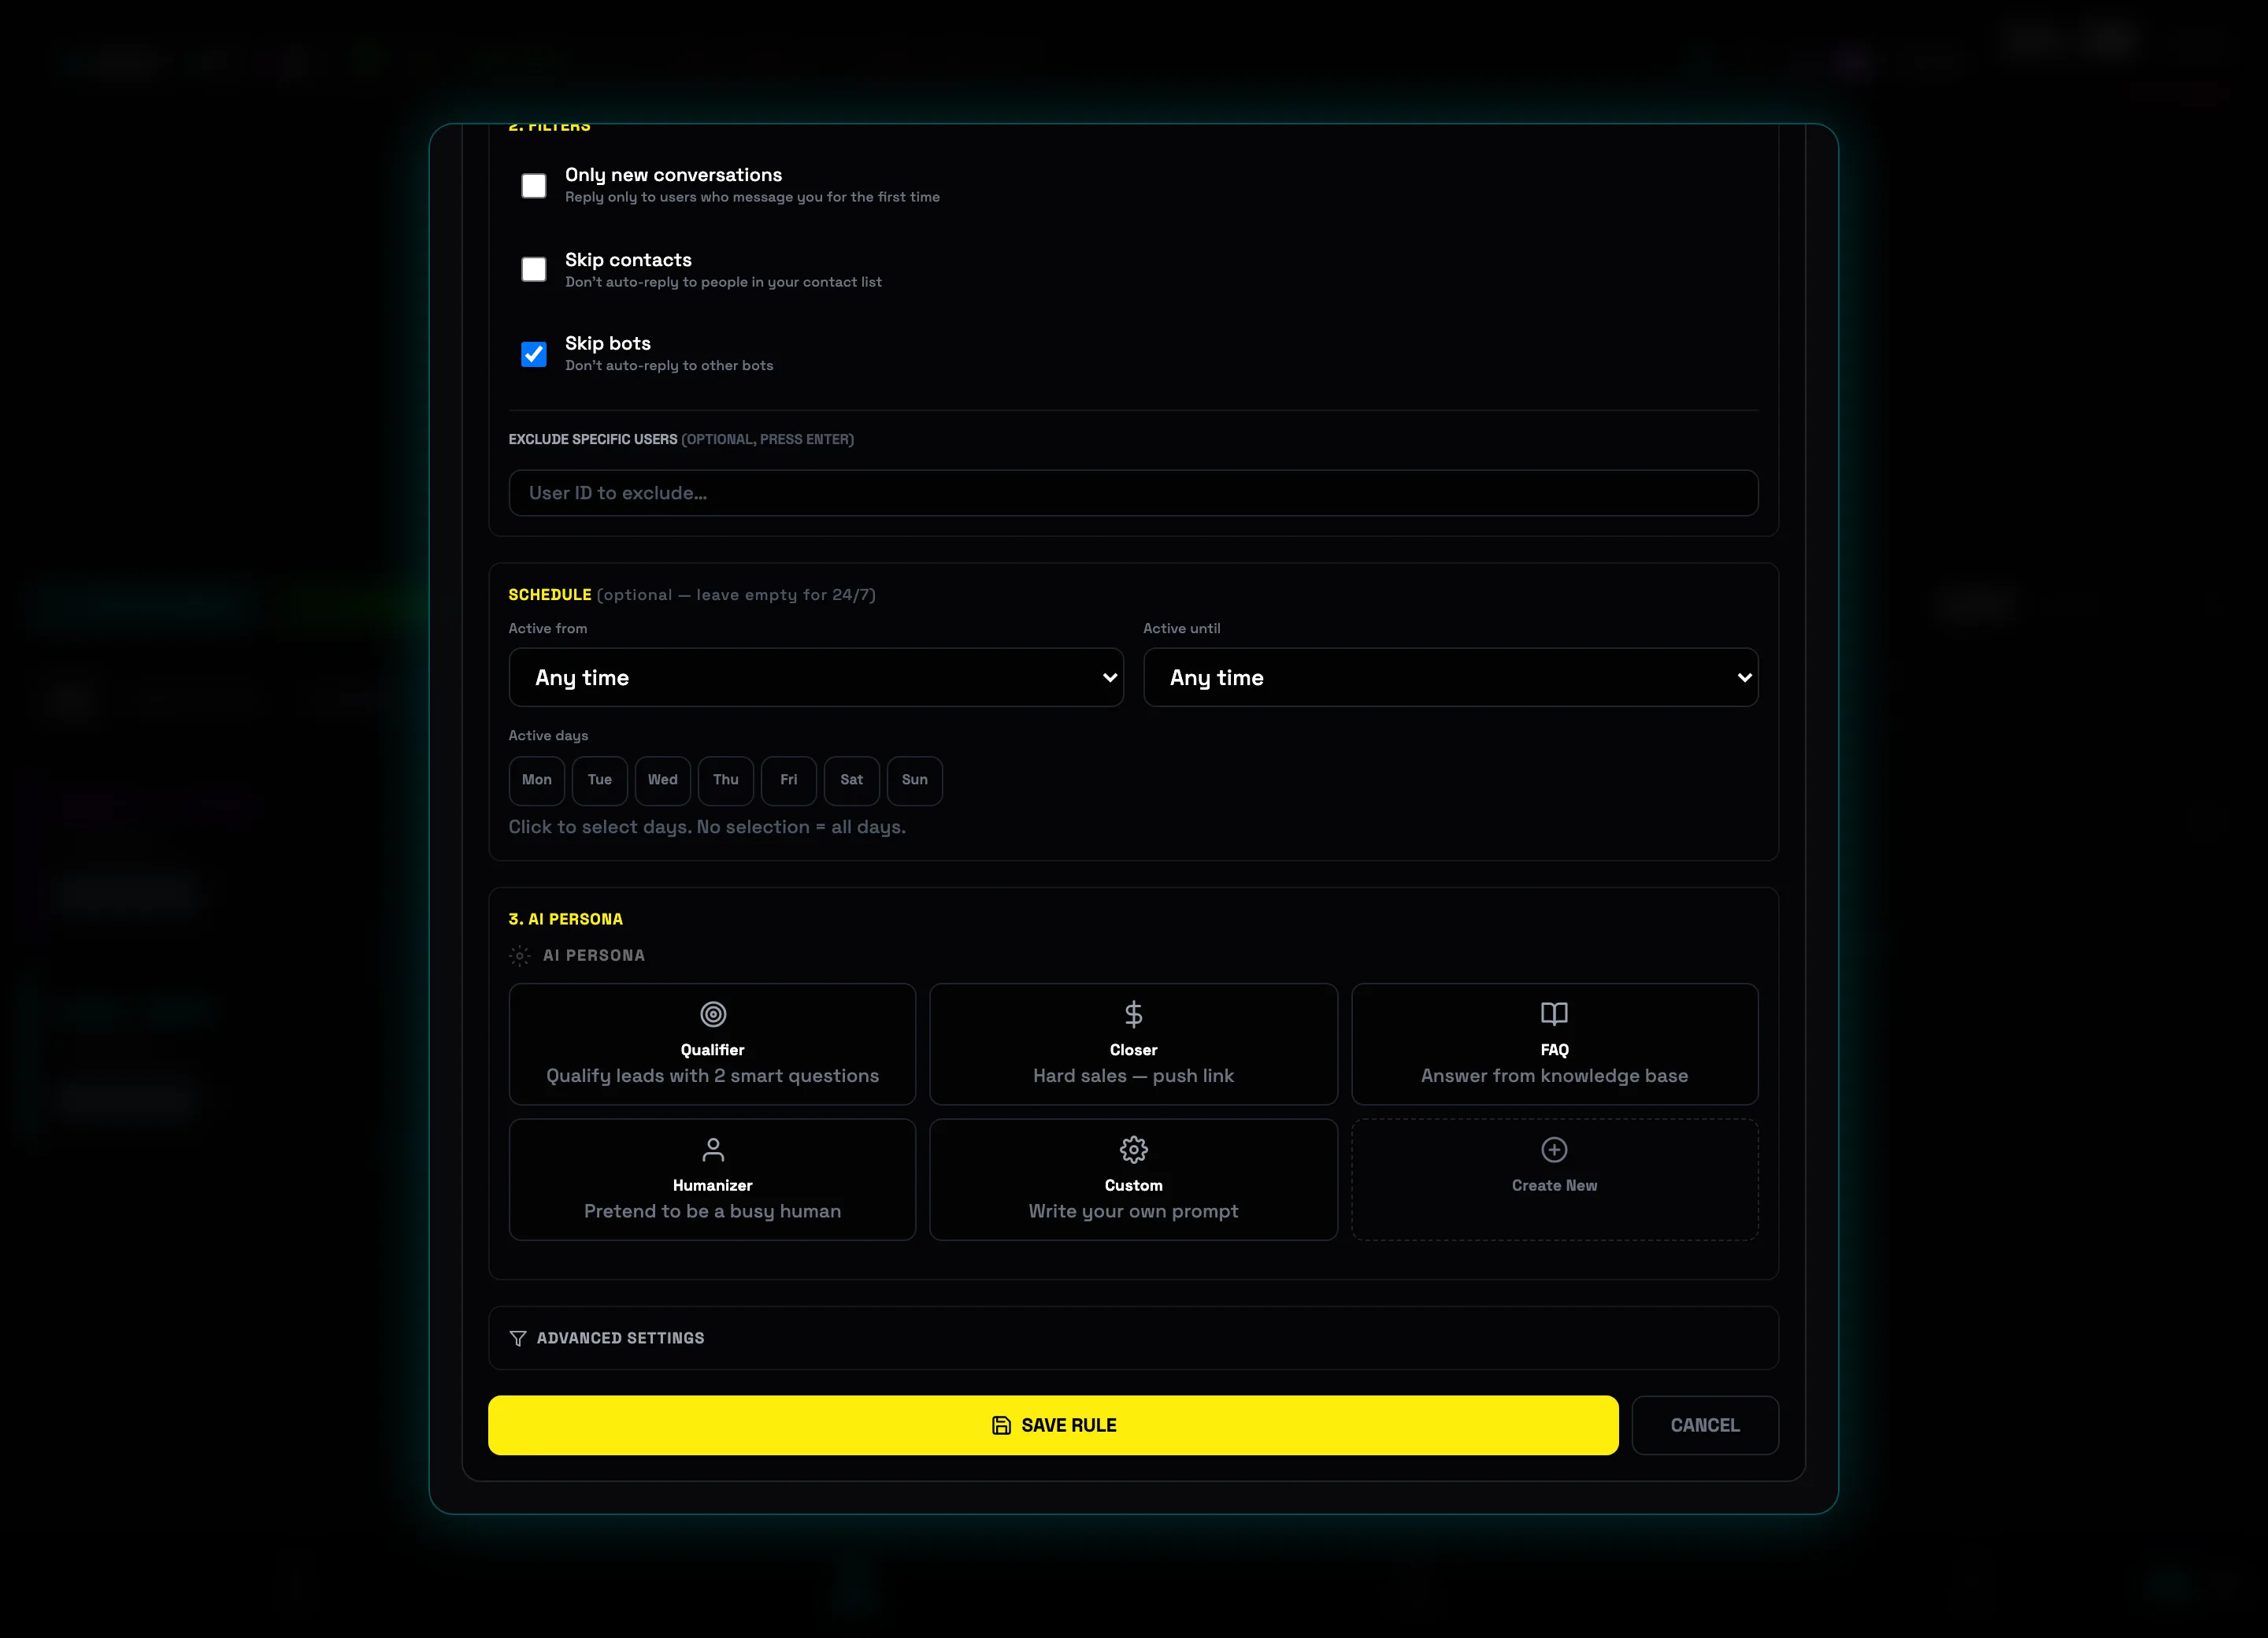
Pick an AI persona for the job
The 3. AI PERSONA block has five ready-made roles: Qualifier (qualifies leads with two questions), Closer (hard sell — pushes the link), FAQ (answers from the knowledge base), Humanizer (pretends to be a busy person), and Custom with your own prompt. The Create new tile saves your own persona.
 AI persona gallery
 -
3
Upload a knowledge base and edit the prompt
A persona has an editable SYSTEM PROMPT, and in KNOWLEDGE BASE you add sources: + ADD TEXT, + ADD URL (the page is scraped automatically), and + UPLOAD PDF. In ADVANCED AI SETTINGS — reply style and length, conversation memory, and a Fallback reply in case the AI fails.
 System promptKnowledge base💡Tip: for a FAQ agent, one text document with a price list and answers to 10–15 common questions is enough — the AI doesn't make up facts outside the knowledge base.
 -
4
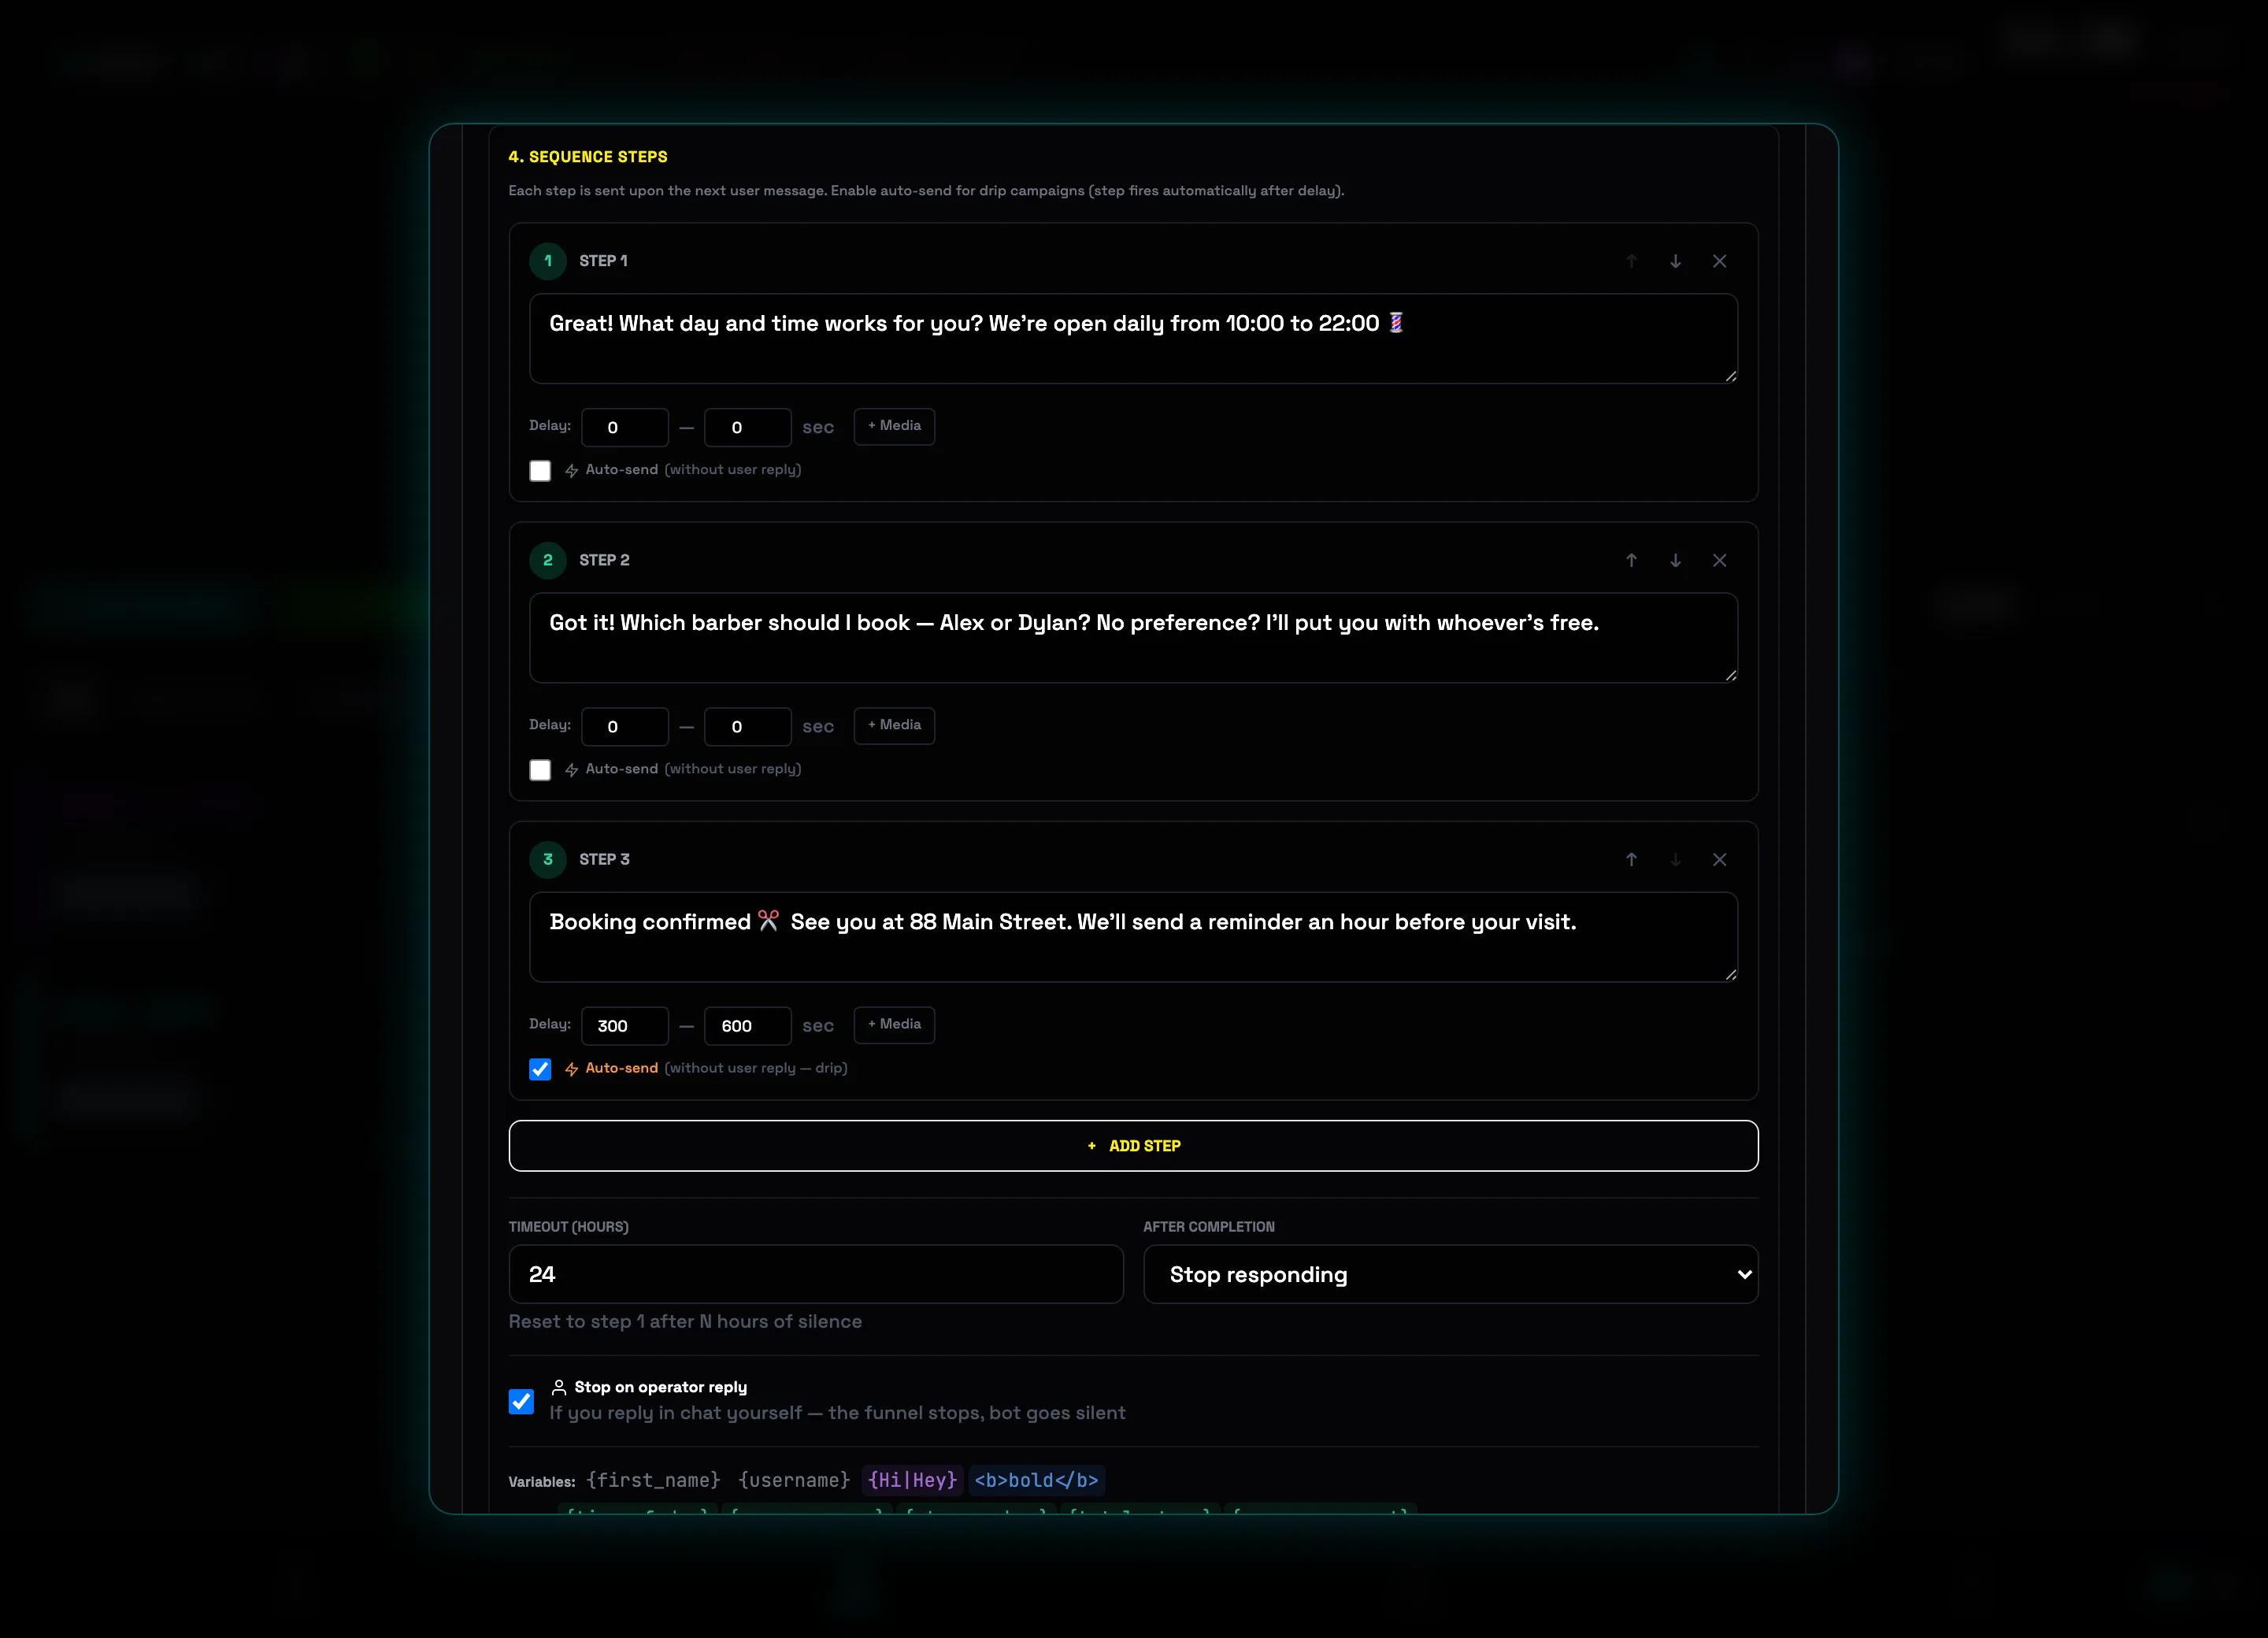
Build a funnel in sequence mode
The SEQUENCE MODE checkbox replaces a single reply with a chain of steps (the 4. SEQUENCE STEPS block): each step goes out on the client's next message, and the ADD STEP button extends the chain. A step has a delay and an Auto-send checkbox — the step is sent on its own, without a reply from the user (drip campaign). Below are TIMEOUT (HOURS) to reset to step 1 and AFTER COMPLETION: Stop replying, Loop from the start, or restart after 24h/48h/7 days.
 Funnel stepsAdd step
 -
5
Enable smart-stop and safety limits
The Stop on operator reply checkbox halts the funnel as soon as you write in the chat yourself — the bot goes quiet and doesn't interrupt a live conversation. In ADVANCED SETTINGS: DELAY BEFORE REPLY (S), per-user and per-chat pauses, MAX REPLIES (TOTAL), Read before replying (looks like a real person), and Reply to a user only once.
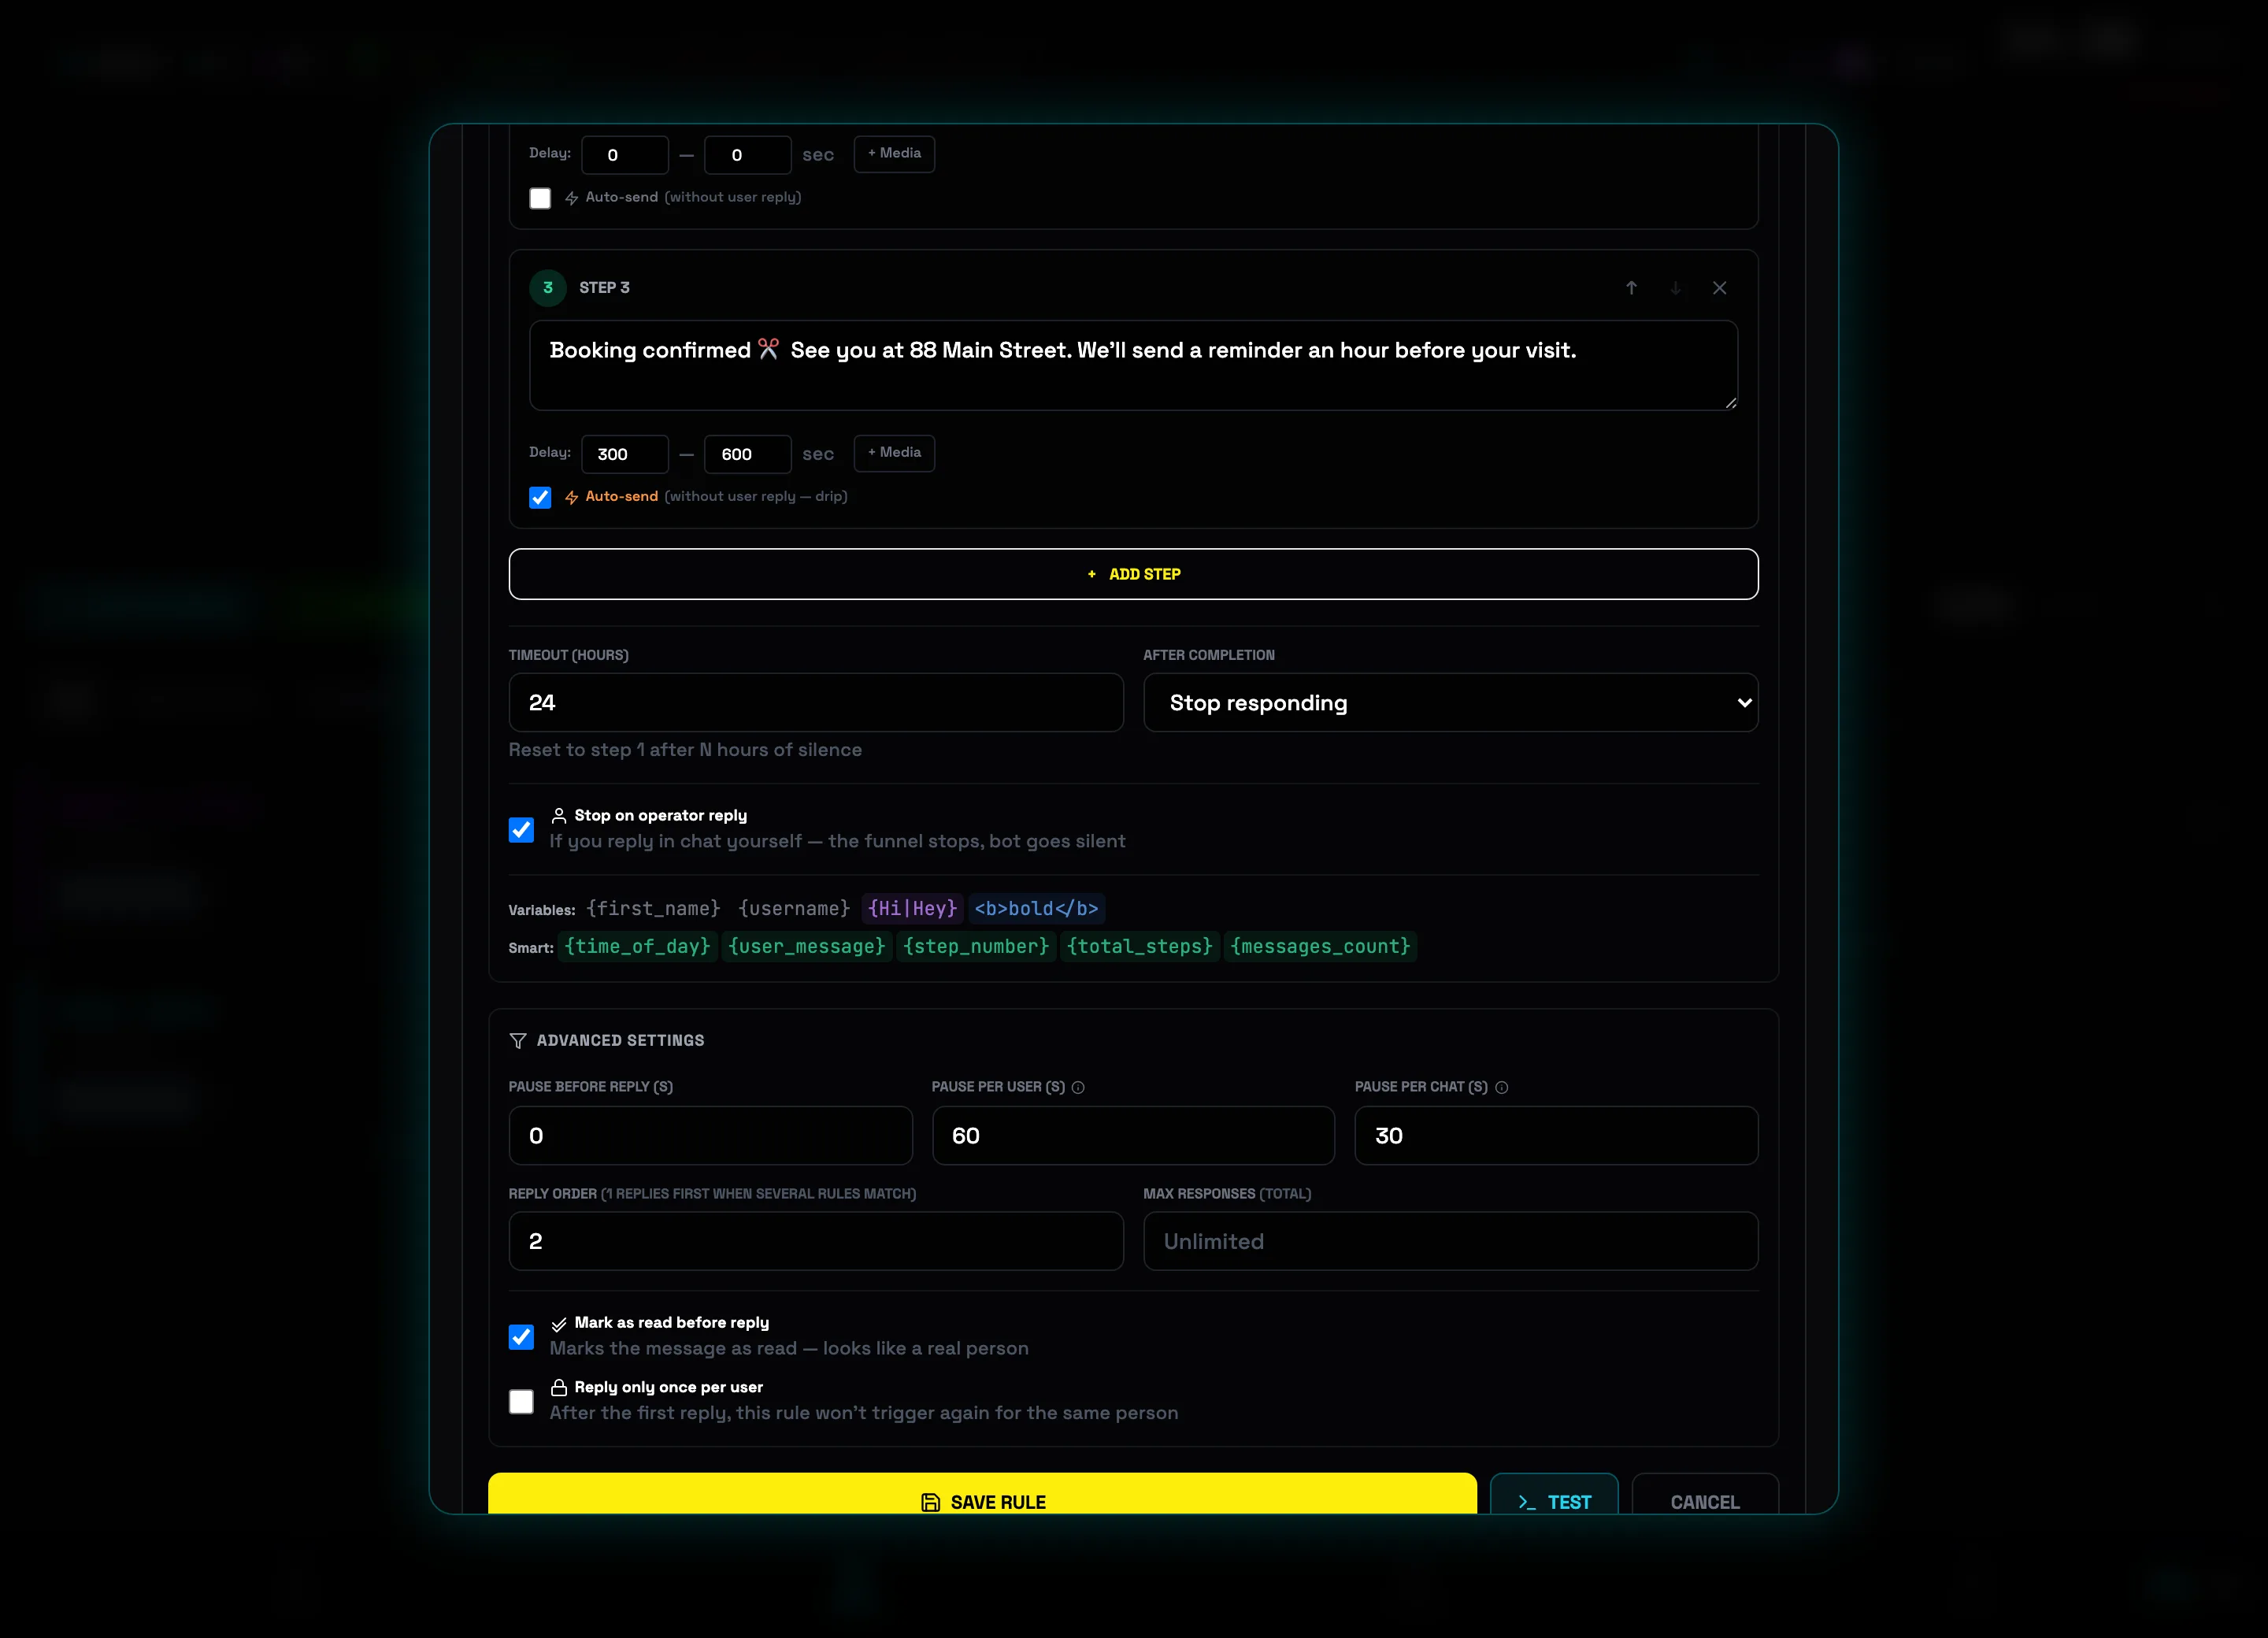 Stop on operator replyReply only once per user⚠️Important: don't set the delay before reply to 0 seconds on fresh accounts — instant replies at high volume look robotic. 5–15 seconds is enough.
FAQ — frequent questions
What to do if an account got a spam_block?
1. Go to the Dashboard and click Spam Check on the account card.
2. Wait — the block usually lifts within 24–48 hours.
3. Lower the broadcast speed (SAFE or RECOVERY mode).
How do I avoid getting blocked?
Use spintax, Smart Delays, content uniquification. Set up a Proxy for each account. Watch Flood Guard — if health drops below 50, reduce the load.
How do the delay modes differ?
TURBO — maximum speed, low safety.
NORMAL — medium speed, everyday work.
SAFE — slow, high safety, after warnings.
RECOVERY — minimal speed, after a flood_wait.
AUTO — adaptive mode, recommended for most.
What is Vault and why do I need it?
Vault is a catalog of 2+ million Telegram groups and channels. Instead of searching manually, pick a category, filter by parameters, and join hundreds of groups in one click. Tutorial — section 08.
How does Deep Hunter work?
1. The query is expanded by AI (semantic analysis).
2. Search via DuckDuckGo + Brave Search.
3. Extraction of t.me links from the results.
4. Validation of each group via the Telegram API.
5. Filtering by availability, size, activity.
How is AI Campaign Builder different from Deep Hunter?
Deep Hunter searches for groups via search engines and returns a list.
AI Campaign Builder is a chat assistant: it searches in Vault, scores groups by a composite score, generates a ready-made message, and creates a campaign with a single button. More — section 13.
When to use Auto Invite, and when a regular SEND?
Auto Invite — when you need to join 100+ groups in advance (warming up an account, spreading the load over time).
SEND can join groups on its own too, but the speed budget is split between join and send. For large lists it's better to split: Auto Invite first (SAFE), then the broadcast.
Will I get banned from AutoComment?
There's a risk with an aggressive configuration. For safe operation:
1. Pause per channel ≥ 5 minutes — no more than one comment per channel every 5 minutes.
2. Multiple accounts — one account = no more than 3–5 channels.
3. Don't chase the top spot — landing in the top 5 is enough.
4. Typing indicator — turn it on so the post looks live.
How do I set up an AI autoresponder without my own API key?
The simplest path is Gemini 2.5 Flash: a free key at aistudio.google.com, 250 requests a day with no payment. That's enough for 50–80 conversations a day.
If you hit the limit, plug in DeepSeek (cheap) or OpenAI (more stable). You can set up a fallback chain: Gemini → DeepSeek → static text.
AutoResponder Pro replies instantly. Won't that give it away?
Yes, instant replies (<2 sec) are an obvious sign of a bot.
Use: Delay (5–15 sec), Typing indicator, Mark as read (read before replying), plus text variability through spintax or an AI persona.